Windows Authentication: Dot NET Security Part 2

Introduction
The .NET framework caters to different types of authentication mechanisms to use within your applications - —including basic authentication, digest authentication, forms authentication, Passport, and Integrated Windows authentication. You also can develop your own custom authentication mechanisms; for instance, Windows authentication that matches web users to Windows user accounts that are defined on the local computer or other domain on the network. In this article, you will learn how to use Windows Authentication in your web application and how to apply impersonation to assume another identity temporarily.

Abstract
The confidential data and resources must be shielded from malicious utilization and controlled in a way that unauthorized users could not be able to access any of the data—even if they are able to bypass your application's built-in protection mechanism. Protecting data requires coordinating several different technologies such as Role-based security (RBS) which
allows you to control what users can access based on their credentials and group memberships.
With the .NET Framework, you can make RBS decisions based on the local user database, an Active Directory Domain Services domain, or a custom user database. You can also use the .NET Framework to configure access control lists (ACLs). ACLs are the operating system's method for tracking that should have access to what and determining which actions require adding an event to the event log. Finally, to protect data if an attacker bypasses operating system security, the .NET Framework provides cryptography tools for encrypting, validating, and signing data.
Authentication and Authorization
Authentication is the process that determines the identity of a user. After a user has been authenticated, a back-end mechanism determines if the identified user has authorization to proceed. Authentication is often performed by providing a valid username and password on internet or intranet environments. The username identifies you, and the password offers the computer system some assurance that you really are who you claim to be. After you are authenticated, the computer agrees that you are who you claim to be. However, it doesn't yet know whether you are allowed to access the resource that you are requesting. That is why Authorization mechanisms came into effect and take care of further process.
Authorization generally happens only after authentication. Authorization is the process of verifying that a user is allowed to access a requested resource. This process determines whether an authenticated user is permitted access to any part of an application, access to specific points of an application, or access only to specified datasets that the application provides. After all, how can you determine whether someone is allowed to do something if you don't recognize that person's identity?
Windows Authentication Overview
Form Authentication is a wonderful approach if you are implementing your own authentication process using a back-end database and a custom page. But if you are creating a web application for a limited number of users who already have Windows account, then Windows Authentication is beneficial.
Windows-based authentication is manipulated between the Windows server and the client machine.
The ASP.Net applications directories typically reside at the Windows server, which is called IIS (Internet Information Server). The requests go directly to IIS to provide the authentication process in a Windows-based authentication model. This type of authentication is quite useful in an intranet environment where you can let the server deal completely with the authentication process — especially in environments where users are already logged onto a network.
In this scenario, you can utilize the credentials that are already in place for the authentication and authorization process. The entire responsibility of authentication us done by IIS. It first takes the user's credentials from the domain login. If this process fails, IIS displays an alert dialog box so the user can enter or re-enter his login information.
Advantage of Windows Authentication
- It allows you to use the existing Windows Accounts.
- Dispense Single Authentication model for multiple type of applications.
-
It lessens the burden of coding on the developer side.
Disadvantage of Windows Authentication
- Non- Microsoft OSes do not support this mechanism —tied to Windows users.
-
It doesn't give control over the authentication process.
To set up your ASP.NET application to work with the Windows-based authentication, begin by creating some users and groups. Within your Windows operating system, go to Control panel à choose Add or Remove User. Then create this account "Test" as following.
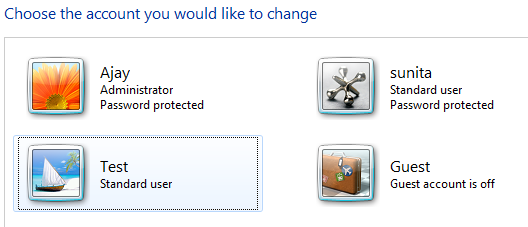
Figure 1.1 New User Creation
Type of Windows Authentication
During the implementation of Windows Authentication, typically IIS proposes a range of possible authentication strategies to authenticate each request it receives as following.
- Basic Authentication
- Digest Authentication
- Integrated Windows Authentication
- UNC Authentication
- Anonymous Authentication
Before implementing such aforementioned strategies, first it is required to configure IIS. You can confirm whether IIS is already installed or not by typing the loopback address http://localhost (or http://127.0.0.1) in the browser. The following page displayed in the browser ensures that IIS is configured:
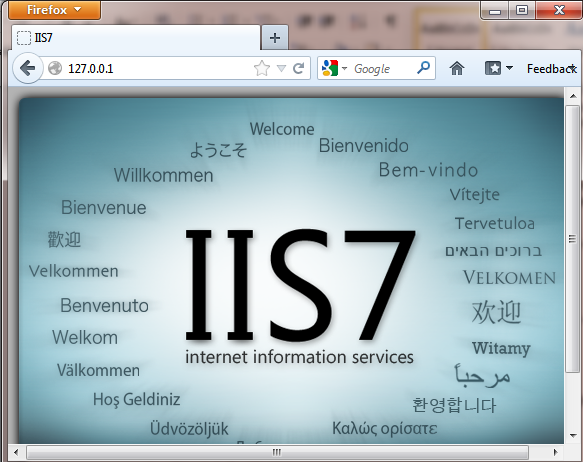
Figure 1.2 IIS Page
If this page is not displayed, then we can anticipate that IIS is pre-configured. We have to turn on the IIS from the Windows Feature manually. Here, you just enable the Internet Information Services option as follows:
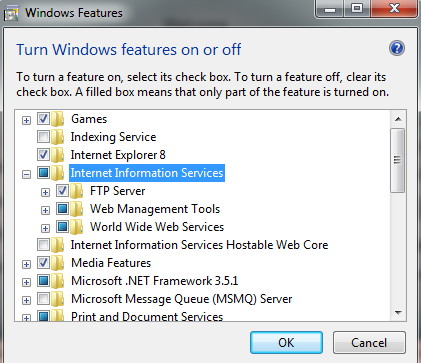
Figure 1.3 Windows Features
It will take some to configure. After that, you can open the IIS manager from Administrative Tools or open it directly from Run by typing inetmgr command. The IIS Manage opened-up as follows:
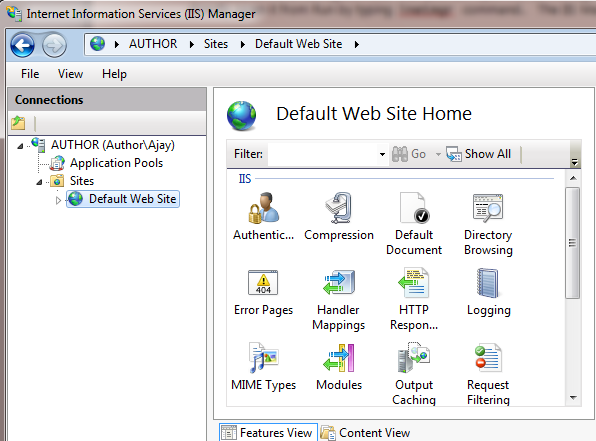
Figure 1.4 IIS Manager
Note: It is suggested that you register the ASP.NET 4.0 version with IIS 7.0 web server before creating any projects via this command "aspnet_regiis.exe -i"
Basic Authentication
This form of authentication is supported by all browsers. When a website requests client authentication using Basic authentication, the web browser displays a login dialog box from the user name and password as follows:
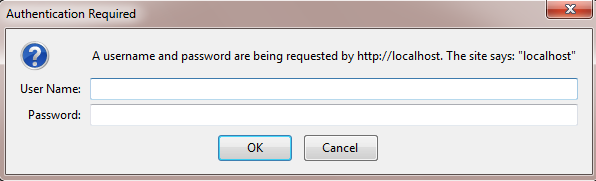
Figure 1.5 IIS Basic Authentication
After a user provides built-in Windows user account information, the data is transmitted to a web server. Once IIS receives the authentication data, it attempts to authenticate the user with the corresponding Windows account. This password is encoded using Base64 and sent to server. It is important to note that the Base64 encoding is not encryption. So the drawback of this mechanism is that the user name and password are sent in clear text (unencrypted) during communication. MITM attack can be executed by a malicious hacker and crucial credentials can be capture in between the communication.
Hands-on
In order to see Basic Authentication into action, we create an ASP.NET websites which is hosted on local IIS web server. Follow these steps:
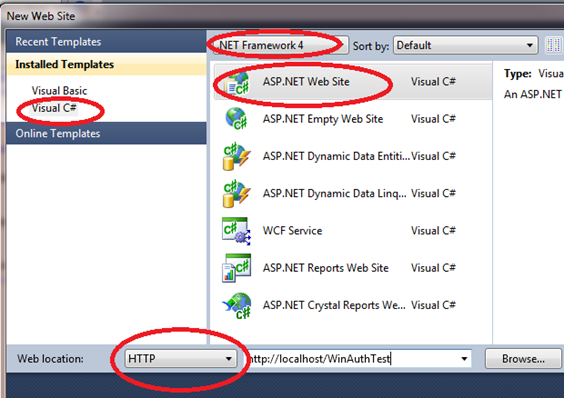
Figure 1.6 New ASP.NET website
Figure 1.7 IIS
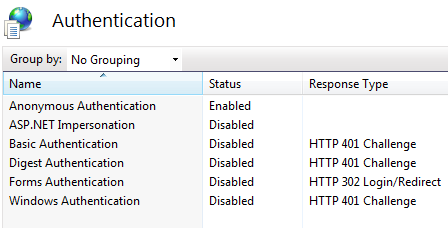
Figure 1.8 Authentications
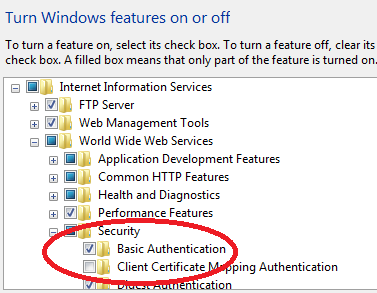
Figure 1.9 IIS Security options
Digest authentication can also be performed programmatically. We can enable this authentication using AppCmd command as follows:
Digest Authentication
Digest Authentication, like Basic Authentication requires the user to provide account information using a login dialog box that is displayed by the browser. Unlike the basic authentication, the user name and password are not transmitted in clear text. Instead, a cryptographically secure hash with this information is sent. We can implement this authentication by simply enabling this option in IIS as follows:
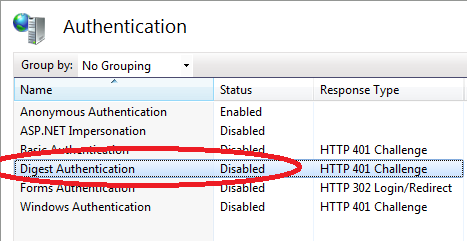
Figure 1.10 Digest Authentications
Digest Authentication involves hashing the user's password using the MD5 algorithm. Windows is unable to store MD5 hashes of password for local accounts (SAM database) thus the limitation of Digest Authentication is that in IIS, it function only when the virtual directory being authenticated or controlled by Windows Active Directory Domain Controller.
Digest Authentication protects users and applications against a variety of malicious attacks by incorporating a piece of information about the request as inputs to the hashing algorithm.
Enabling and disabling digest authentication can also be performed programmatically. We can enable this authentication using AppCmd command as follows:
Integrated Windows Authentication
Integrated Windows Authentication is the most reasonable mechanism for LAN-WAN-based applications. For this authentication to work properly, both client and server must be on same network. In fact, integrated authentication does not transmit any credential information. Instead, it coordinates with the domain server where it logged in and gets that computer to send the authentication information to the server.
It performs authentication without any client interactions. When IIS asks the client to authenticate itself, the browser sends a token that represents the Windows account of the current user. Technically, this authentication incorporates two authentication mechanisms: NTLM and Kerberos. Enabling integrated authentication via IIS manager typically enables supports for both of these two mechanisms as follows:
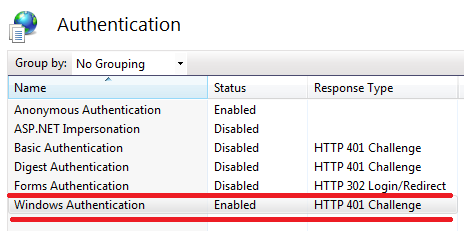
Figure 1.11 Integrated Authentications
UNC Authentication
UNC (Universal Naming Convention) authentication allows you to configure IIS to use a specified user account when accessing resources on a remote share. This authentication can be implemented during creation a virtual directory for a web application. To configure UNC authentication follow these steps as:
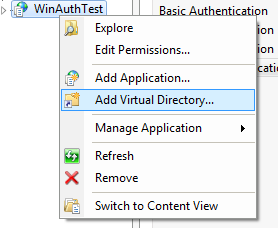
Figure 1.12 UNC Authentications
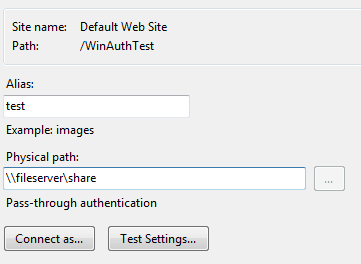
Figure 1.13 UNC Authentications
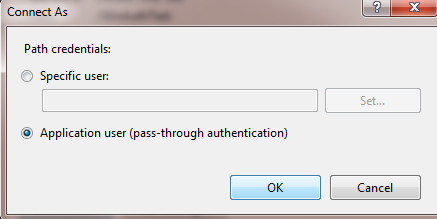
Figure 1.14 User Account
Anonymous Authentication
A remote user is not required to supply credentials to access a file when Anonymous Authentication is enabled. By default, the configured anonymous access account is the IUSR account created when IIS is installed. Anonymous Authentication can be configured from IIS manages as follows:
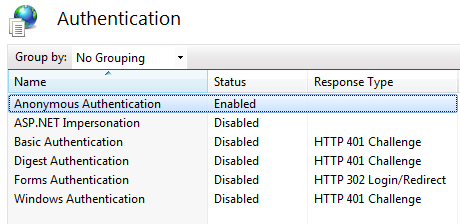
Figure 1.15 Anonymous Authentications
It is important to note that if you enable more than one authentication option, the client will use the strongest authentication method as long as anonymous authentication is not enabled. If anonymous authentication is enabled, the client will access the website anonymously. So it is suggested that you disable anonymous authentication during more than one authentication implementation.
Programmatic Authentication
You can access some additional information about the currently authenticated user using WindowsIdentity class. The following code is required to achieve this feet as:
[plain]
using System;
using System.Configuration;
using System.Web;
using System.Web.Security;
public partial class _Default : System.Web.UI.Page
{
protected void Button1_Click(object sender, EventArgs e)
{
if (Request.IsAuthenticated)
{
// Display generic identity information.
if (User is WindowsPrincipal)
{
WindowsPrincipal principal = (WindowsPrincipal)User;
lblData.Text += "<br><b>Power user? </b>";
lblData.Text += principal.IsInRole(
WindowsIdentity identity = principal.Identity as WindowsIdentity;
lblData.Text += "<br><b>Token: </b>";
lblData.Text += identity.Token.ToString();
lblData.Text += "<br><b>Guest? </b>";
lblData.Text += identity.IsGuest.ToString();
lblData.Text += "<br><b>System? </b>";
lblData.Text += identity.IsSystem.ToString();
}
}
}
When you build this program, the following extra Windows-specific information would be displayed as:
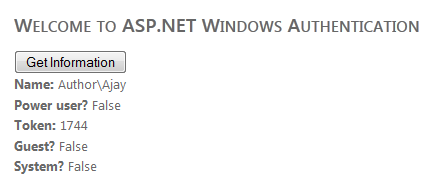
Figure 1.16 Information's
Impersonation
Everything that ASP.NET does is executed under a Windows account. Impersonation is the process by which an application can take on the identity of its user to access all the resources for which the user has credentials. Instead of using a fixed account for all users, web pages and applications, you can temporarily change the identity that ASP.NET uses for certain tasks.
As an analogy, you are operating your operating system remotely and want to access some resources residing on the local system. This requires you to logon with a particular user name and password on the local system. Let's say that you have some files in the location C:temp. In the ACL editor for the folder, temp removes all the groups and users to leave just the Administrator user and Administrator user group associated with it as shown below:
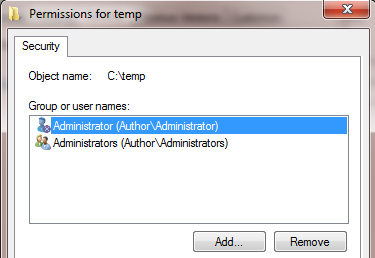
Figure 1.17 ACL
Now create a simple ASP.NET web application with Button and List box control to access all files resides in the temp folder as follows:
[vbnet]
protected void Button1_Click(object sender, EventArgs e)
{
String[] xfiels = Directory.GetFiles(@"c:temp");
foreach (string a in xfiels)
{
ListBox1.Items.Add(a.ToString());
}
}
Configure the application in IIS to use Windows integrated authentication. Finally, build the project. When you click the button to access the files in the temp folder, you would see an error that would indicate that access to C:temp is denied. This is because your application is running with an ASP.NET account which will not be allowed access to the C:temp folder according to the ACL.
So we need to make our application run under Administrator's identity which can be achieved by impersonation. We would add the following code in the web.config file to impersonate Administrator identity as;
[plain]
<configuration>
<system.web>
<identity impersonate ="true" userName ="ajay" password ="zxcvbnm123"/>
</system.web>
</configuration>
Now, build the project again to test application, and it should work fine when you click the button as follows:
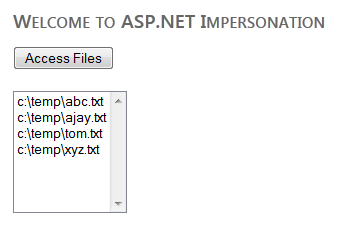
Figure 1.18 output
Alternately, you can configure impersonation from IIS manager. Let's take the above example reference, when you are done with all programmatic and other configurations related to impersonation. If you notice in the IIS manager, the ASP.NET impersonation option is enabled and configured with impersonates "ajay" account as follows:
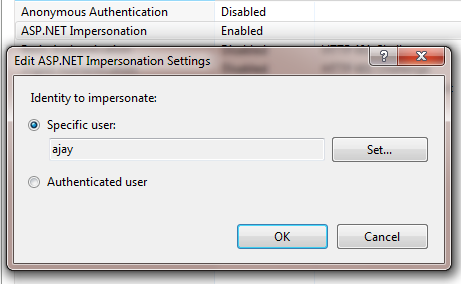
Figure 1.19 Impersonations
Summary

11 courses, 8+ hours of training
In this article, we examined the various authentication mechanisms proposed by ASP.NET such as Basic, Digest, Anonymous, Integrated, and UNC. Additionally, we looked at the techniques of configuring them from IIS and programmatically. We also learn how to retrieve user information's and how to impersonate users so your code runs under different Windows accounts.

In this Series
- Windows Authentication: Dot NET Security Part 2
- DevSecOps: Moving from “shift left” to “born left”
- What’s new in the OWASP Top 10 for 2023?
- DevSecOps: Continuous Integration Continuous Delivery (CI-CD) tools
- Introduction to DevSecOps and its evolution and statistics
- MongoDB (part 3): How to secure data
- MongoDB (part 2): How to manage data using CRUD operations
- MongoDB (part 1): How to design a schemaless, NoSQL database
- Understanding the DevSecOps Pipeline
- API Security: How to take a layered approach to protect your data
- How to find the perfect security partner for your company
- Security gives your company a competitive advantage
- 3 major flaws of the black-box approach to security testing
- Can bug bounty programs replace dedicated security testing?
- The 7 steps of ethical hacking
- Laravel authorization best practices and tips
- Learn how to do application security right in your organization
- How to use authorization in Laravel: Gates, policies, roles and permissions
- Is your company testing security often enough?
- Authentication vs. authorization: Which one should you use, and when?
- Why your company should prioritize security vulnerabilities by severity
- There’s no such thing as “done” with application security
- Understanding hackers: The insider threat
- Understanding hackers: The 5 primary types of external attackers
- Want to improve the security of your application? Think like a hacker
- 5 problems with securing applications
- Why you should build security into your system, rather than bolt it on
- Why a skills shortage is one of the biggest security challenges for companies
- How should your company think about investing in security?
- How to carry out a watering hole attack: Examples and video walkthrough
- How cross-site scripting attacks work: Examples and video walkthrough
- How SQL injection attacks work: Examples and video walkthrough
- Securing the Kubernetes cluster
- How to run a software composition analysis tool
- How to run a SAST (static application security test): tips & tools
- How to run an interactive application security test (IAST): Tips & tools
- How to run a dynamic application security test (DAST): Tips & tools
- Introduction to Kubernetes security
- Key findings from ESG’s Modern Application Development Security report
- Microsoft’s Project OneFuzz Framework with Azure: Overview and concerns
- Software maturity models for AppSec initiatives
- Best free and open source SQL injection tools [updated 2021]
- Pysa 101: Overview of Facebook’s open-source Python code analysis tool
- Improving web application security with purple teams
- Open-source application security flaws: What you should know and how to spot them
- Android app security: Over 12,000 popular Android apps contain undocumented backdoors
- 13 common web app vulnerabilities not included in the OWASP Top 10
- Fuzzing, security testing and tips for a career in AppSec
- 14 best open-source web application vulnerability scanners [updated for 2020]
- 6 ways to address the OWASP top 10 vulnerabilities
- Ways to protect your mobile applications against hacking

Get certified and advance your career
- Exam Pass Guarantee
- Live instruction
- CompTIA, ISACA, (ISC)², Cisco, Microsoft and more!

Application security
Application security
Application security
DevSecOps: Continuous Integration Continuous Delivery (CI-CD) tools
Application security