Website Hacking 101, Part III

To view Part I of the article series, please open: https://resources.infosecinstitute.com/website-hacking-101/
To view Part II of the article series, please open: https://resources.infosecinstitute.com/website-hacking-101-part-ii/

What should you learn next?
Introduction
In this part of the Website Hacking 101 series, we are going to discuss controlling access to directories (if access is not controlled by key directories like include/includes, the system can be accessed simply by guessing the URL), direct static injection (A Direct Static Code Injection attack consists of injecting code directly onto the resource used by application while processing a user request), file inclusion vulnerability (especially when dealing with files from external servers) and database security (quick guide).
Exercise 9: Controlling Access
It is always good practice to control access to your assets. There are directories and files that you do not want to be accessed by ordinary users.
For instance, most apps have a system or include/includes directory.
If the script in the includes directory is not written well enough to handle access outside the usual include statement, it might trigger some errors which would reveal information to possible attackers. For example, errors can reveal your hosting account which could lead to brute-force/dictionary attacks on your hosting account (that is just one simple example). Also, if a user opens a file with an extension .inc instead of .php – the code will not execute and will be printed as is. All files that do not contain server-side code or are not named properly will also be readily available for examination.
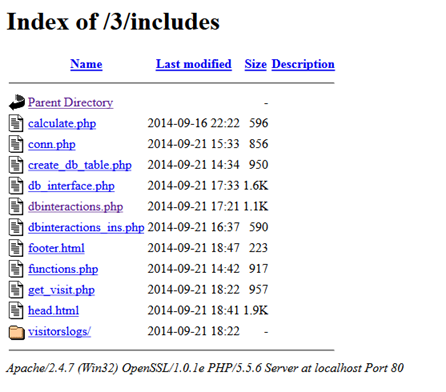
Figure 1: Unprotected includes directory. All assets are revealed.
The attacker can then test all the different assets for errors and start gathering information about additional vulnerabilities.
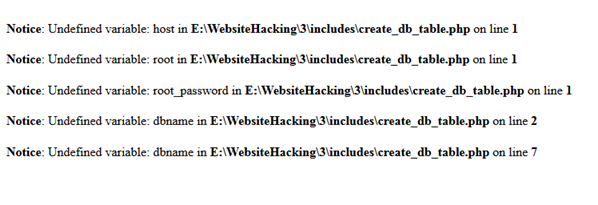
Figure 2: Some of the includes do trigger errors
As we mentioned before, a possible solution is to set display_errors to Off in the php.ini file or to use ini_set ('display_errors', 'off') in the code of a particular script.
However, it is a better alternative to deny access to everyone but the server to this directory. In that way, your pages which include or require files from that directory can still access them but requests from a visitor (the client) would trigger an error.
You simply create an .htaccess file in the forbidden-to-be directory and insert:
[plain]
order allow,deny
allow from 127.0.0.1
deny from all
where 127.0.0.1 can be used for localhost. You can also insert directly a domain name or your server's IP address. There are myriad websites that show the IP address of the server, should you be in doubt about it.
IMPORTANT: If you enable access to directories/files only from the server, you will be able to access them with functions such as include, require, fopen and file_get_contents, but users would not be able to access the files if the link was provided as an href attribute to an <a> tag or if the request for the file is made via an ajax call, since such requests also come from the client and not from the server itself. Thus, use this method only for directories/files that are not normally requested by the client.
Alternatively, you can deny offending parties (such as spammers) access to your app by getting the $_SERVER['REMOTE_ADDR'], $_SERVER['HTTP_X_FORWARDED_FOR'] or $_SERVER['HTTP_CLIENT_IP'] (one of the last 2 values may be set if the client is using a proxy) array elements and writing the offending IP to the .htaccess file along with a 'deny from' directive.
Exercise 10: Direct Static Injection (Your visits)
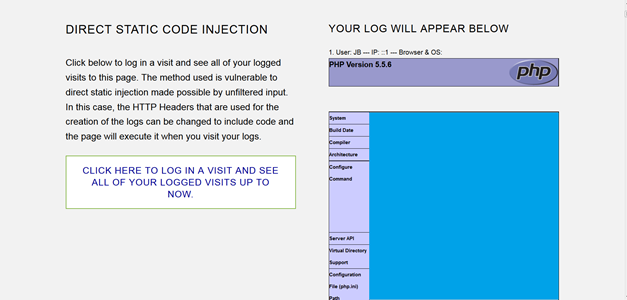
Let's say that we have an app that logs data about each visit of its users. The data can include the user's IP, browser & OS and date and time of the visit. This data can then be shown to the user so he can check for illegal logins or it can be processed by some script to check for abnormal user behavior.
Such an app can be vulnerable to direct static injection, because the gathered data can be tampered with by the user to include code which will execute itself when the user visits his log.

Figure 3: How a user log may look. In this sample, the user clicks on the button, types his name and sees all data about that name. There is no session/cookie/authentication.
From the data in the log, we can determine that $_SERVER["HTTP_USER_AGENT"] is used to gather information about the user's browser & OS.
Thus, we can easily start Tamper Data and change the User-Agent to include a piece of code that we want to try to execute and if the data is not properly sanitized – it will work.
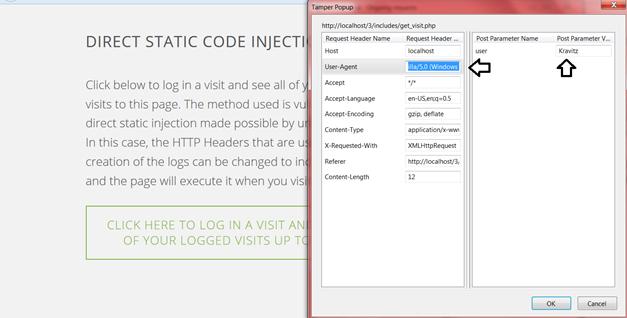
Figure 4: Changing the User-Agent Header
The first time I changed it to <?php echo "I EXECUTED PHP SCRIPT "" ?> and I saw that it worked, so now I know that I can execute arbitrary code in the webpage. For example, here is what I get if I change the user-agent to <?php phpinfo(); ?>
You can basically ruin this website. That is why our next exercises will touch on input sanitation.
Exercise 11: File inclusion vulnerability
There are times when you are required to load files from external servers. Sometimes the PHP code inside these pages has to be executed as well. If you want to use include() or require() you would need to set allow_url_include to 'on' in the php.ini file. It is not possible to turn it on using ini_set('allow_url_include', 'on') inside the script. However, you can always create your own custom php.ini file and enable them there should you be using shared hosting (See Appendix 1 to see how to create custom php.ini in shared hosting). Furthermore, to turn on allow_url_include, allow_url_fopen has to be turned on. If the file that you want to get is not expected to contain php code, you can use file_get_contents to get its contents. If you want to use that function and still execute php code, you should evaluate the contents after loading them – eval().
In the example website, we have used the following method to load any file.
[php]
$contents = file_get_contents($file . ".php");
echo eval("?> $contents");
If your website requires, it is a good idea to rely on whitelisting to filter out bad files.
[php]
/* Avoiding path traversal and use of whitelisting. Only files that are in the $files array can be loaded to to the page. External files that are in the array would also be loaded successfully */
$file = $_GET['file'];
$file = str_replace(array(".", "/"), "", $file);
$files = ["calculator", "files", "visits", "mysql"];
if (in_array($file, $files)) {
$contents = file_get_contents($file . ".php");
echo eval("?> $contents");
}
else
echo "<h3 style='text-align: center; color:#fff'>Bad file chosen.</h3>";
If we did not employ the whitelisting, the following and many more things could happen:

Figure 5: The attacker can get the user's cookies
The attacker can give a URL to the website's URL on which his own external script is loaded to a third user that uses the website to get the user's cookies. He can even save them on a .txt file in the server which he can easily access to check for newly gathered cookies.
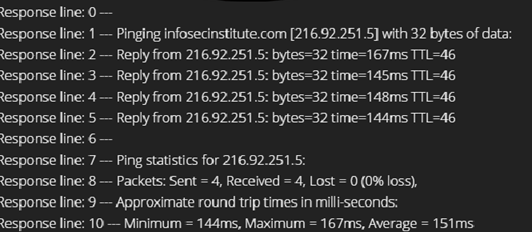
Figure 6: The attacker can execute external programs/commands on the server
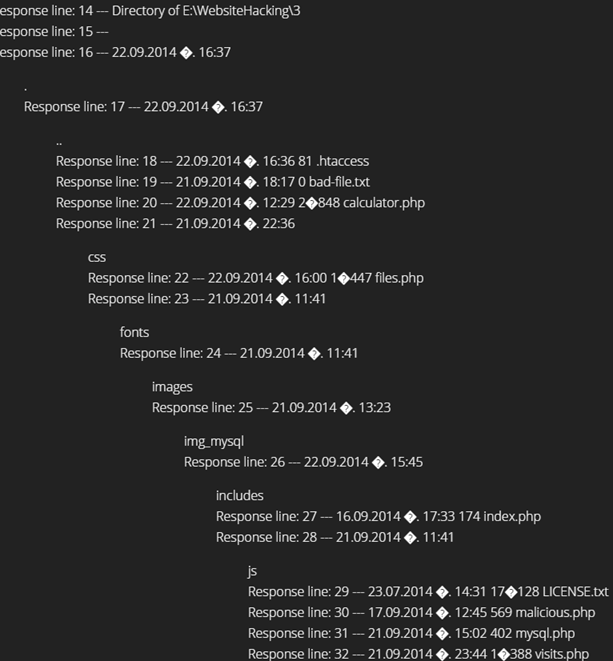
Figure 7: The attacker can see/delete your entire app
Basically, he can do whatever he wants, depending on your settings, should you make such a mistake.
Exercise 12: Database Security
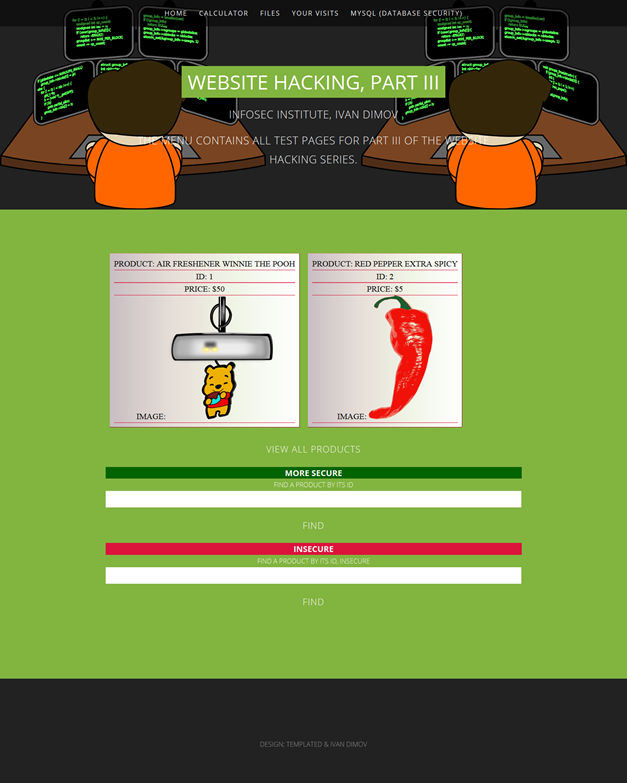
When the example is opened, it creates a db with a table of 2 products. Then, you can perform an insecure search for product by this ID and a more secure one. You will have to insert your MySQL user credentials in includes/conn.php to run this example.
Firstly, it should be noted that input sanitation would not remove second level SQL injections. That is why you can also employ whitelisting to allow the user to enter only the type of characters that are necessary for the functionality to work.
The insecure search is made with the original mysql() API which is deprecated and should not be used in new projects. The more secure one is made with the PDO object.
NOTE: PDO or mysqli should be used for handling MySQL. PDO can handle connections with all kinds of database servers – not just MySQL. It is more secure than the old mysql() API
When using PDO you do not have to escape inputs with a function such as mysql_real_escape_string($string) but for the input to be properly escaped you would have to use prepare and execute statements instead of the direct $pdo_object->query($query_string).
[sql]
$query = $db->prepare("SELECT * FROM Products WHERE product_id = ?");
$query->execute(array($id));
Here is how a query might look like with prepare and execute methods applied.
Secondly, we know that the user is supposed to enter a number (ID of the product) so we can use regex to filter the input and leave only the numbers from the input string which would prevent the input from becoming a second level sql injection (because the user would be able to store only digits on the database should the input be stored there).
[sql]
$id = $_POST['id'];
$id = preg_replace("/[^0-9]/", "", $id);
Here is how the whole query might look:
[php]
require_once("conn.php");
if (isset($_POST['id'])) {
$id = $_POST['id'];
$id = preg_replace("/[^0-9]/", "", $id);
$query = $db->prepare("SELECT * FROM Products WHERE product_id = ?");
$query->execute(array($id));
if (isset($id) AND $id !== "") {
showData($query);
else {
echo "<p>Bad query!</p>";
}
And here is how the showData function looks. It can be reused each time some filter is applied to the database search queries.
[php]
function showData($query) {
if ($query->rowCount() > 0) {
foreach($query as $row) {
echo "<div class='product'>";
echo "<h3>Product: {$row['product_name']} </h3>";
echo "<h3>ID: $row[product_id] </h3>";
echo "<h3>Price: $$row[product_price] </h3>";
echo "<h3>Image: <img src='$row[product_img]' alt='$row[product_name]'</h3>";
echo "</div>";
}
}
else
}
[/php]
Connecting to a database with PDO looks like this:
[sql]
$db = new PDO("mysql:host=$host;dbname=$dbname;charset=utf8", "$root", "$root_password")
where dbname may be omitted and mysql can be replaced with a different database.
It is handy to do some checks before the request comes to the back-end of the app to decrease unnecessary load on server, provide better interface to the user (where he won't have to wait for the server-side script to execute if he merely mistypes something, he can be shown directions as to what is wrong with his input, etc.) but you should always be aware that client-side validation can easily be circumvented.
The search by ID can be set to be validated by the HTML5 built-in validation mechanism. However, for the validation to take place, the input-collecting tags must be within a <form> tag and the validation takes place when the user clicks the <input type="submit"> button.
[html]
<form action="" method="POST">
<h3> MORE SECURE</h3>
<label for="db_byid">Find A Product by its ID</label><input name="id" type="number" max="500" maxlength="3" size="3">
<input type="submit" value="Find">
</form>
Here is how the HTML5 validation may be used with our "Search by product id". Here, the client will check whether the input is a number, lower than 500 and containing only 3 digits on 'submit'.
Alternatively, you can do your own validation on submit with js:
[php]
var idGiven = $("#db_byid").val().trim().replace(/[^0-9]/g, "");
PHP Injection can easily occur when using eval() so be careful when allowing user input to run through eval().
Conclusion
We are barely touching upon the vulnerabilities involved with web apps, but one has to be aware that the responsibility of security lies, to a large extent, in the developer's hands and it is not an issue that has to be tackled by security experts only.
The next part of the series is going to be more practically oriented.
Appendix 1
Create the php.ini file in you root directory (home/username). Do not upload it in public_html or www as this will make the file publicly accessible. Create an .htaccess file in the same place and add the line SetEnv PHPRC /home/yourusernamehere/php.ini.
And it's done… You can add the code below to the .htaccess to further protect the file.
[plain]
<FilesMatch ".*.(ini)$">
order allow,deny
deny from all
</FilesMatch>
Become a Certified Ethical Hacker, guaranteed!
Get training from anywhere to earn your Certified Ethical Hacker (CEH) Certification — backed with an Exam Pass Guarantee.
NOTE: This will match all .ini files.
Enroll in an Ethical Hacking Boot Camp and earn two of the industry’s most respected certifications — guaranteed.
- CEH exam voucher
- PenTest+ exam voucher
- Exam Pass Guarantee
- Live online hacking training
In this Series
- Website Hacking 101, Part III
- The rise of ethical hacking: Protecting businesses in 2024
- How to crack a password: Demo and video walkthrough
- Inside Equifax's massive breach: Demo of the exploit
- Wi-Fi password hack: WPA and WPA2 examples and video walkthrough
- How to hack mobile communications via Unisoc baseband vulnerability
- How to build a hook syscall detector
- Top tools for password-spraying attacks in active directory networks
- NPK: Free tool to crack password hashes with AWS
- Tutorial: How to exfiltrate or execute files in compromised machines with DNS
- Top 19 tools for hardware hacking with Kali Linux
- 20 popular wireless hacking tools [updated 2021]
- 13 popular wireless hacking tools [updated 2021]
- Man-in-the-middle attack: Real-life example and video walkthrough [Updated 2021]
- Decrypting SSL/TLS traffic with Wireshark [updated 2021]
- Dumping a complete database using SQL injection [updated 2021]
- Hacking clients with WPAD (web proxy auto-discovery) protocol [updated 2021]
- Hacking communities in the deep web [updated 2021]
- How to hack Android devices using the StageFright vulnerability [updated 2021]
- Hashcat tutorial for beginners [updated 2021]
- How to hack a phone charger
- What is a side-channel attack?
- Copy-paste compromises
- Hacking Microsoft teams vulnerabilities: A step-by-step guide
- PDF file format: Basic structure [updated 2020]
- 10 most popular password cracking tools [updated 2020]
- Popular tools for brute-force attacks [updated for 2020]
- Top 7 cybersecurity books for ethical hackers in 2020
- How quickly can hackers find exposed data online? Faster than you think …
- Hacking the Tor network: Follow up [updated 2020]
- Podcast/webinar recap: What's new in ethical hacking?
- Ethical hacking: TCP/IP for hackers
- Ethical hacking: SNMP recon
- How hackers check to see if your website is hackable
- Ethical hacking: Stealthy network recon techniques
- Getting started in Red Teaming
- Ethical hacking: IoT hacking tools
- Ethical hacking: BYOD vulnerabilities
- Ethical hacking: Wireless hacking with Kismet
- Ethical hacking: How to hack a web server
- Ethical hacking: Top 6 techniques for attacking two-factor authentication
- Ethical hacking: Port interrogation tools and techniques
- Ethical hacking: Top 10 browser extensions for hacking
- Ethical hacking: Social engineering basics
- Ethical hacking: Breaking windows passwords
- Ethical hacking: Basic malware analysis tools
- Ethical hacking: How to crack long passwords
- Ethical hacking: Passive information gathering with Maltego
- Ethical hacking: Log tampering 101
- Ethical hacking: What is vulnerability identification?
- Ethical hacking: Breaking cryptography (for hackers)

Get certified and advance your career
- Exam Pass Guarantee
- Live instruction
- CompTIA, ISACA, (ISC)², Cisco, Microsoft and more!


