Webinspect Part 2

In the first part of this article we have seen how to start a scan using WebInspect. As discussed earlier, Default scan settings tab is the heart of the WebInspect tool as it allows you to configure the scan based on the requirements and architecture of the web application. This post covers in-depth details about the default scan settings tab and also focusses on analysis after the scan is complete. The Default scan settings tab can be opened by clicking on the "Settings (Default)" which is located at the bottom left hand side of the scan wizard window and the screen below appears.

What should you learn next?
What should you learn next?
Scan settings:
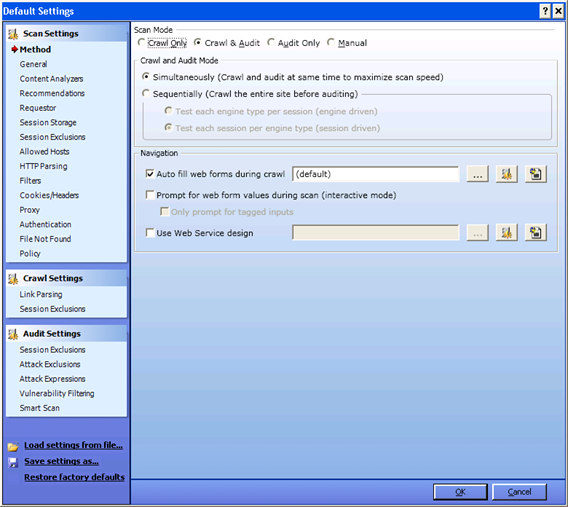
Method
Based on your input in the previous window, scan mode display here automatically as"crawl and audit". As mentioned earlier, to conduct a scan WebInspect has to crawl and audit.
Simultaneously vs. Sequential: If WebInspect crawls and audits simultaneously it is a mode known as "simultaneously". If WebInspect crawls the entire site and then audits one by one, it's in "sequential" mode. So you can select the option you prefer. If your site content changes before the crawl is completed, it's best to use "simultaneously" mode. If you select "sequential" mode, you need to select the order in which crawl and audit will take place.
Test each engine type per session: WebInspect audits all sessions using the first audit engine, then audits all sessions using the second audit engine etc.
Test each session per engine type: WebInspect runs all audit engines against the first session and then runs all audit engines against the second session. The program thenproceeds continuing in sequence until all sessions are audited.
During the scan, WebInspect will encounter pages that contain input which should move to the next page. If you want WebInspect to auto-fill those forms, you can select that option under navigation. If you want Webinspect to ask you for values, then select "prompt for values option". (But remember to watch the program during the scan, or the scan wouldn't proceed without the input). Now click on the "General" tab.
General:
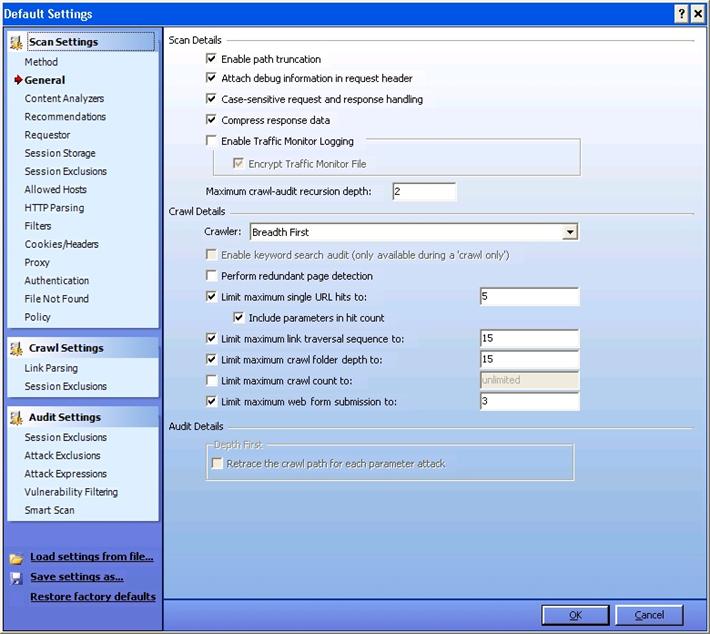
Enable Path Truncation: If you want WebInspect to look for "path truncation attacks'" (requesting directories without filenames) select it.
Attach debug information in request header: WebInspect will include a header "Memo" in the HTTP request which can be used for debugging purpose.
Case-sensitive request response handling: If the server you are hitting is case-sensitive, then select this option
Compress response data: WebInspect will save you some space by compressing the stored response in its database.
Enable Traffic Monitor Logging: Each and every request and response will be logged, and you can view it later under the "Traffic Monitor'"option while analyzing.
Maximum crawl-audit recursion depth: If vulnerability is found in one page, WebInspect crawls and follows the link. If that link points to another, then recursion depth is 1. If that link points to another, then recursion depth is 2. Default value is 2 and maximum value is 1000.
Depth First vs. Breadth First: If your web application follows a system that orders requests (for example: in an online shopping cart, the user is required to visit the shopping cart page before accessing the check-out page), then select Depth First. If your web application does not follow an order of requests, you can select Breadth First.
Limit maximum single URL hits to: This refers to the number of times a page can be hit by WebInspect. It's an important feature because WebInspect can sometimes enter into an endless loop, depending on the architecture of your site.. Placing a limit on maximum single URL hits prevents this scenario.
You can discern the functionality of the other options under this tab by their names. Click on the next tab: "Content Analyzer".
Content Analyzer:
This deals with the settings for the content that has to be scanned.
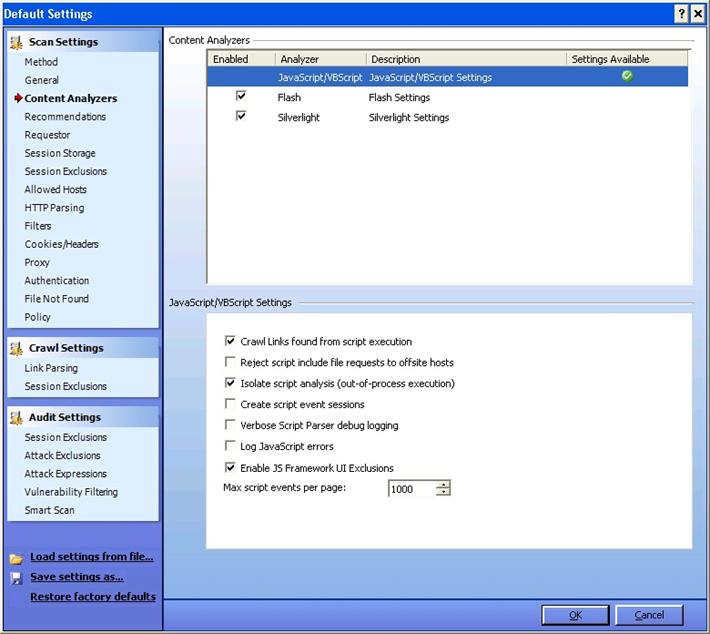
Flash: Select this if you want WebInspect to analyze flash files.
Java Script/VB Script: The default setting on this is enabled. Click on this, and you will find other options which allow you to reject scripts that include requests to offsite hosts, log JavaScript errors, etc.
Recommendations:
When this feature is enabled WebInspect will present you with a list of recommendations for performing a better scan after the first scan is complete.
Requestor:
Requestor deals with HTTP requests and responses.

Requestor Performance: Shared Requestor vs. Separate Requestor:
With shared requestor, crawler and auditor use a common requestor while scanning a site, and they use the same state. With separate requestor, both crawler and auditor use separate requestors. If maintaining state is not an issue, then you can go with shared requestor. However, separate requestors would result in much faster scans.
Requestor Settings:
Limit maximum response size to: You can specify the maximum response size that can be accepted from the server. However, this does not apply to flash files.
Request retry count: You can specify how many times WebInspect can resend a HTTP request after it receives a failed response.
Request timeout: You can specify how long WebInspect can wait for an HTTP response.
StopSscan If Loss Of Connectivity Detected: During the scan, WebInspect encounters variety of situations like: server is not responding, etc. So with this feature, you can specify some conditions under which Webinspect wouldstop a scan.
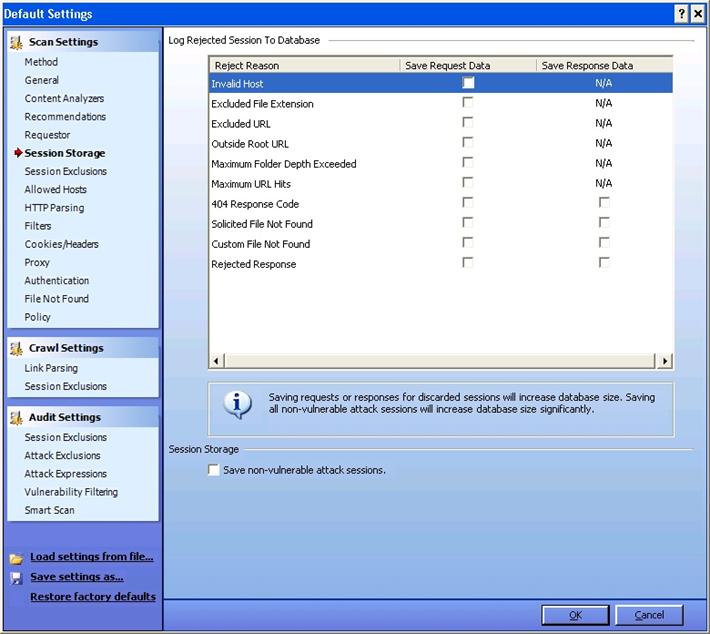
Session Storage:
As you can see from the picture below, you can log rejected sessions. Additionally, you can save the request data and response data as applicable, by enabling the below options.
Session Exclusions:
Excluded or Rejected File Extensions:
Using this option, this you can exclude or reject certain file extensions from either crawl, or audit, or both. If you are rejecting a file, WebInspect will not request the file at all. If you are excluding a file, WebInspect will request the file, but it will not attack said files during the audit phase.
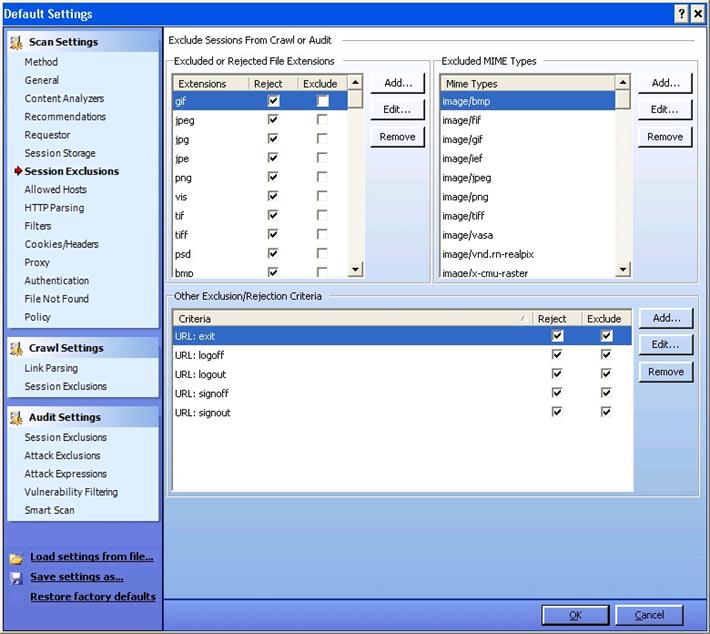
Similarly you can also specify MIME types and URL types that need to be rejected. For example, during a scan you don't want to hit the logout button. In other words, if the url is something like: www.ex.com/abc.jsp?logout=true, then by specify the criteria above, you can avoid hitting this url.
Allowed Hosts:
You might be using multiple domains for your website, and this features allows you to add several domains so that they will each be allowed during the crawl and audit. During the scan, if WebInspect encounters other domains, it will not scan them. Additionally, you can specify those domains under this section so that they will be included.
HTTP Parsing:
If your application uses URL rewriting or any post data techniques to maintain the state in the application, then you need to identify the parameters that maintain the state. For example, PHP uses PHPSESSID, and jsp uses jsessionid.
Filers:
Websites handle very sensitive data (like credit card numbers, SSN numbers, etc.) which are not supposed to be viewed by anyone, not even thePentester. So with this option, you can search and replace those values in order to keep any such data private. In addition, you can filter HTTP request content and also HTTP response content.
Cookies/Headers:
Here you can include "referrer" and "host" in HTTP header requests, and you can also add custom headers and custom cookies to the requests sent by WebInspect.
Proxy:
Under this tab you need to specify the proxy setting if you are using a proxy feature. If you are not using any proxy, you can select "direct connection". If you are using a PAC (proxy automatic configuration) file, you can specify that, or you can chose to import the proxy settings from your browser.
Authentication:
This section is important because it deals with the authentication process for your application. During a scan, WebInspect might encounter a situation where it has to authenticate before proceeding to next page. In such situations, the details you provide in under this tab will dictate how the program will proceed.. From the point of view of a web application, passwords and digital signatures are the primary forms of authentication. You can specify if your scan requires any of the following:
- Network Authentication
- Client Certificates
-
Client Certificates for tools
Login Macro & Startup Macro:
Macro is used to reply or playback the sequence of steps that you have recorded. So you need to record the authentication steps required to login to the application. In case WebInspect unknowingly hits the logout button (or any other button that logs it out of the web application), it can use the macro to relogin into the application. Using the Web Macro Recorder tool of WebInspect, you can record a macro, store it, browse for it, and eventually upload the macro as needed. For now, let's see the difference between a login macro and a startup macro.
Login Macro: If the authentication part contains a simple login page which requires a username and password, you can use this feature to allow WebInspect to log back into the application.
Startup Macro: If you scan is targeting a particular part of an application, or if you cannot determine the logout signature of the application, you can record a startup macro.
File not found:
Select this option to find a "file not found" response from the server and use it to specify which responses should not be treated as "file not found" response.
Policy:
Depending on the policy selected, WebInspect will scan a website for vulnerabilities. A policy details the kind of vulnerabilities that WebInspect will look for. For example, if OWASP Top 10 policy is selected, WebInspect will look only for the OWASP Top 10 vulnerabilities. By default, WebInspect includes some standard policies like OWASP 2010, etc. You can also create your own custom policy by stating the vulnerabilities you want.
Crawl Settings:
As discussed earlier, crawler is something which traverses through the hierarchical structure of the site and constructs the tree structure. Here you can find the options which instruct the WebInspect how to crawl through that content.
Link Parsing:
Hyperlinks are usually defined by either HTML or JavaScript. But there might be some protocols which use a different way of specifying hyperlinks. To accommodate this, you can use custom links feature under this.
Session Exclusions:
You can specify the areas that need to be excluded from the crawl here.
Audit Settings:
Under this you have options which control the way in which audit will be conducted.
Session Exclusions:
You can specify the areas that need to be excluded from the audit here.
Attack Exclusions:
You can manually enter the Parameters, cookies, and headers which need to be excluded from the audit.
Once all your prefered settings are selected, we have finished with the configuration of your WebInspect scan. Click on the "next" button in every window from here and finally click on "scan". WebInspect will now start scanning for vulnerabilities and will present you with any issues that arise. Now we must proceed onto analysis. After the scan is completed, WebInspect will present you with the screen below.
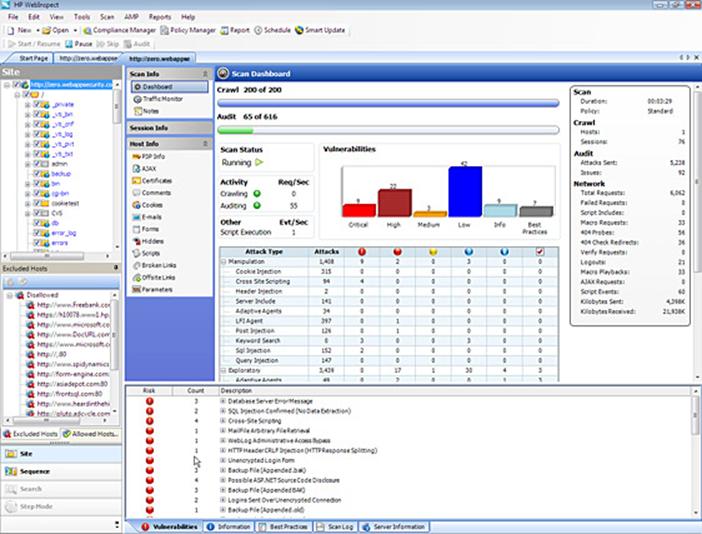
This screen can be divided into 3 panes: Navigation Pane, Information Pane, and Summary Pane.
Navigation Pane:
There are 4 views under this:
- Site view: This view shows the hierarchical structure of the website and also highlights those sessions in which a vulnerability is found.
- Sequence view: Shows the order in which WebInspect traversed the tree structure (i.e. the order in which WebInspect hit the URLs).
- Search view: Helps you to search for HTTP message components. For example, you can search for all the sessions where cookies are set.
- Step view: After the scan is complete, you can manually browse to a specific URL and include it in the scan, if you found that the particular URL was missing from the first scan.
Information Pane:
This contains "scaninfo" which includes information about the scan. It also contains "sessioninfo" and "hostinfo". "Sessioninfo details information specific to a selected session, and "hostinfo" gives details about a host.
"Dashboard" is an important link that can be found under the scaninfo tab. It presents you with the comprehensive view of the details of the scan. Essentially, it is the summary of the scan results as shown below.

In Session Info, you can see the vulnerability type, HTTP request, HTTP response, browser view, and many other options. You can explore the data further by clicking on each label."Hostinfo" doesn't contain much valuable information, but you can find details about P3P info, certificates, cookies, etc. if you want to.
Summary Pane:
Located at the bottom of the window, the summary pane allows you to access vulnerability information quickly and one by one. Note that by clicking on "vulnerability" in the Summary pane, the corresponding session is automatically selected in Navigation pane. Afterwards, you can click on web browser under "sessionview" to view it in browser, or you can click HTTP request to see the request headers, etc. This is where you start analyzing them to eliminate the false positives. If you are satisfied that a particular finding reported by WebInspect is not a vulnerability, right click on that and "ignore vulnerability". If you wish to bundle them as false positives, you can do the same. You can change the severity of the reported vulnerability too. Additionally, you can also find server information and scan log information under this section. By proceeding in this manner, we will locate and identify vulnerabilities that have to be formally reported.
Reporting:
Become a Certified Ethical Hacker, guaranteed!
Get training from anywhere to earn your Certified Ethical Hacker (CEH) Certification — backed with an Exam Pass Guarantee.![]()
Become a Certified Ethical Hacker, guaranteed!
Get training from anywhere to earn your Certified Ethical Hacker (CEH) Certification — backed with an Exam Pass Guarantee.
To generate a report, select "Report"-->"Generate Report", and include the parameters that you desire. WebInspect will provide you with a description and for the identified vulnerabilities. By accessing the "Vulnerability Assessment Report" in WebIspect, you can generate a report in desired format. Thus WebInspect stands out to be a wonderful tool for automating the vulnerability assessment of web applications.

In this Series
- Webinspect Part 2
- The rise of ethical hacking: Protecting businesses in 2024
- How to crack a password: Demo and video walkthrough
- Inside Equifax's massive breach: Demo of the exploit
- Wi-Fi password hack: WPA and WPA2 examples and video walkthrough
- How to hack mobile communications via Unisoc baseband vulnerability
- How to build a hook syscall detector
- Top tools for password-spraying attacks in active directory networks
- NPK: Free tool to crack password hashes with AWS
- Tutorial: How to exfiltrate or execute files in compromised machines with DNS
- Top 19 tools for hardware hacking with Kali Linux
- 20 popular wireless hacking tools [updated 2021]
- 13 popular wireless hacking tools [updated 2021]
- Man-in-the-middle attack: Real-life example and video walkthrough [Updated 2021]
- Decrypting SSL/TLS traffic with Wireshark [updated 2021]
- Dumping a complete database using SQL injection [updated 2021]
- Hacking clients with WPAD (web proxy auto-discovery) protocol [updated 2021]
- Hacking communities in the deep web [updated 2021]
- How to hack Android devices using the StageFright vulnerability [updated 2021]
- Hashcat tutorial for beginners [updated 2021]
- How to hack a phone charger
- What is a side-channel attack?
- Copy-paste compromises
- Hacking Microsoft teams vulnerabilities: A step-by-step guide
- PDF file format: Basic structure [updated 2020]
- 10 most popular password cracking tools [updated 2020]
- Popular tools for brute-force attacks [updated for 2020]
- Top 7 cybersecurity books for ethical hackers in 2020
- How quickly can hackers find exposed data online? Faster than you think …
- Hacking the Tor network: Follow up [updated 2020]
- Podcast/webinar recap: What's new in ethical hacking?
- Ethical hacking: TCP/IP for hackers
- Ethical hacking: SNMP recon
- How hackers check to see if your website is hackable
- Ethical hacking: Stealthy network recon techniques
- Getting started in Red Teaming
- Ethical hacking: IoT hacking tools
- Ethical hacking: BYOD vulnerabilities
- Ethical hacking: Wireless hacking with Kismet
- Ethical hacking: How to hack a web server
- Ethical hacking: Top 6 techniques for attacking two-factor authentication
- Ethical hacking: Port interrogation tools and techniques
- Ethical hacking: Top 10 browser extensions for hacking
- Ethical hacking: Social engineering basics
- Ethical hacking: Breaking windows passwords
- Ethical hacking: Basic malware analysis tools
- Ethical hacking: How to crack long passwords
- Ethical hacking: Passive information gathering with Maltego
- Ethical hacking: Log tampering 101
- Ethical hacking: What is vulnerability identification?
- Ethical hacking: Breaking cryptography (for hackers)

Get certified and advance your career
- Exam Pass Guarantee
- Live instruction
- CompTIA, ISACA, (ISC)², Cisco, Microsoft and more!


