Vulnerability Assessment of SNMP Service – I

Background:
This is the first article out of a series of articles that I am planning to write on vulnerability assessment of SNMP Service. SNMP – also known as Simple Network Management Protocol. SNMP is a protocol managing devices on Internet Protocol (IP) network. As the name suggests, It is mainly used for managing the network devices and monitoring these network enabled devices for administration purpose.
Learn Digital Forensics
In this article, we'll introduce users how to enable SNMP service – which can later be attacked to retrieve interesting information – thus giving them a hands on experience on how to perform vulnerability assessment of SNMP service.
Why SNMP?
SNMP is a very common protocol that could be found enabled on variety of operating systems like Windows Server, Linux & UNIX servers as well as network devices like routers, switches etc. SNMP service can reveal interesting information about the target network device or operating system in question. This includes (but not limited to) usernames, system up time, system name etc.
Objective:
Objective of this article is to explain users how to set up SNMP service – step by step on a Ubuntu Linux Machine. For the purpose of segregation and simplicity, this article will explain every step that can help a user in setting up the service. We'll be using a Virtual box image of Ubuntu for this purpose.
Intended Audience:
Anyone interested in learning about vulnerability assessment of SNMP will find this article useful. There are few pre-requisites though, as the article assumes that the reader has a basic understanding about Linux Operating System, knows how to use the terminal, and connect the box to internet. If reader is not familiar with these aspects, it is recommended that they go through a crash course for the above-mentioned items before following the steps mentioned in this article.
Out of Scope:
Tutorial on Linux operating system or usage of terminal is out of scope. Explaining each and every SNMP configuration is also out of scope of this article. Similarly, an explanation on how to set up Ubuntu on VMware or Virtual box is also out of scope.
Configuring SNMP:
-
First thing we need to do is check if our Ubuntu system is connected to the network. If we key in the command "ifconfig" at the command prompt, we should be able to see something as follows. Command is highlighted in red in the following figure. The actual IP Address is masked in the figure, however if an IP is allocated to your machine, the following command's output should show that:

-
Next, we need to check if we are connected to the internet. This could be done by pinging any website from command prompt using "ping" command. If you don't get output like the one showed in the following figure, then it means that your system is not connected to internet. Trouble shoot and find out why this is the case. Normally Ubuntu automatically is connected to the network and acquires an IP Address, so there are rare chances of problems here. However, we need to ensure that we are connected; else, we'll not be able to perform next steps.

-
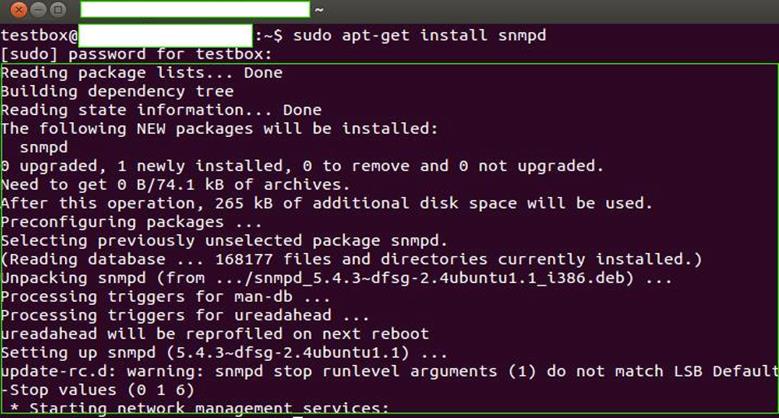
Now that we know that our system is connected to the internet, we can download the SNMP daemon using the terminal, and we'll then configure the same. Use the following command to install SNMP.

Note the keyword "sudo" here. SUDO command allows us to execute any following command with root level privileges on Linux box. This command is important here because Ubuntu's default installation does not have root user activated by default, however some user actions like installation of additional programs, as we are doing above, requires us to have root privileges. Hence, we use SUDO here to achieve it. APT or Advanced Packaging Tool is a utility that we'll use to install our required service. We'll not go into the details of what all things could be done with APT, however for the sake of this article, it is sufficient to understanding that APT could be used to do the installation and un-installation using this utility. Please note that invoking the utility without using SUDO command can generate permission-related errors. I'll show one such permission error example in upcoming steps. It is recommended that you use SUDO. Alternately, if you are an advanced user, you can set up a root account and do all the actions using root user, in which case, it may not be necessary to use SUDO.
-
Once we hit enter, we'll be asked for a password as shown in the following figure. Enter the password of the user using which you have logged into the system as, and press enter again.

-
If all is well and the password we provided is accepted by the system, we should be able to installation progress as shown in the following figure. Once SNMP is installed, the service would be restarted by the operating system itself before command prompt control is passed back to the end user:
-
Once SNMP service is installed, and the control is passed back by the Operating System to us, we need to edit the configuration file. Without this step, we'll not be able to attack this service from a remote system. We need to locate the configuration file for this purpose. It should be located in the /etc/snmp/ directory. Let's check the contents of this directory. Key in the command "ls /etc/snmp" as shown in the following figure:

There are three configuration files shown in above figure. The one that interest us is "snmpd.conf" and it is highlighted in blue box in above figure.
-
Let's try to print the contents of this file on terminal to see if it contains anything or not. We can do so by using Linux command – "cat." However, there is a catch here. If we try to use the "cat" command as shown in the following figure to view the file content, we'll get an error.

It is obvious that if we don't even have permissions to view the file content, as shown in the figure, it is not possible for us to modify it, either. Changing the permissions may not help much here because we need to root privileges to view or edit this file.
-
Now let's try to use SUDO and then key in the above command as follows:
"sudo cat /etc/snmp/snmpd.conf"
Voila! We are now able to view the contents of the file.
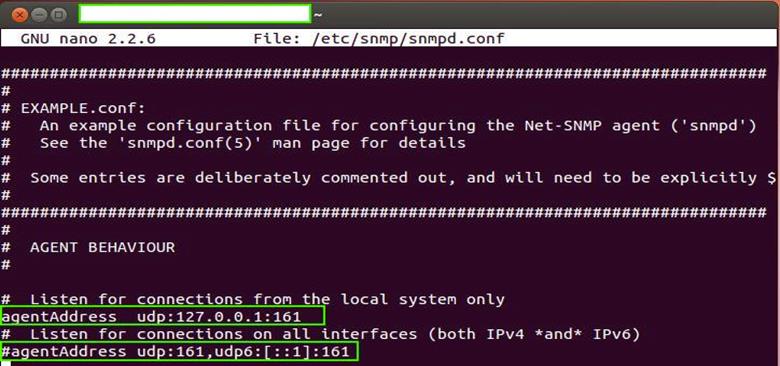
- It is a good idea to avoid the mistake that we did in previous step. Hence, we'll edit the file using root level privileges. I prefer using the "nano" editor. However if you are comfortable using "vi", you can edit the command accordingly to open up the configuration file with "vi" or any other editor of your choice.

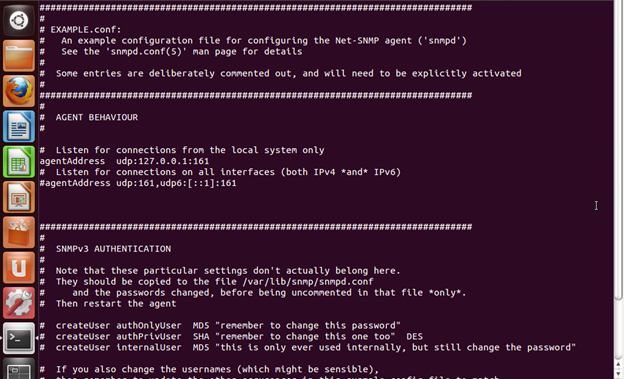
- Following is the output of the above command, which also shows the original content of the file. As of now, we have not done any modifications to the same. There is one important configuration setting that I want to highlight here. "agentAddress udp:127.0.0.1:161" is uncommented at this point of time. What this means is that we can only connect to snmp service using localhost or 127.0.0.1. This is of no use to us as we want to deliberately attack this box, which is why we are doing this entire exercise.
- We need to uncomment this line, and instead uncomment the next configuration setting – "agentAddress udp:161,udp6:[::1]:161". When we uncomment this configuration setting, it will allow anyone to connect to our SNMP service and thus make it open to attack (bad security, but it is needed in our case). The following screenshot shows the modified version of our configuration file.
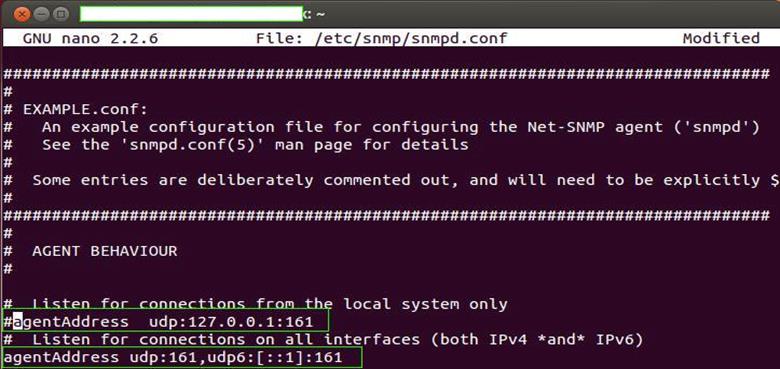
- As you can see, the first configuration is now commented and the next one is uncommented. The "#" character is used to comment a line in the configuration file and vice-versa, removing the "#" character will uncomment a configuration setting.For advanced users, let me highlight here that default community string is "public" and we'll let it remain as unchanged. For readers not familiar with community strings, you can think of it as a password to connect to SNMP service. It provides a level of authentication, thus ensuring that not everyone has access to the service. However many times, people tend to forget to change the default password and sometimes people assume, "Why would someone bother about community strings?" Well the bad news is, attackers out there do worry about it and default community strings are of prime interest, as they can harvest fruitful information about the system or device by querying SNMP service.
-
Next, we need to restart the service using the following command in order for the changes to take place.
"/etc/init.d/snmpd restart"
You can also restart the system instead, which will also have the same effect as the network service being restarted upon rebooting. Either one of these two steps is necessary for the changes to be relevant.
That's it. We are good to go. Now we can hit the SNMP service from any other machine located on the network. I prefer using VMWare network. However, if you do have a lab set up, you can use one. A simple UDP port scan for port number 161 of our Ubuntu box will reveal that the service is indeed running.
What Next?
Learn Digital Forensics
References:

In this Series
- Vulnerability Assessment of SNMP Service – I
- Digital forensics and cybersecurity: Setting up a home lab
- Top 7 tools for intelligence-gathering purposes
- iOS forensics
- Kali Linux: Top 5 tools for digital forensics
- Snort demo: Finding SolarWinds Sunburst indicators of compromise
- Memory forensics demo: SolarWinds breach and Sunburst malware
- Digital forensics careers: Public vs private sector?
- Email forensics: desktop-based clients
- What is a Honey Pot? [updated 2021]
- Email forensics: Web-based clients
- Email analysis
- Investigating wireless attacks
- Wireless networking fundamentals for forensics
- Protocol analysis using Wireshark
- Wireless analysis
- Log analysis
- Network security tools (and their role in forensic investigations)
- Sources of network forensic evidence
- Network Security Technologies
- Network Forensics Tools
- The need for Network Forensics
- Network Forensics Concepts
- Networking Fundamentals for Forensic Analysts
- Popular computer forensics top 19 tools [updated 2021]
- 7 best computer forensics tools [updated 2021]
- Spoofing and Anonymization (Hiding Network Activity)
- Browser Forensics: Safari
- Browser Forensics: IE 11
- Browser Forensics: Firefox
- Browser forensics: Google chrome
- Webinar summary: Digital forensics and incident response — Is it the career for you?
- Web Traffic Analysis
- Network forensics overview
- Eyesight to the Blind – SSL Decryption for Network Monitoring [Updated 2019]
- Gentoo Hardening: Part 4: PaX, RBAC and ClamAV [Updated 2019]
- Computer forensics: FTK forensic toolkit overview [updated 2019]
- The mobile forensics process: steps and types
- Free & open source computer forensics tools
- An Introduction to Computer Forensics
- Common mobile forensics tools and techniques
- Computer forensics: Chain of custody [updated 2019]
- Computer forensics: Network forensics analysis and examination steps [updated 2019]
- Computer Forensics: Overview of Malware Forensics [Updated 2019]
- Incident Response and Computer Forensics
- Computer Forensics: Memory Forensics
- Comparison of popular computer forensics tools [updated 2019]
- Computer Forensics: Forensic Analysis and Examination Planning
- Computer forensics: Operating system forensics [updated 2019]
- Computer Forensics: Mobile Forensics [Updated 2019]
- Computer Forensics: Digital Evidence [Updated 2019]

Get certified and advance your career
- Exam Pass Guarantee
- Live instruction
- CompTIA, ISACA, (ISC)², Cisco, Microsoft and more!

Digital forensics

Digital forensics

Digital forensics
Digital forensics