Visual Studio 2010 Basics

Introduction
This article will demonstrate the development life cycle for various .NET framework applications,for instance, executables, console applications,Windows Forms, etc., and how to build them in C# using .NET framework compilation features. This chapter will also investigate the entry point of C# programs in depth and take a closer look on other compilation options used during command line execution. By the end of this chapter, you should obtainsufficient understanding of C# to write simple programs using Notepad or VS2010 IDE without using any advance Object-oriented features.

What should you learn next?
Prerequisites
- In order to execute console basedWindows Forms or other .NET applications, you need to have the following: Either Windows 7, 8 or Win 2008 Server OS (latest service pack)
- .NET Framework 3.5 SDK or latest
- Visual Studio 2010 IDE
- SQL Server 2008 (optional)
- Notepad++ (optional)
- At least 2GB RAM
Building C# Applications
As a programmer, you can choose various tools to develop C# base applications such as Visual Studio 2010 IDE, Notepad++, or even Text Pad.Visual Studio 2010 is a more convenient tool in writing C# applicationsthough, because it provides multiple features such as Intellisense support, better debugging tools and many other important utilities.
There is common misconception among the rookie programmers that it is not possible to build a program in C# without purchasing a licensed copy of Visual Studio, but the truth is that you can build any .NET program by downloading the free .NET framework software development kit. You can develop console based applications, Windows Forms and class libraries (DLL) using the .NET SDK.
Building C# Application using Csc.exe
Sometimes you don't have a copy of VS 2010 or you might be in an environment where you are prohibited from using code generation tools.In this case, you can create a simple C# program in the traditional method by typing the code into a text editor such as Notepad. The following code simply displays the message "Hello World"on the screen:
[c language="#"]
using System;
namespacetestPro
{
classtestClass
{
static void Main()
{
Console.WriteLine("Hello World");
}
}
}
Once you have finished coding, save this file with a ".cs" extension in any directory. Then, compile this program by running the C# command line compiler (csc.exe) against the source file:.
csc.exe test.cs(csc.exe /target:exetest.cs)
After successfully compiling that file, the test.exe file is created in the project folder which produces the output. The file can be customized by applying other compilation options such as the following:
You can also reference external assembly into the program. Suppose you want to display a message box via console based application - you have to import the associate namespace or class name into the program to utilize their functionality, as follows:
[c language="#"]
using System;
usingSystem.Windows.Forms;
namespacetestPro
{
classtestClass
{
static void Main()
{
Console.WriteLine("Hello World");
MessageBox.Show("test");
}
}
}
Building Console Application using Visual Studio
We can develop console applications using Visual Studio 2010 IDE, which provides a better interface for coding along with other features such as compile time debugging, Intellisense, etc. Generally, it is easier to develop applications under Visual Studio IDE rather than onNotepad. To create an application, follow these steps:
- Open the Visual Studio 2010 program.
-
Then go to File menu,click on Projectand select Console Application. The following dialog box opens:
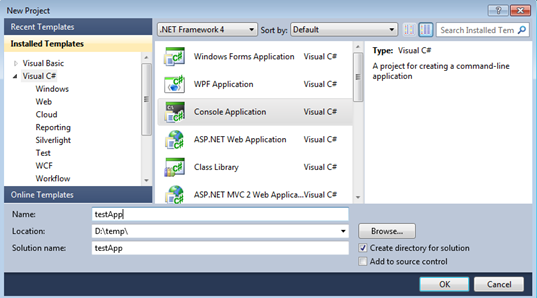
Image 1.1: Console Application
In the New Project dialog box, you can set options such as the language in which you want to write code, the framework, the project file location and the kind of application you're making.
- Select the location in which the application file will be stored and give it a project name, testApp in this example.
-
After that, the VS2010 IDE creates a program.cs file and imports some default namespace which associates the application to run as follows in the Solution Explorer:
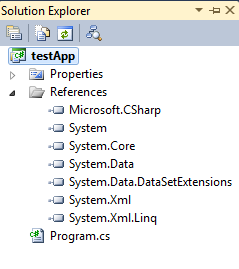
Image 1.2: Solution Explorer
-
Now open the program.cs file to write the business logic. Here you can import namespace as per your requirements:
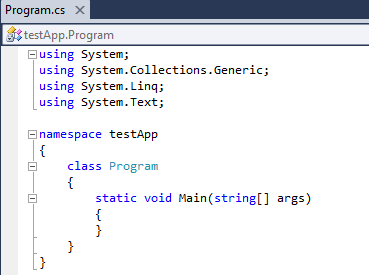
Image 1.3: Code Editor
- Place the code in the Main() entry point function to display some message over the console. We'll use the WriteLine() method of the Console class to achieve this.
[c language="#"] using System;
using System.Text;
namespace testApp
{
classProgram
{
staticvoid Main(string[] args)
{
Console.WriteLine("test application");
Console.ReadKey();
}
}
}
-
Finally, build the application using F9 or from the Build menu. If the application is error-free it will be successfully compiled.Here's the output of this program:
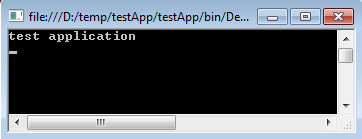
Image 1.4: Console Application Output
Building Windows Form Applications using Visual Studio IDE
Windows Form applications are different from console applications in terms of user interface. In Windows Forms we can manipulate arbitrary controls such as buttons, textboxes, list box menu bars, image controls etc, and we don't need to write code using these controls like when usingC/C++. Just simply select the specific control from the toolbox and drag it over the form.
- Open the Visual Studio 2010 program.
-
Then go to File menu,click on Project and select Windows Forms Application. The following dialog box will open:
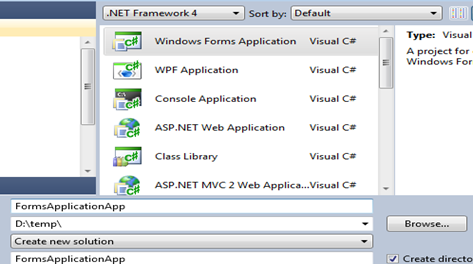
Image 1.5: New Form Application
- When the solution file process is finished, a Form is created with two version files, Form1.Designer.cs for designing the form with controls and Form1.cs for coding the corresponding controls.
-
Now open the Toolbox from the View menu and select your control, such as Button, and drag it over the form:
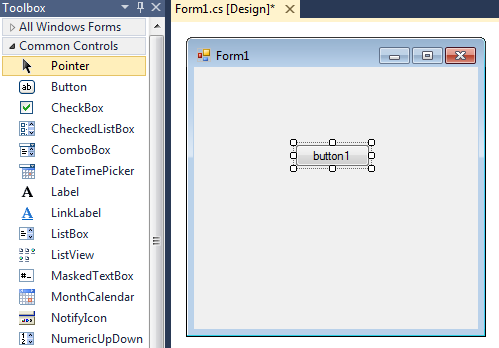
Image 1.6: Control design
-
Now you can edit the button control properties such as name, text, size, position, color, style, etc., from the properties box:
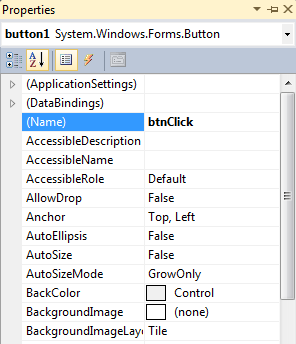
Image 1.7: Property Window
- Now create an Event handler for the button control such click, change, drag, enter etc., from the properties window.
-
Select the button control, open its properties and click on Event. Now double click the properties list box and a click event is generated in the code file as follows:
[c language="#"]
publicpartialclassForm1 :Form
{
public Form1()
{
InitializeComponent();
}
privatevoidbtnClick_Click(object sender, EventArgs e)
{
}
}
-
You can open the Form1.cs code file using View Code in the Solution Explorer:
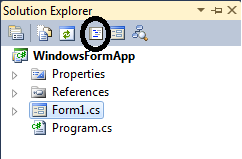
Image 1.8: Code View Depict
-
Now put a code for functionality in the btnClick_Click() method so that when a user clicks the button, a message box will appear:
[c language="#"]
privatevoid</span>btnClick_Click(object sender, EventArgs e)
{
MessageBox.Show("test message");
}
[/c] -
Finally,compile the code using F9.A form with a button control will appear, and when you the click the button,the following output is generated:
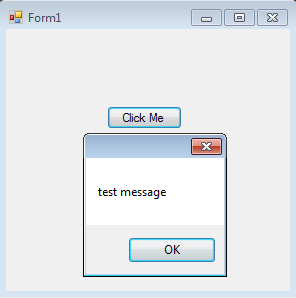
Image 1.9: Win Form output
Even if you don't import the message box class into the source,we can still compile this code by using the csc.exe:
csc /r:System.Windows.Forms.dll *.cs
Response Files
Sometimes you have to specify the complex number of input options at the command prompt to inform the compiler so that in can process the source code. A C# response file with a .rsp extension provides a mechanism to execute multiple instructions during compilation. Let'slook at an example .rsp file:
[c language="#"]
#The response file
# For the Test.exe example
# External assembly references.
/r:System.Windows.Forms.dll
# output and files to compile
/target:exe /out:Test.exe *.cs
Save this file as myRespFile.rspin the same directory where the source files reside. Then open the command prompt and compile the test.exe files:
csc.exe @myRepFile
It is mandatory to put the '@' symbol before the response file during compilation.We can also specify multiple response files using csc.exe as well.

Note:You can also create Windows Form applications using Notepad and compile them with csc.exe.

Anatomy of the Main() Method
Every executable program in the .NET framework must have a definition for the Main() method which is used to signify the entry point of the program. The Main() method signature is adorned with the static keyword which illustrates that this method automatically executes without creating the class instance. It has a default return type void which means that we don't explicitly define the return value using the return keyword. It has a single parameter which happens to be an array of strings (string[] args) and it must be private, although that is not required.
[c language="#"]
static void Main(string[] args)
{
}
There are four valid signatures for Main() when being used as the entry point:
[c language="#"]
// not return type, no argument
static void Main()
{
}
// not return type, array of string argument
static void Main(string[] args)
{
}
// int return type, no argument
staticint Main()
{
}
// int return type, array of string argument
staticint Main(string[] args)
{
}
Processing command line arguments
The following program sample loops through the string array, passes to the Main() method and writes the value of each option to the console window:
[c language="#"]
classProgram
{
staticvoid Main(string[] args)
{
for (int i = 0; i <args.Length; i++)
{
Console.WriteLine("Arguments"+i+":"+args[i]);
}
}
}
You can compile this program using the command prompt. When you run the executable file, you can pass in arguments after the name of the program as follows:
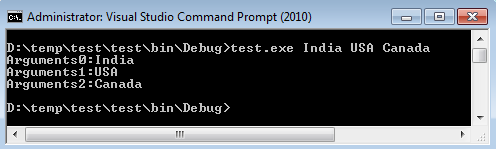
Image 1.10: Command Line Arguments
You can also test the command line parameter using Visual Studio instead of command line. Just go to the Solution Properties, open the Debug pane, and specify the arguments in Start Options as follows:
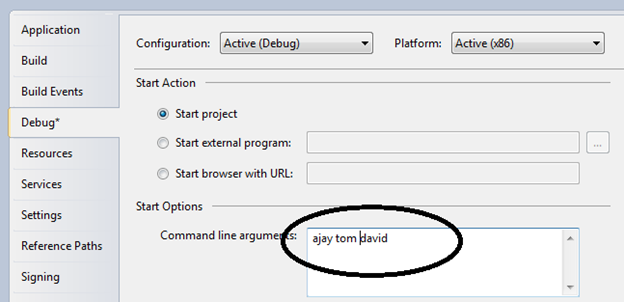
Image 1.11: Solution Property Window
Multiple Entry Points
When a C# console or Windows application is compiled, the compiler by default looks for exactly one entry point (called Main() method). If there is more than one Main() method, the compiler issues an error message. Consider the following example where we are implementing more than one entry point:
[c lanugauge="#"] using System;
namespace test
{
classProgram
{
staticvoid Main(string[] args)
{
test.Main();
Console.ReadLine();
}
}
classtest
{
staticint Addition(int a, int b)
{
return a + b;
}
publicstaticvoid Main()
{
int x = Addition(10, 20);
Console.WriteLine(x);
}
}
This program contains two entry points in two classes. If you try to compile this code in the usual way, you will get the following error message:
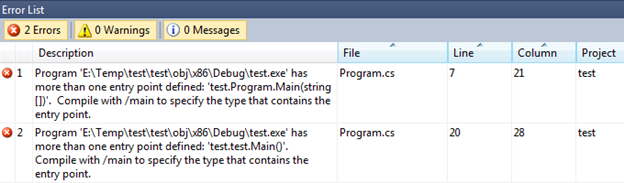
Image 1.12: Error Message
However, you can still compile this code successfully by explicitly telling the compiler which of these methods to use as the entry point for the program using the Solution Property:
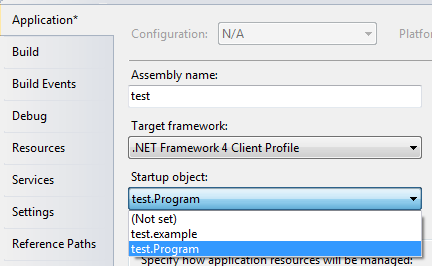
Image 1.13: Application Tab
Here, if you notice in the Startup object, the compiler made an entry of both entry points. You have to explicitly choose which Main() method you want to execute.
Using Comments in Code
Comments are used for documentation purposes in the source code. .NET IDE caters to two kinds of comments, single-line (// ….) and multiple-line (/*…….*/). Everything in both comments will be ignored by the compiler.Here's an example of single-line and multiple-line comments:
[c language="#"]
Single-Line comment
// return a + b;
//Multiple-Line comment
/*public static void Main()
{
int x = Addition(10, 20);
Console.WriteLine(x);
}*/
Summary
What should you learn next?
This article covered the areas needed to write simple C# programs using Visual Studio IDE or others. This article gave you an understanding to create your first application in C#.net; creating this example has helped you to explorer the new Visual Studio IDE and shown how powerful the features of the IDE are. It has also discussed other significant concepts such comment to embellish the code. You have also seen the program Entry Point implementation in diverse ways.

- 12 pre-built training plans
- Employer-requested skills
- Personalized, hands-on training
In this Series
- Visual Studio 2010 Basics
- Free Valentine's Day cybersecurity cards: Keep your love secure!
- How to design effective cybersecurity policies
- What is attack surface management and how it makes the enterprise more secure
- Is a cybersecurity boot camp worth it?
- The aftermath: An analysis of recent security breaches
- Understanding cybersecurity breaches: Types, common causes and potential risks
- Breaking the Silo: Integrating Email Security with XDR
- What is Security Service Edge (SSE)?
- Cybersecurity in Biden’s era
- Password security: Using Active Directory password policy
- Inside a DDoS attack against a bank: What happened and how it was stopped
- Inside Capital One’s game-changing breach: What happened and key lessons
- A DevSecOps process for ransomware prevention
- What is Digital Risk Protection (DRP)?
- How to choose and harden your VPN: Best practices from NSA & CISA
- Will immersive technology evolve or solve cybercrime?
- Twitch and YouTube abuse: How to stop online harassment
- Can your personality indicate how you’ll react to a cyberthreat?
- The 5 biggest cryptocurrency heists of all time
- Pay GDPR? No thanks, we’d rather pay cybercriminals
- Customer data protection: A comprehensive cybersecurity guide for companies
- Online certification opportunities: 4 vendors who offer online certification exams [updated 2021]
- FLoC delayed: what does this mean for security and privacy?
- Stolen company credentials used within hours, study says
- Don’t use CAPTCHA? Here are 9 CAPTCHA alternatives
- 10 ways to build a cybersecurity team that sticks
- Verizon DBIR 2021 summary: 7 things you should know
- 2021 cybersecurity executive order: Everything you need to know
- Kali Linux: Top 5 tools for stress testing
- Android security: 7 tips and tricks to secure you and your workforce [updated 2021]
- Mobile emulator farms: What are they and how they work
- 3 tracking technologies and their impact on privacy
- In-game currency & money laundering schemes: Fortnite, World of Warcraft & more
- Quantitative risk analysis [updated 2021]
- Understanding DNS sinkholes - A weapon against malware [updated 2021]
- Python for network penetration testing: An overview
- Python for exploit development: Common vulnerabilities and exploits
- Python for exploit development: All about buffer overflows
- Python language basics: understanding exception handling
- Python for pentesting: Programming, exploits and attacks
- Increasing security by hardening the CI/CD build infrastructure
- Pros and cons of public vs internal container image repositories
- CI/CD container security considerations
- Vulnerability scanning inside and outside the container
- How Docker primitives secure container environments
- Top 4 Zapier security risks
- Common container misconfigurations and how to prevent them
- Building container images using Dockerfile best practices
- Securing containers using Docker isolation
- Introduction to container security

Get certified and advance your career
- Exam Pass Guarantee
- Live instruction
- CompTIA, ISACA, (ISC)², Cisco, Microsoft and more!

General security
Free Valentine's Day cybersecurity cards: Keep your love secure!

General security
General security