QEMU Windows Guest: Bridged Networking

Bridged networking can be used when we want our guest virtual machine to get the IP address from our router and be able to see the host and all other machines in our LAN network. This is also a requirement if we want to have a server on the guest VM and would like other computers in the network to access it directly.
When we would like to use this networking mode on a host system that has Internet access on the eth0 interface, we first need to create the tap0 interface. Then we need to create the bridge br0 and add tap0 and eth0 to the bridge. After that the bridge br0 and the eth0 interface should get an IP address from the network DHCP server; this happens through the eth0 interface, which is the only interface physically connected to the network switch/router.

What should you learn next?
When bridging the tap interface with the host interface, we need to keep in mind that all guest virtual machines will obtain the IP address from the network DHCP server and every machine in the network will be able to see that virtual machine. We must take this into consideration when security is a primary concern and the virtual machines shouldn't be accessible from the outside world.
The first thing we must do when setting up bridging is actually to create the bridge by using the brctl command, which is available in the bridge-utils packet.
[python]
# brctl addbr br0
After that we need to add the physical interface eth0 (providing access to the network) and virtual interface tap0 to the bridge.
[python]
# brctl addif br0 eth0
# brctl addif br0 tap0
But we don't need to do that by hand. We can simply edit the /etc/network/interfaces or /etc/conf.d/net (depends on the Linux distribution) file appropriately. On Gentoo Linux system, the /etc/conf.d/net configuration file is used, which might contain the following, which sets up the eth0 and tap0 interfaces and br0 bridge;
[python]
# Interface eth0
# Interface tap0
config_tap0="null"
# Interface br0
config_br0="dhcp"
bridge_br0="eth0 tap0"
brctl_br0="setfd 0 stp on sethello 1"
After doing that, we need to create the symlinks for all the network interfaces in /etc/init.d/ directory, as shown below:
[python]
# ln -sf /etc/init.d/net.lo /etc/init.d/net.eth0
# ln -sf /etc/init.d/net.lo /etc/init.d/net.tap0
# ln -sf /etc/init.d/net.lo /etc/init.d/net.br0
When this is done, we only need to start the br0 bridge interface and everything will be done for us automatically; if the tap0 interface is missing, it will be created automatically, so we don't need to do that by hand.
[python]
# /etc/init.d/net.br0 restart
* Caching service dependencies ...
* Bringing down interface br0
* Stopping dhcpcd on br0 ...
* Destroying bridge br0 ...
* Bringing up interface br0
* Creating bridge br0 ...
* Adding ports to br0
* eth0 ...
* tap0 ...
* dhcp ...
* Running dhclient ...
* received address 192.168.1.105/24
From the output above, it's clear that the net.br0 script first destroys the current br0 bridge if already present and then creates a new br0 bridge and adds the eth0 and tap0 interfaces to it. At the end, it runs dhclient on the br0 interfaces and receives the 192.168.1.105 IP address. At that time, we'll be connected to the outside world by using the br0 interface.
We must also add the net.br0 init script to the default run level, so the bridge will be automatically created when booting the system.
Now we've described the basics of the bridged networking, but we still need to bring the QEMU into the story. We need to start QEMU with the "-netdev tap,id=net0,ifname=tap0,script=no,downscript=no -device e1000,netdev=net0" command-line options, which basically say to use the host TAP interface tap0 and disable the script and downscript, which are used when starting/stopping the guest virtual machine; we've disabled those two scripts because we don't need them, since the tap interface is already present. We would want to use those two scripts when the tap interface isn't already present on the system and when we would like to create it automatically when starting the virtual machine. The "ifname=tap0" option is important to tell QEMU the name of the tap0 interface, which was already created on the system.
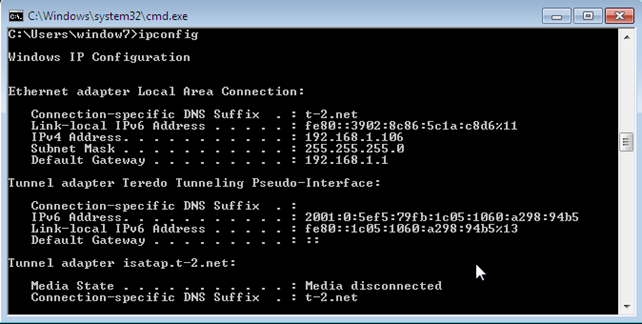
The Windows 7 guest virtual machine would then use tap0 interface, which is in the same collision domain as eth0, so when the Windows operating system would broadcast a DHCP request, it would be sent over the bridge to the eth0 interface and to the network DHCP server, which would reply with a DHCP lease giving the guest VM an IP address. The picture below presents that the guest virtual machines received the IP address 192.168.1.106.
Let's now also ping the guest VM from host to see whether the guest operating system is accessible over the network. The output below presents the successful pings coming from host to guest VM, which indicates the networking is working.
[python]
# ping -c 3 192.168.1.106
PING 192.168.1.106 (192.168.1.106) 56(84) bytes of data.
64 bytes from 192.168.1.106: icmp_seq=1 ttl=128 time=0.395 ms
64 bytes from 192.168.1.106: icmp_seq=2 ttl=128 time=0.496 ms
--- 192.168.1.106 ping statistics ---
3 packets transmitted, 3 received, 0% packet loss, time 2000ms
rtt min/avg/max/mdev = 0.343/0.411/0.496/0.065 ms
If we're doing this on a laptop where we're not connected to the cable interface eth0, but rather to the wlan0 wireless interface, we're in a trouble.
If we simply add the tap0 and wlan0 interfaces to the bridge and restart the /etc/init.d/net.br0 init script, we would receive an error, as shown below. The problem in the wireless specification, because the AP can only accept the packets from the authenticated clients by looking at the MAC address. If the MAC address is not authenticated, it will reject the packet. This essentially happens when a guest virtual machine sends a packet with its own MAC and IP address. Since the MAC address is new (from the guest VM), AP will reject that packet; this happens because the VM is not part of the actual AP client list. A somewhat more detailed explanation can be found here. We can solve the problems in two ways:
- WDS Mode: This must be configured both on the AP and the client side and specifies that the AP should also send the traffic not bound to any of the clients over the air.
- EBTables: This is a filtering program that can be used for filtering the traffic passing through Linux bridge [4]. EBTables is like IPTables, except that it's
Virtualbox solves this problem by silently translating the MAC addresses to the MAC address of the wlan0 interface wireless card. This means that the AP sees only one MAC address and multiple IP addresses for each of the guest virtual machines and host network. This is essentially like NAT at a layer 2 instead of layer 3. If we would like to use wireless network card with bridging mode in QEMU, we basically need to do something similar.
To use ebtables, we must first compile the kernel:
[python]
[*] Networking support
[*] Networking options
[*] Network packet filtering framework (Netfilter)
<*> Ethernet Bridge tables (ebtables) support
<*> ebt: filter table support
<*> ebt: nat table support
<*> ebt: 802.3 filter support
<*> ebt: ARP filter support
<*> ebt: IP filter support
<*> ebt: 802.1Q VLAN filter support
<*> ebt: arp reply target support
<*> ebt: dnat target support
<*> ebt: redirect target support
<*> ebt: snat target support
If we use ebtables, we can rewrite the MAC addresses transparently and the AP will think all packets came from the same wlan0 wireless interface, which has already authenticated with it. There are a couple of rules we want to add to ebtables, but all of them reside in the NAT table, which is logical, since we must rewrite the MAC addresses.
Remember from the iptables course that there are three tables: MANGLE used for mangling with packets, FILTER used for filtering packets, and NAT used for network address translation. The NAT table contains three queues:
- PREROUTING: the address translation occurs before routing immediately when the packet arrives at the network interface. At this point the routing has not been done yet, so the firewall doesn't know whether the packet should be processed by the local system or sent to the next hop. In the latter case, the packet is routed to the right interface on the same server and then leaves the server though that interface. This is used to translate the destination IP addresses to something matching the routing on local server. When doing NAT in PREROUTING, it means that routing and packet filtering in the Linux system will see a packet going to its real destination and the -i (incoming interface) can be used to specify the interface for incoming connections [5].
- POSTROUTING: the address translation occurs after routing just before the packets will exit the system; this is used to translate the source IP addresses to something matching the routing on the destination server. When doing NAT In POSTROUTING queue, it means that routing and packet filtering in the Linux system will see the unchanged packet and the -o (outgoing interface) can be used to specify the interface for outgoing connections [5].
- OUTPUT: network address translation for the packets generated by the firewall, which is our host in this particular case.
With ebtables this is essentially the same, except we're talking about MAC addresses rather than IP addresses. Let's present the ebtables rules that we need to use in order to use the right MAC addresses.
The first rule that takes the packets from the interface br0 matches an IP address IP_VM and changes the destination MAC address with MAC_VM. This effectively overwrites the destination MAC address, which is set to the br0 interface at the beginning to the MAC address of the virtual machine our VM is using. For this rule to be effective, we need the IP/MAC addresses of every virtual machine, so we can overwrite the destination MAC addresses based on the IP addresses of virtual machines.
[python]
# ebtables -t nat -A PREROUTING -p IPv4 -i br0 --ip-dst IP_VM -j dnat --to-dst MAC_VM --dnat-target ACCEPT
# ebtables -t nat -A PREROUTING -p ARP -i br0 --arp-ip-dst IP_VM -j dnat --to-dst MAC_VM --dnat-target ACCEPT
But we also need another rule that overwrite the source MAC address from the MAC address of the AP sending the packet to the MAC address of our bridge interface br0. This rule below is basically saying to overwrite all packets going out the br0 interface with the MAC address MAC_BR.
[python]
# ebtables -t nat -A POSTROUTING -o br0 -j snat --to-src MAC_BR -snat-arp --snat-target ACCEPT
I've also created two pictures demonstrating the above rules, where the first picture demonstrates the packets coming from AP to our VM and the second picture shows the packets flowing from VM to AP. The first picture can be seen below and demonstrates the AP sending the packet with the source MAC address set to ap and destination MAC address set to br0 to the br0 interface. At that point the PREROUTING rule is activated, which translates the destination mac address from br0 into vm (the
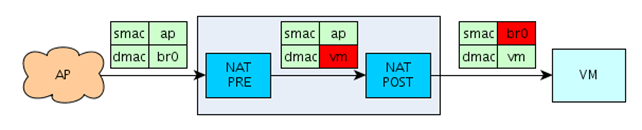
MAC address of our virtual machine). After that, the POSTROUTING queue is translating the source mac address from ap to br0.
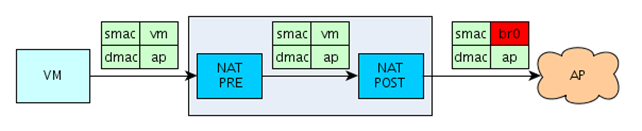
The second picture demonstrates how the packet flows from VM to AP. When the packet from VM reaches the tap interface, there are no changes by the PREROUTING rule, but the POSTROUTING rule changes the source MAC address from vm to br0, so the packet will be accepted by the AP.
So far we have only described the theory of the process, but let's actually do it now. I wrote a command, which prints the interface name and its corresponding MAC address and can be seen below:
[python]
# ifconfig -a | egrep "mtu|ether" | sed 'N;s/n//' | grep -v "lo:" | sed 's/^([^:]*).*ether ([0-9a-f:]*).*/1 2/g'
br0 32:7f:aa:56:59:01
eth0 f4:ce:46:97:c4:b0
The commands below add the actual ebtables rules that we need for bridged networking mode, which we can use in QEMU. The first
[python]
# ebtables -t nat -A POSTROUTING -o br0 -j snat --to-src 32:7f:aa:56:59:01 --snat-arp --snat-target ACCEPT
# ebtables -t nat -A PREROUTING -i br0 --ip-dst 172.16.1.2 -j dnat --to-dst 32:7f:aa:56:59:02 --dnat-target ACCEPT
To make the above commands work, we need to ensure that the interfaces br0 and tap0 have the right IP/MAC addresses. The MAC addresses can be controlled by editing the /etc/conf.d/net configuration file and adding the following two entries that ensure the MAC address of interface br0 is 32:7f:aa:56:59:01 and the MAC address of interface tap0 is 32:7f:aa:56:59:02.
[python]
mac_br0="32:7f:aa:56:59:01"
mac_tap0="32:7f:aa:56:59:02"
But we also need to ensure that the virtual machine that will use the interface tap0 always gets the IP address 172.16.1.2. We can do this by either of the two methods:
- Static IP: we can use static IP address in the /etc/conf.d/net directly by using the following configuration options.
config_tap0="172.16.1.2 broadcast 172.16.1.255 netmask 255.255.255.0"
- DHCP: if we're using dhcp in /etc/conf.d/net, we must ensure that the dnsmasq will assign a static IP address to specific MAC address. To do that, we must edit /etc/dnsmasq.conf and add a configuration option like the one below.dhcp-host=32:7f:aa:56:59:02,172.16.1.2
But, when restarting net.br0, we can quickly figure out wlan0 cannot be added to the bridge br0. We'll receive an error like the one shown below:
[python]
# brctl addif br0 wlan0
can't add wlan0 to bridge br0: Operation not supported
I searched for the solution for quite some time and then I stumbled upon the solution that this is no longer supported by the newer versions of kernel and the fact that it works in Debian is because Debian uses an older version of the kernel. The solution for this problem is adding just the tap0 interface to the br0 bridge and running dnsmasq DHCP server on the br0 interface. Therefore, all clients connected to tap interfaces that are bridged to the br0 bridge will automatically receive IP addresses. Then we only have to add the right route and iptables entries and enable ip forwarding on the host. We'll go through all of those steps now just to make sure everything actually works the way it should.
First we have to set up the dnsmasq DHCP server by editing the /etc/dnsmasq.conf and adding the following configuration directives.
[python]
# cat /etc/dnsmasq.conf | grep -v "^#" | grep -v "^$"
interface=br0
dhcp-range=172.16.1.2,172.16.1.100,12h
dhcp-host=00:26:c6:21:cf:02,172.16.1.2
dhcp-option=3,172.16.1.1
[/python]
We also need to start the dnsmasq init script, which will start a DHCP server on interface br0 and serve IP addresses from 172.16.1.2 to 172.16.1.100. We're also assigning a default IP address, 172.16.1.2, to the MAC address 00:26:c6:21:cf:02. When we start our Windows guest operating system, the DHCP server will assign that address to it, which we can see below.
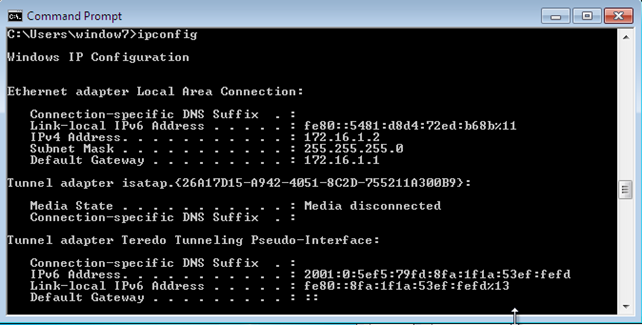
Notice that the IP address is 172.16.1.2, which means that the MAC address must be properly set. We can verify that by showing the detailed settings of our network card seen below:
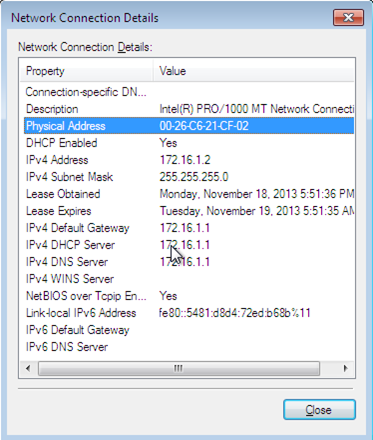
The MAC address is the same as was configured in the DHCP server to set static IP address. We might just as easily set a static IP address directly in the /etc/conf.d/net configuration file, but then we would have to do that for every interface added to the br0 bridge. The host and the guest can now also ping each other, but the Internet is still not accessible from the guest operating system. We can verify that with a simple DNS request by executing an "nslookup google.com" command.
To give guest virtual machines access to the internet, we have to set ip_forwarding to true, so our host will be able to forward packets. To do that, we have to add the following to the /etc/sysctl.conf configuration file and restart the computer.
[python]
sysctl -w net.ipv4.ip_forward=1
Additionally, we also have to configure the firewall iptables to allow private virtual machines to communicate with the outside world by configuring IP masquerading. This makes actual requests from private IP addresses from virtual machines with an actual IP address of the host. We must add the rule to the NAT table's POSTROUTING chain and we must match only the IP packets with a source IP address set to 172.16.1.0/24.
[python]
# iptables -t nat -A POSTROUTING -j MASQUERADE --source 172.16.1.0/24
After that the nslookup command should resolve to IP addresses in guest operating system, as shown below.
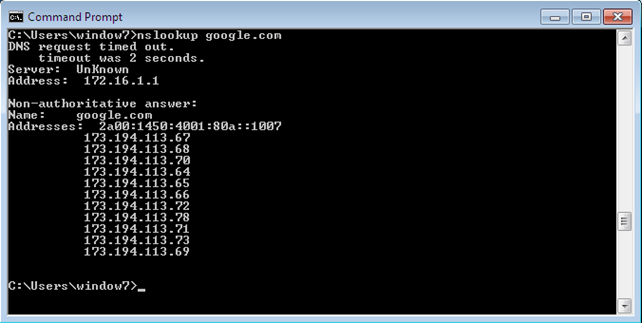
At that time, Internet access from the guest virtual machine is established and we virtual machines are able to connect to the Internet, as well as to other networking devices on the network. The only problem left is connecting other networking devices to the guest virtual machines, which can be achieved by adding a route for 172.16.1.0/24 on the networking device wishing to connect to the virtual machine.
This isn't exactly how bridged networking works in Virtualbox, but it's a close approximation. The only difference is other networking devices not being able to connect to virtual machines with ease, since the virtual machines are actually using different IP address range, but even that can be solved. We can instruct our router DHCP to only give away IP addresses from 192.168.1.2-192.168.1.49 and instruct DHCP to give away IP addresses from 192.168.1.50-192.168.1.99. That way, the IP address range would be the same, but other networking devices would still need another routing entry, so they will know to redirect all packets destined to virtual machines to our host computer, which can forward them further.
At this point, I'm satisfied with the setup I have now and I won't dig any deeper, but I'm sure we can probably (with not much more work) define exactly the same bridged network as it's used with Virtualbox/Vmware.
Conclusion
In this article we've presented the basics of bridged networking in QEMU, which we must understand when trying to create a more advanced networking configuration for our guest virtual machines. We've come quite close to the actual bridged implementation as used with Virtualbox/Vmware by using the "-netdev tap" QEMU configuration option.
References
[1] QEMU-img man page, http://linux.die.net/man/1/QEMU-img.
[2] QEMU-kvm man page, http://linux.die.net/man/1/QEMU-kvm.
[3] Updating the guest initramfs with the virtio driver, http://www.linux-kvm.org/page/Boot_from_virtio_block_device#Windows_XP.
[4] Ebtables, http://ebtables.sourceforge.net/.
What should you learn next?
[5] Saying How To Mangle The Packets, http://www.netfilter.org/documentation/HOWTO/NAT-HOWTO-6.html.

In this Series
- QEMU Windows Guest: Bridged Networking
- Free Valentine's Day cybersecurity cards: Keep your love secure!
- How to design effective cybersecurity policies
- What is attack surface management and how it makes the enterprise more secure
- Is a cybersecurity boot camp worth it?
- The aftermath: An analysis of recent security breaches
- Understanding cybersecurity breaches: Types, common causes and potential risks
- Breaking the Silo: Integrating Email Security with XDR
- What is Security Service Edge (SSE)?
- Cybersecurity in Biden’s era
- Password security: Using Active Directory password policy
- Inside a DDoS attack against a bank: What happened and how it was stopped
- Inside Capital One’s game-changing breach: What happened and key lessons
- A DevSecOps process for ransomware prevention
- What is Digital Risk Protection (DRP)?
- How to choose and harden your VPN: Best practices from NSA & CISA
- Will immersive technology evolve or solve cybercrime?
- Twitch and YouTube abuse: How to stop online harassment
- Can your personality indicate how you’ll react to a cyberthreat?
- The 5 biggest cryptocurrency heists of all time
- Pay GDPR? No thanks, we’d rather pay cybercriminals
- Customer data protection: A comprehensive cybersecurity guide for companies
- Online certification opportunities: 4 vendors who offer online certification exams [updated 2021]
- FLoC delayed: what does this mean for security and privacy?
- Stolen company credentials used within hours, study says
- Don’t use CAPTCHA? Here are 9 CAPTCHA alternatives
- 10 ways to build a cybersecurity team that sticks
- Verizon DBIR 2021 summary: 7 things you should know
- 2021 cybersecurity executive order: Everything you need to know
- Kali Linux: Top 5 tools for stress testing
- Android security: 7 tips and tricks to secure you and your workforce [updated 2021]
- Mobile emulator farms: What are they and how they work
- 3 tracking technologies and their impact on privacy
- In-game currency & money laundering schemes: Fortnite, World of Warcraft & more
- Quantitative risk analysis [updated 2021]
- Understanding DNS sinkholes - A weapon against malware [updated 2021]
- Python for network penetration testing: An overview
- Python for exploit development: Common vulnerabilities and exploits
- Python for exploit development: All about buffer overflows
- Python language basics: understanding exception handling
- Python for pentesting: Programming, exploits and attacks
- Increasing security by hardening the CI/CD build infrastructure
- Pros and cons of public vs internal container image repositories
- CI/CD container security considerations
- Vulnerability scanning inside and outside the container
- How Docker primitives secure container environments
- Top 4 Zapier security risks
- Common container misconfigurations and how to prevent them
- Building container images using Dockerfile best practices
- Securing containers using Docker isolation
- Introduction to container security

Get certified and advance your career
- Exam Pass Guarantee
- Live instruction
- CompTIA, ISACA, (ISC)², Cisco, Microsoft and more!

General security
Free Valentine's Day cybersecurity cards: Keep your love secure!

General security
General security