Learning Pentesting with Metasploitable3 – Part 2

Introduction:
This is the second part in this series of articles on Learning Pentesting with Metasploitable3. We have prepared our lab setup in our previous article. This article shows the Information Gathering techniques that are typically used during Penetration Testing by using Metasploitable3 VM. This phase is crucial during a penetration test as we will proceed to the exploitation phase using the information gathered in this phase and for the same reason, our success rate depends on the amount of useful information gathered in this phase.
Mapping the network:
Often during our assessments, we may have to start with finding the live hosts by scanning the network if the client does not provide us the target IP addresses in scope. This is typically the case with most of the black box assessments.

FREE role-guided training plans
From the first part of this series, we know that the following is the setup we have.
Kali Linux: 172.28.128.4
Metasploitable3: 172.28.128.3
Let's begin with identifying the target IP address of Metasploitable3 using multiple tools.
Checking ARP Cache:
To start with, one of the first things we can do without running any active scans is to check the ARP cache table as shown in the preceding figure.

As you can see, we have the target IP address in our ARP cache table.
Scanning with netdiscover:
Next, let's use a tool called netdiscover to uncover the target IP address.
Since we know that Kali machine's IP is 172.28.128.4, running the following command will discover all the IPs in the subnet.
netdiscover –r 172.28.128.0/24
-r : range

netdiscover sends ARP requests to all the machines specified in the range and shows the details of the live hosts based on the responses.
Scanning with nmap:
When we say Reconnaissance, Nmap is the first tool that comes to our mind. Nmap is used to perform port scanning, service enumeration, OS detection, vulnerability identification (using NSE scripts), etc.
The following is the basic nmap command that is used to scan live hosts in a network.
nmap –sP [IP address]/CIDR

As we can see in the above figure, we found our target IP address using nmap too.
Scanning for TCP Ports:
Scanning for open ports is one of the fundamental steps we have to perform after identifying the live hosts. This step will give us a better understanding of what services are running on the target host.
Running the following command will result in scanning the top 1000 TCP ports and also detecting their service versions.
nmap –Pn –sV [IP address]

What should catch our attention is that there are many web applications running on the server. It is obviously good news as the following cases are commonly seen with management consoles such as JMX-Console, WebLogic administrator console in organizations.
- It is exposed, and no authentication is required to access the administrative functions.
- Default credentials are not changed.
- The outdated version is running, and public exploits are available.
We will dig deeper into these running services later in this series, but let's note that the scan on top 1000 ports revealed ten open ports.
It is always a good idea to scan all the ports in the range 0-65535. That may give us few more ports of our interest.
Let's run one more TCP port scan using the following command.
nmap –Pn –sV [IP address] –p 1-65535

Interestingly, this scan has revealed seven more open ports resulting in a total of 17 TCP ports.
Scanning for UDP Ports:
We should not forget about the UDP scans during an assessment. There can be multiple services that are running on UDP ports, and we should not miss them.
You may run a default UDP scan, but I am going to run a UDP scan on port 161 to check if SNMP service is running. This can be done using the following command.
nmap –sU –sV [IP address] –p 161

Interesting! SNMP service is running with default community string public.
A misconfigured SNMP service like this is a great source of information. SNMP with the default community strings provides valuable information to the attackers.
Open up a new terminal on the attacker's machine and run the following command to obtain the information using the misconfigured SNMP service.
snmp-check 172.28.128.3
The above command will result in a longer output, and I am picking some of the interesting pieces of it.
The following figure shows the system information.

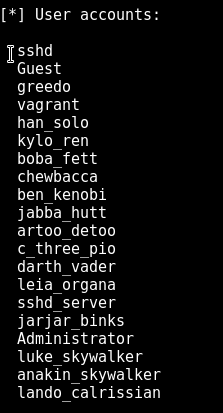
Next is user accounts. Following is the list of user accounts the machine has. This list of user accounts will be quite useful to fire up a tool like Hydra and perform brute force attacks on services like SSH or FTP. You may also try your luck by typing the username in the password field too.
Next, let's take a look at listening ports.
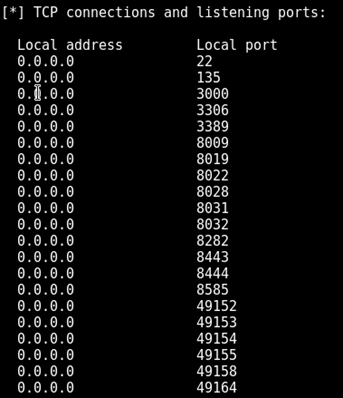
If you notice, there are some additional ports (135, 3389, etc.) listening on the machine but they were not seen during the port scan using nmap. 3389 is the default port for Remote Desktop Service. We did not see the port 3389 during the nmap scan, but SNMP service is showing it as running. Let us log in to the Metasploitable3 server using the credentials vagrant:vagrant and cross verify if 3389 is listening. This can be done by launching a command prompt and running the following command.
netstat –anob | find "3389"

As we can see in the above figure, it is confirmed that port 3389 is listening.
Now, the obvious reason for not being able to see these open ports through nmap scans earlier is Windows Firewall, which is blocking these ports. Just to confirm, we can check the Windows Firewall rules by navigating to
Start > Control Panel > System and Security > Windows Firewall > Advanced Settings > Inbound Rules

As we can see, port 135,139, 3306, 3389 and 445 are blocked by the firewall.
Though the Windows firewall is blocking the port 3389, we got to know that Remote Desktop Service with default port 3389 is running due to the misconfigured SNMP service.
This is where things get interesting. Windows firewall is blocking some ports, and as an attacker, we came to know that those ports are running. How can this blocked port be useful for an attacker?
Let's try to see if we can access Remote Desktop Service in our traditional way using an RDP client in Kali Linux instead of nmap scan. The following command can be used to check this.
rdesktop [target system's IP Address]

Even rdesktop failed to connect, and that is expected.
However, it is still possible to connect to the Remote Desktop Service using SSH Tunneling as shown in the preceding screenshot.

If you notice, we can connect to the target's remote desktop service right from our Kali machine thus bypassing the firewall restriction. This is achieved using SSH Tunneling. Using an SSH tunnel, we forwarded all connections coming to localhost on port 3389 to 3389 of Metasploitable3 using the following command.
ssh –L 3389:localhost:3389 user@target
We will discuss the full details of SSH Tunneling and how one can use this to bypass firewalls when we discuss Post Exploitation concepts in this series.
Coming back to SNMP output, the following figure shows the list of UDP ports running.

Similarly, we can check the running network services to identify from the SNMP-check output to get more detailed information about the services.
If you are interested in some other tools to exploit SNMP, you can read this article written by me earlier.
After finding out the open ports and gathering the best possible information about the target, it can add additional benefit if we run an automated scan using a tool like Nessus/OpenVAS.

FREE role-guided training plans
Conclusion:
In this article, we discussed Information Gathering concepts using Metasploitable3. We have used tools such as netdiscover, nmap, and SNMP-check to gather information about our target machine. The whole idea behind this article is to show that we should gather as much information as possible before jumping into the exploitation phase. In the next article, we will begin with exploiting various vulnerabilities on Metasploitable3.

- 12 pre-built training plans
- Employer-requested skills
- Personalized, hands-on training
In this Series
- Learning Pentesting with Metasploitable3 – Part 2
- Intelligence-led pentesting and the evolution of Red Team operations
- Red Teaming: Taking advantage of Certify to attack AD networks
- How ethical hacking and pentesting is changing in 2022
- Ransomware penetration testing: Verifying your ransomware readiness
- Red Teaming: Main tools for wireless penetration tests
- Fundamentals of IoT firmware reverse engineering
- Red Teaming: Top tools and gadgets for physical assessments
- Red teaming: Initial access and foothold
- Top tools for red teaming
- What is penetration testing, anyway?
- Red Teaming: Persistence Techniques
- Red Teaming: Credential dumping techniques
- Top 6 bug bounty programs for cybersecurity professionals
- Tunneling and port forwarding tools used during red teaming assessments
- SigintOS: Signal Intelligence via a single graphical interface
- Top tools for mobile android assessments
- Top tools for mobile iOS assessments
- Red Team: C2 frameworks for pentesting
- Inside 1,602 pentests: Common vulnerabilities, findings and fixes
- Red teaming tutorial: Active directory pentesting approach and tools
- Red Team tutorial: A walkthrough on memory injection techniques
- Python for active defense: Monitoring
- Python for active defense: Network
- Python for active defense: Decoys
- How to write a port scanner in Python in 5 minutes: Example and walkthrough
- Using Python for MITRE ATT&CK and data encrypted for impact
- Explore Python for MITRE ATT&CK exfiltration and non-application layer protocol
- Explore Python for MITRE ATT&CK command-and-control
- Explore Python for MITRE ATT&CK email collection and clipboard data
- Explore Python for MITRE ATT&CK lateral movement and remote services
- Explore Python for MITRE ATT&CK account and directory discovery
- Explore Python for MITRE ATT&CK credential access and network sniffing
- Top 10 security tools for bug bounty hunters
- Kali Linux: Top 5 tools for password attacks
- Kali Linux: Top 5 tools for post exploitation
- Kali Linux: Top 5 tools for database security assessments
- Kali Linux: Top 5 tools for information gathering
- Kali Linux: Top 5 tools for sniffing and spoofing
- Kali Linux: Top 8 tools for wireless attacks
- Kali Linux: Top 5 tools for penetration testing reporting
- Kali Linux overview: 14 uses for digital forensics and pentesting
- Top 19 Kali Linux tools for vulnerability assessments
- Explore Python for MITRE ATT&CK persistence
- Explore Python for MITRE ATT&CK defense evasion
- Explore Python for MITRE ATT&CK privilege escalation
- Explore Python for MITRE ATT&CK initial access
- Top 18 tools for vulnerability exploitation in Kali Linux
- Explore Python for MITRE PRE-ATT&CK, network scanning and Scapy
- Kali Linux: Top 5 tools for social engineering
- Basic snort rules syntax and usage [updated 2021]

Get certified and advance your career
- Exam Pass Guarantee
- Live instruction
- CompTIA, ISACA, (ISC)², Cisco, Microsoft and more!

Penetration testing
Intelligence-led pentesting and the evolution of Red Team operations

Penetration testing
Red Teaming: Taking advantage of Certify to attack AD networks
Penetration testing
Penetration testing
Ransomware penetration testing: Verifying your ransomware readiness