IoT: Hacking a Smart Bulb with Bluetooth - Advanced

This is the 2nd part of the Bluetooth hacking blog. I hope you have gone through the 1st part. If not, please go through it.
Let's start.

What should you learn next?
Short Primer on CSR – In this section, we will be learning a bit about CSR and its interaction with the bulb so you get an idea how we can connect and interact with the bulb using CSR.
As said above, CSR is like a USB, so we connect it to the laptop. First, we will have to check whether the laptop detects CSR dongle or not. It can be checked using hciconfig command as shown below -

Above is the result obtained when CSR is not connected to the laptop. hci0 is the default interface of the laptop Bluetooth.

Above is the result obtained when CSR is connected to the laptop. hci1 is the new interface obtained when we connect CSR to the laptop. Thus, our dongle has been detected by the laptop.
Next Step – Connecting to the Bulb
Whenever you want to connect to any device over Bluetooth, we first turn on the Bluetooth of our device. We have already turned on the Bluetooth of our laptop.
Now we will have to scan for available Bluetooth devices. In our case, the laptop will scan for Bulb using dongle. For that, we will make use of following command – sudo hcitool lescan
lescan will scan for the available Bluetooth devices in the vicinity as shown below –
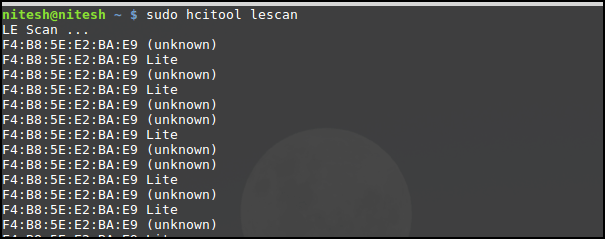
As shown above, we have obtained the MAC address of the bulb – F4:B8:5E:E2:BA:E9
Now we can connect to the bulb using following command – sudo gatttool –I –b device_mac_address
Command Explanation –
-I à making the connection interactive
-b à specifying the mac address of the device.
The screenshot for the same is shown below –

If you have a look at the above screenshot, in the second line I have written connect for connecting to the bulb. The last line (blue color) shows we have connected to the bulb successfully.
Now let's check for services and characteristics of the bulb. For listing the services and characteristics, we use "primary" and "characteristics" command respectively as shown below –

As seen above, the bulb has four services and 21 characteristics. If we read the primary services, 1st service starts from handle (attr handle) 0x0001 and ends at the handle (end grp handle) 0x000b. You may be thinking starting value is 0x0001 and ending value is 0x000b. What about the values between 0x0001 and 0x000b??? Right??
If you remember we have discussed service and characteristics and I have said within services are various characteristics. So, the missing values between 0x0001 and 0x000b are various characteristics which the bulb offers. You can verify the same by reading the output of characteristics command. If you have a look at it, we can see 0x0002, 0x0004 till 0x000a. After 0x000a should come 0x000b but what we have is 0x000d. Where is 0x000b and 0x000c??
Have a look at the primary command output. You will see 0x000b (end grp handle) and 0x000c (attr handle). Thus, 0x000b is the value at which 1st primary service ends and at 0x000c second primary service starts.
What we deduce is - 1st primary service starts from 0x0001 and ends at 0x000b, and it has five characteristics starting from 0x0002 and ends at 0x000a.
Similarly, we can determine other services and their characteristics being used by the bulb.
Handle – Every service and characteristics have a unique field called Handle. The handle is a unique identifier for identifying the service or characteristic. Thus, all services and characteristics are referenced using the handle. Also, if we want to write or change the value of any characteristic we need to identify the handle for it and write or read the value using the particular handle value.
Most Important Point – Some of the services and characteristics are predefined by Bluetooth SIG and is implemented as is in IoT devices. Some services and characteristics are implemented by the vendor in their device. Now the question is what you should do when you are pentesting an IoT device. You can either exploit predefined services by Bluetooth SIG, or you can exploit vendor defined services. Right??
If you exploit predefined services, then the vendor is not responsible for it, and he/she will simply ask us to report it to SIG since he/she has nothing to do with predefined services and also, he/she cannot fix it. Thus, you should always exploit vendor defined services
Now the next question is – how to identify vendor services and predefined services?
Just have a look at the output of characteristics command in the above screenshot – If you read the value of "uuid" field, some of the values are 0000fff1, 0000fff2….0000fff6. The rule is – For vendor-specific characteristics, values should always start with "f, " i.e., 0000f*** series. Thus, if you come across values starting from "f" then you should realize this is a vendor specific characteristic, and we have to exploit these characteristics only. I hope it is crystal clear to identify vendor specific and SIG specific characteristics.
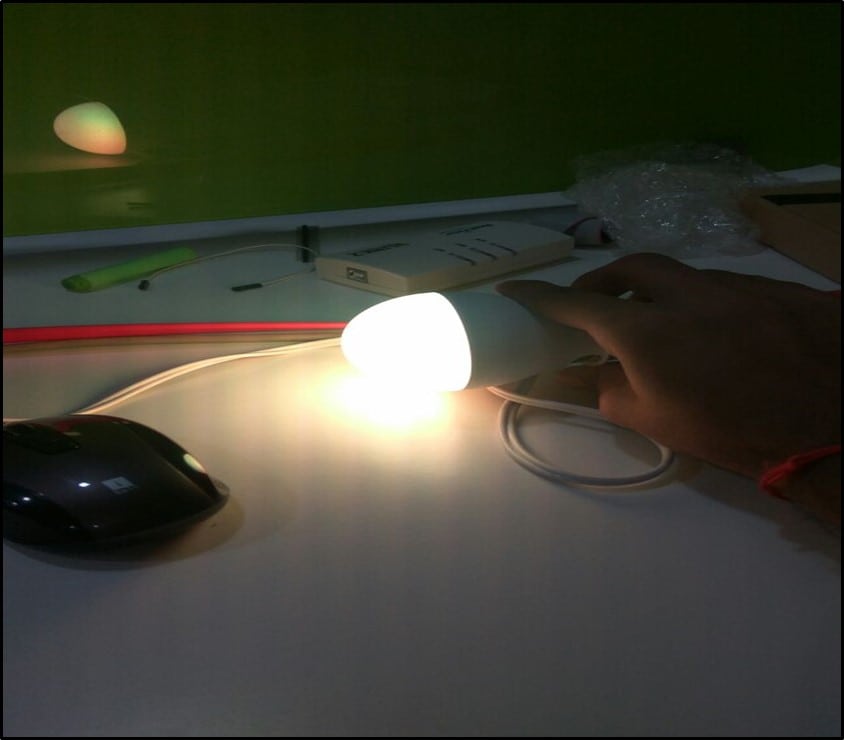
About the Bulb -
The bulb is a smart bulb by Reos. It can be controlled using a mobile application named "Reos Lite." The mobile application allows a user to change the color, receive alerts and change the bulb into various modes. Sample picture of the bulb and mobile application are shown below -


Now I will interact with the bulb using the Android application over Bluetooth. At the same time – all the interaction between the bulb and mobile phone is getting recorded and saved in the mobile automatically.
The first step is to connect to the bulb. For this, mobile should have Bluetooth enabled, and then we connect our mobile to the Bulb through the mobile application as shown below -
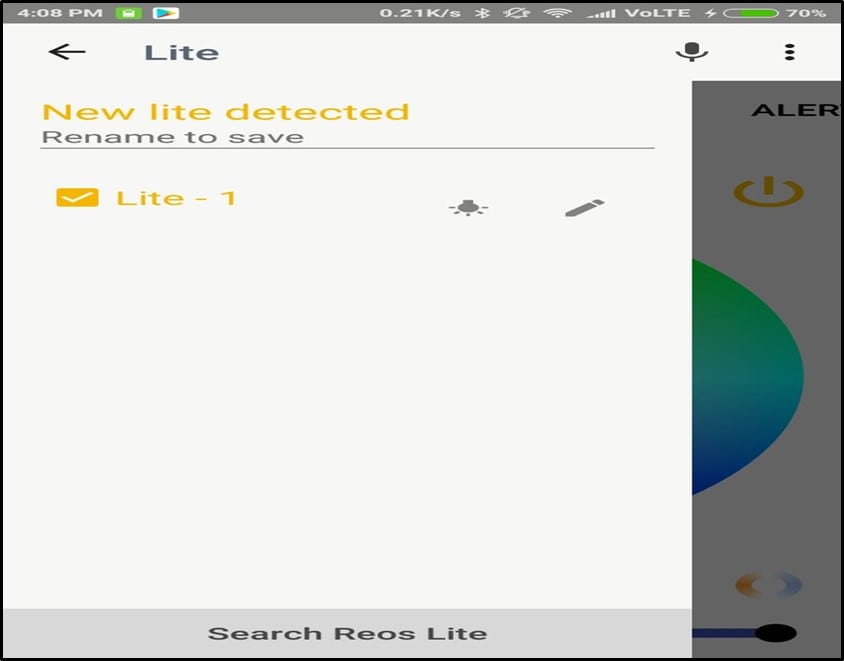
As seen we are connected to the bulb, and the name is "Lite-1".
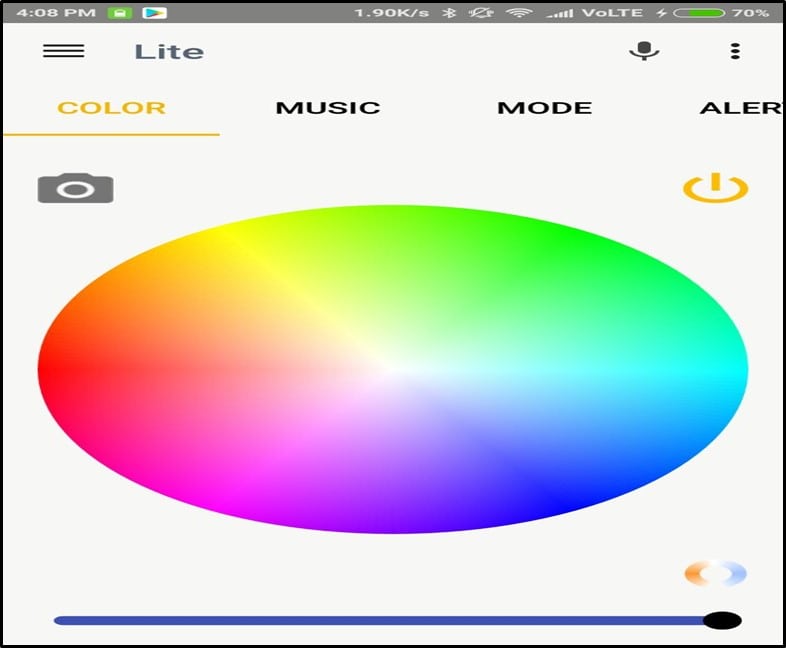
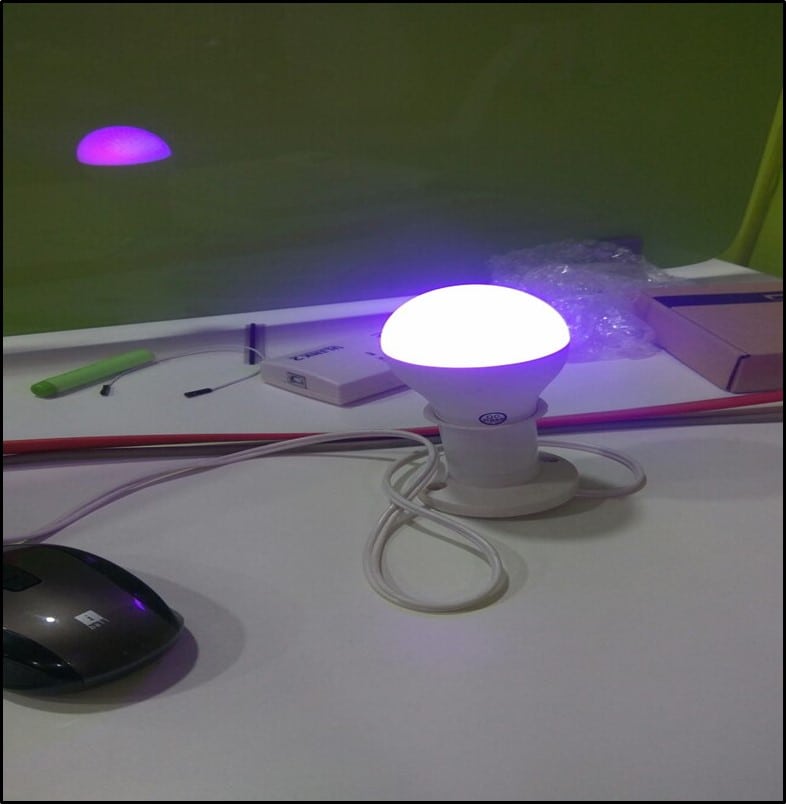
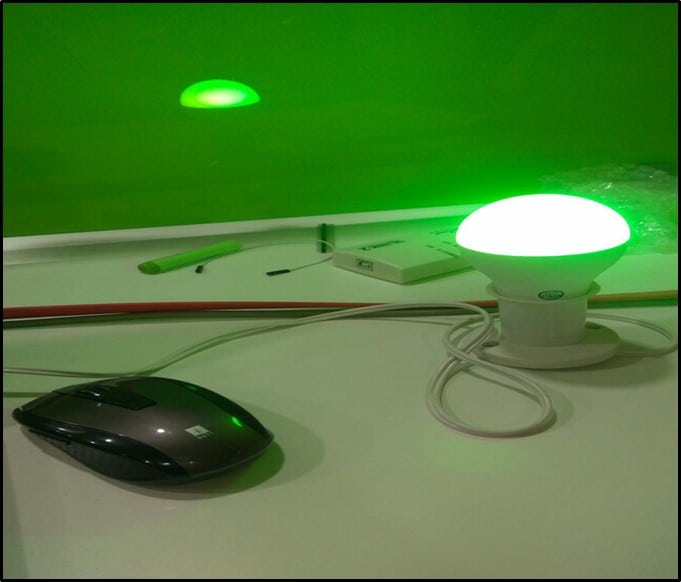
Now I am changing the color of the bulb. Sample pictures for the same are shown below –

This was just a small overview of the bulb and mobile application interaction.
Exploitation – Here starts the exploitation part:
As of now, we have changed the color of the bulb, and I have captured and transferred the Bluetooth packet to my computer.
Now I am using Wireshark to open the log file as shown -
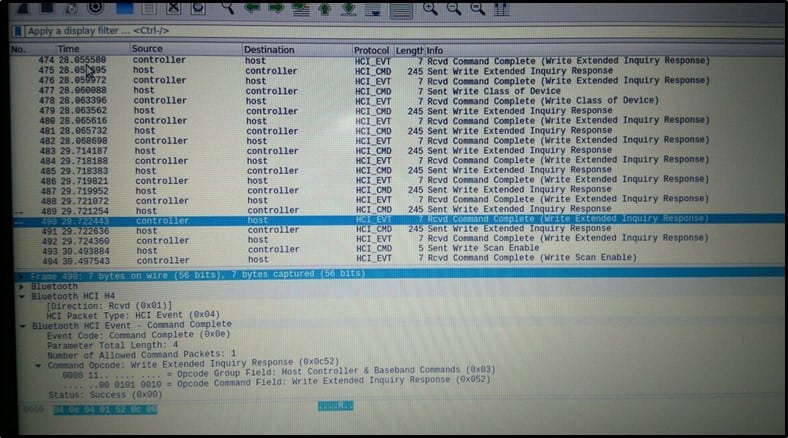
There were around 650-700 packets. Analyzing all of them was not at all an easy task. I was looking for a particular packet which was writing data to the bulb. By data, I mean changing the color of the bulb in our case.
This is what I did -
If we have a look at protocol column, there are three protocols – HCI_EVT, HCI_CMD, and ATT. I just googled their functionality and what I came to know is – only ATT protocol is used for writing data to the bulb while the remaining two protocols are used as Host Controller Interface(HCI). That is the only information I needed, and I quickly understood I have to go through the ATT packets.
Sample ATT Packet is shown below –

In the above diagram, I have highlighted few things. Starting from the top – First highlighted part is the write command from localhost (mobile) to remote (bulb). If we read the Info column - we see something called handle and the value for the handle is 0x002b. It means something was written on the handle 0x002b by the mobile application. In the above section, we have used mobile application for changing the color of the bulb. Thus, we can say for changing the color of the bulb we refer to handle 0x002b.
Now coming to the third highlighted part – we see a field named Value and the value of the "Value" field is something 0f0d03…….
What we understand is - the value 0f0d03…… was used on the handle 0x002b for changing the color of the bulb. Similarly, I went through other ATT packets and made a list of "Value" field as shown below –

Now we have the values of the "Value" field and the handle with us, what we can do is – we can simply replay the packet. For replaying the packet, we can use various tools, but we will be using Bluetooth CSR as discussed above. Also, we need handle value for changing the color which is 0x002b as shown above.
Now, I have connected CSR to the laptop, and I can change the color of the bulb by issuing following command – char-write-req handle_value value
where,
handle_value – is the value of handle
value – value for changing the color.
Same has been shown in the below screenshot –

As seen above, we just have to specify the handle, i.e., 0x002b and the value of the "Value field" for changing the color of the bulb as shown below –
Become a Certified Ethical Hacker, guaranteed!
Get training from anywhere to earn your Certified Ethical Hacker (CEH) Certification — backed with an Exam Pass Guarantee.
So, this is how I was able to change the color of the bulb and control the bulb remotely.
Enroll in an Ethical Hacking Boot Camp and earn two of the industry’s most respected certifications — guaranteed.
- CEH exam voucher
- PenTest+ exam voucher
- Exam Pass Guarantee
- Live online hacking training
In this Series
- IoT: Hacking a Smart Bulb with Bluetooth - Advanced
- The rise of ethical hacking: Protecting businesses in 2024
- How to crack a password: Demo and video walkthrough
- Inside Equifax's massive breach: Demo of the exploit
- Wi-Fi password hack: WPA and WPA2 examples and video walkthrough
- How to hack mobile communications via Unisoc baseband vulnerability
- How to build a hook syscall detector
- Top tools for password-spraying attacks in active directory networks
- NPK: Free tool to crack password hashes with AWS
- Tutorial: How to exfiltrate or execute files in compromised machines with DNS
- Top 19 tools for hardware hacking with Kali Linux
- 20 popular wireless hacking tools [updated 2021]
- 13 popular wireless hacking tools [updated 2021]
- Man-in-the-middle attack: Real-life example and video walkthrough [Updated 2021]
- Decrypting SSL/TLS traffic with Wireshark [updated 2021]
- Dumping a complete database using SQL injection [updated 2021]
- Hacking clients with WPAD (web proxy auto-discovery) protocol [updated 2021]
- Hacking communities in the deep web [updated 2021]
- How to hack Android devices using the StageFright vulnerability [updated 2021]
- Hashcat tutorial for beginners [updated 2021]
- How to hack a phone charger
- What is a side-channel attack?
- Copy-paste compromises
- Hacking Microsoft teams vulnerabilities: A step-by-step guide
- PDF file format: Basic structure [updated 2020]
- 10 most popular password cracking tools [updated 2020]
- Popular tools for brute-force attacks [updated for 2020]
- Top 7 cybersecurity books for ethical hackers in 2020
- How quickly can hackers find exposed data online? Faster than you think …
- Hacking the Tor network: Follow up [updated 2020]
- Podcast/webinar recap: What's new in ethical hacking?
- Ethical hacking: TCP/IP for hackers
- Ethical hacking: SNMP recon
- How hackers check to see if your website is hackable
- Ethical hacking: Stealthy network recon techniques
- Getting started in Red Teaming
- Ethical hacking: IoT hacking tools
- Ethical hacking: BYOD vulnerabilities
- Ethical hacking: Wireless hacking with Kismet
- Ethical hacking: How to hack a web server
- Ethical hacking: Top 6 techniques for attacking two-factor authentication
- Ethical hacking: Port interrogation tools and techniques
- Ethical hacking: Top 10 browser extensions for hacking
- Ethical hacking: Social engineering basics
- Ethical hacking: Breaking windows passwords
- Ethical hacking: Basic malware analysis tools
- Ethical hacking: How to crack long passwords
- Ethical hacking: Passive information gathering with Maltego
- Ethical hacking: Log tampering 101
- Ethical hacking: What is vulnerability identification?
- Ethical hacking: Breaking cryptography (for hackers)

Get certified and advance your career
- Exam Pass Guarantee
- Live instruction
- CompTIA, ISACA, (ISC)², Cisco, Microsoft and more!


