IDA Functions

Ida is a very good disassembler and its automatic analysis upon loading the executable is quite intense and useful, but nevertheless, it can't always be right. Sometimes we need to correct the way Ida detects the functions; usually Ida is unable to properly determine where the function starts/ends, because of the compiler optimizations that screws with the disassembly. With Ida, we can add a new function where the function doesn't exist yet or we can delete the existing function. Usually we would want to add existing instructions that do not already belong to a function and point at the starting address where we want the function to start and choose the Edit - Functions - Create Function option. If the function already exists at that location, the Create Function will be greyed out and we won't be able to create a function; we can just edit the function. Then the Ida will automatically scan forward looking for the return statement of the function; wherever it finds one, there will be the end of the function. When the function is initialized; the start and end of the function is found, Ida will analyze it and save the additional data to the database.
We may also delete a function by choosing the Edit - Functions - Delete Function, which can be used if we think that Ida didn't correctly detect the function.

Let's take a look at an example function. First let's present the graphical overview about the function that can be seen on the picture below:
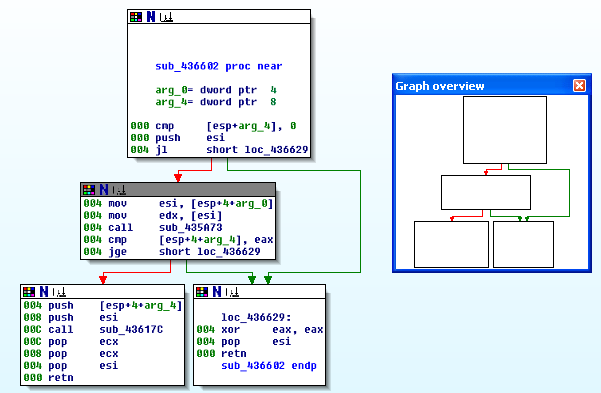
Okay, we can see that the function is quite simple, it starts at an address 0x00436602; note that the function is taken from the Putty executable. Now let's also present the disassembled view of the function in question; this can be seen in the picture below:
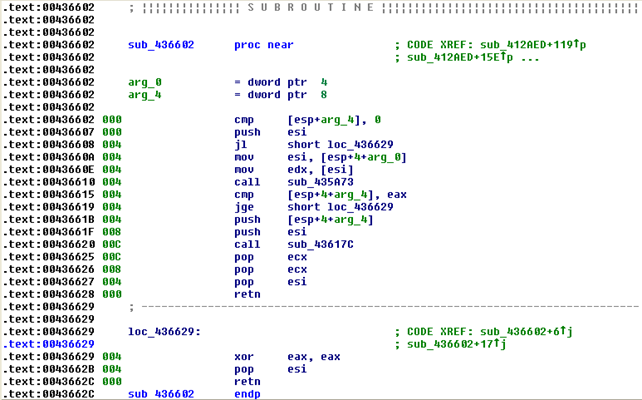
Notice that the function starts with a comment that this is a SUBROUTINE; this is a clear indicator that this is indeed a function. We can also see that it takes two parameters, the arg_0 and arg_4. And it ends at two locations, the 0x00436628 and 0x0043662C (because of the retn instruction), but the latter address is higher and is therefore the rightful location of the function end. If we now click at any location inside the function and select Edit - Functions - Edit function, we will see a dialog as shown on the picture below:
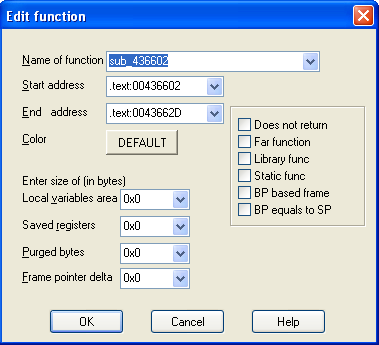
We can see that the function starts at the address 0x00436602 and ends at 0x0043662D, which is one byte ahead of our retn instruction. This is because 0x0043662C is the address where the actual instruction is being stored, but we need to look past that to also include that instruction, which is why the function actually ends at the address 0x0043662D. On the picture above, we can also change the name of the function from sub_436602 to something else entirely, like myfunction. There are also other options presented, like:
- local variable area: presents the number of bytes used for local variables; in our case there is no local variables, which is why the number is 0x0.
- saved registers: presents the number of bytes used to save register values when entering the variable; registers should be saved right after the saved return address and right before any local variables. If the executable saves the registers after the local variables or somewhere in between then the registers will add the number of bytes to the local variable area. In our case the function doesn't store and register values, which is why the saved registers value is 0x0.
- purged bytes: presents the number of bytes removed from the stack when the function returns; usually, the ret n instruction is associated with cleaning up the stack and this is also the number that will be presented as the purged data value. In our case, the function doesn't need to clean the stack, which is why there's only the ret instruction and there are no purged bytes.
- frame pointer delta: is used when the function frame pointer doesn't point to the beginning of the local variables stored on the stack, but rather somewhere in the middle. The frame pointer delta then presents the number of bytes the frame pointer has been moved. This usually happens upon compiler optimizations to speed up the program.
There are also other presented variables that are explained below:
- does not return: checked when the function does not return to the caller, so the execution will not continue at the saved return address.
- far function: checked when the function in question is located on another segment.
- library func: checked when the function is a library function.
- static func: checked when the function is a static function.
- BP based frame: checked when the function uses a frame pointer to get the values of function arguments and local variables.
- BP equals to SP: checked when the frame pointer and stack pointer point to the same location.
Transforming Data
Ida does a great job at presenting the data of the disassembly. But what exactly is data? The data are all the values used inside the program: the integer 32-bit values, the pointers, the strings, the data array, custom data types (structs or classes), and so on. Ida has a great deal of knowledge about known data types, so it can present them in the disassembly, which provides us clearer overview about the program.
Nevertheless, Ida will sooner or later stumble upon the data type that it doesn't recognize or it may recognize it incorrectly, which is why we also have a way to change the data types. We can specify the data sizes that are used throughout the program by choosing Options - Setup data types. That dialog box is presented on the picture below:
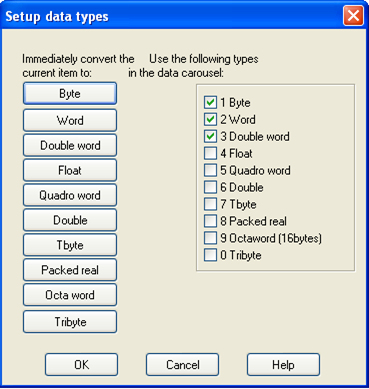
The buttons on the left can be used to immediately change the data type of the currently selected item in the disassembly. The options on the right are used if we right-click on the data item and want to reformat it to some other data type: the options checked on the list on the right will be presented to us. We can therefore use the presented options to take one data type and change it into another. The data type is any location within the disassembled program that describes data.
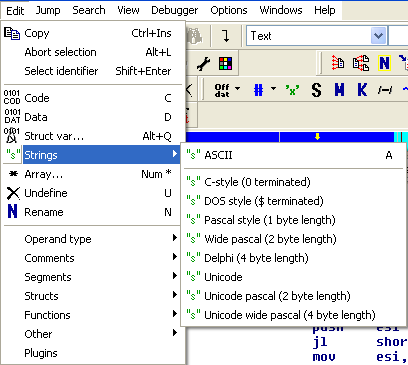
We can also change how the string data types are found and represented in a program. By default, the strings are recognized by the ending null character. But we can also redefine how Ida should search for strings by clicking on the Edit - Strings option and choose a value. The predefined values of how to represent a string are presented on the picture below:
We can use the options above to change the formatting of the specific string within the disassembled program. We can configure the options for strings by choosing the Options - ASCII style string, which is presented on the picture below:
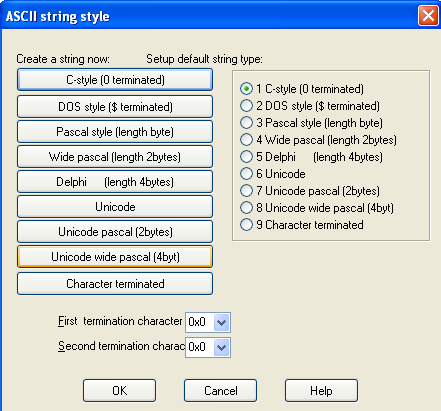
The buttons on the left change the string style of the currently selected string under the cursor, whereas the options on the left specify the default string style of the executable.
Conclusion
In the article we presented various graphs available within Ida; the first graph was able to present the function's building blocks, which can be useful if we want to perform a detailed analysis of a particular function. There's also a function graph that presents how all the functions in the program are called, but it isn't very useful if we're reverse engineering a complex binary program. The Xrefs to and Xrefs from graphs are useful to show us the function that called the current function and functions that are called by the current one, but those two graphs also suffer from the same problem as the other graphs: if the program is too complex we won't really be able to get anything useful from it. This is why the Ida provides another graph that can be customized to our needs. It has various options that instruct Ida to present only a partial graph and not whole graph, which can be quite useful in complex program where other graphs would be too clustered and hard to comprehend.
Keep in mind that we presented a lot of options in this tutorial and to know them all would require patience and a lot of practice, but it's worth it. I recently switched to Ida from OllyDbg and Immunity Debugger, but I've found Ida very useful and I'm not regretting that I took the time to learn it.
References

Become a certified reverse engineer!
[1] Chris Eagle, The IDA Pro Book: The unofficial guide to the world's most popular disassembler.
- Exam Pass Guarantee
- Live expert instruction
- Hands-on labs
- CREA exam voucher
In this Series
- IDA Functions
- Kali Linux: Top 8 tools for reverse engineering
- Stacks and Heap
- Top 8 reverse engineering tools for cyber security professionals [updated 2021]
- Arrays, Structs and Linked Lists
- Reverse engineering obfuscated assemblies [updated 2019]
- Crack Me Challenge Part 4 [Updated 2019]
- Writing windows kernel mode driver [Updated 2019]
- Assembly programming with Visual Studio.NET
- The basics of IDA pro
- Reverse engineering tools
- Hacking tools: Reverse engineering
- Reverse engineering a JavaScript obfuscated dropper
- Reverse Engineering – LAB 3
- Exploiting Protostar – Stack 0-3
- Reversing Binary: Spotting Bug without Source Code
- Reverse engineering virtual machine protected binaries
- Introduction to Reverse Engineering
- Pafish (Paranoid Fish)
- Extending Debuggers
- Encrypted code reverse engineering: Bypassing obfuscation
- Buffer Overflow Attack & Defense
- Invoking Assembly Code in C#
- iOS Application Security Part 32 - Automating tasks with iOS Reverse Engineering Toolkit (iRET)
- Hooking IDT
- A Guide to Debugging Android Binaries
- Kernel debugging with Qemu and WinDbg
- Shared Folders with Samba and Qemu
- Testing Hooks via the Windows Debugger – An Introduction to RevEngX
- Reverse Engineering with Reflector
- Applied Reverse Engineering with IDA Pro
- Injecting spyware in an EXE (code injection)
- Disassembler Mechanized Part 4: DLL Injector Development
- Disassembler Mechanized Part 3: Code Injection Operation
- Debugging TLS callbacks
- Disassembler Mechanized Part 2: Generating C# and MSIL code
- System address map initialization in x86/x64 architecture part 2: PCI express-based systems
- Coding of Disassembler
- Applied cracking & byte patching with IDA Pro
- .NET reversing with Reflexil
- Reversing firmware part 1
- Reverse Engineering with Reflector: Part 1
- Remoting Technology
- Reverse engineering with OllyDbg
- Understanding Session Fixation
- Optimizing Managed Code Execution
- File system manipulation
- The BodgeIt store part two
- The BodgeIt store part one
- Understanding Windows Internal Call Structure
- Pin: Dynamic Binary Instrumentation Framework

Get certified and advance your career
- Exam Pass Guarantee
- Live instruction
- CompTIA, ISACA, (ISC)², Cisco, Microsoft and more!

Reverse engineering
Reverse engineering
Reverse engineering
Top 8 reverse engineering tools for cyber security professionals [updated 2021]
Reverse engineering