Ew! Skuzzy CTF Walkthrough

In my last article, we exploited a vulnerable machine from the vulnhub.com. That article must have given you some idea about hacking a machine without having much knowledge about it. In this article, we will complete another CTF named "Ew! Skuzzy" from vulnhub.com. As per the description given by the author on the VulnHub.com, the difficulty level of this machine is Intermediate. The Downloadable URL of this virtual machine is given below.
https://download.vulnhub.com/ewskuzzy/Ew_Skuzzy.ova.tgz

What should you learn next?
After downloading and configuring the machine in the virtual box, we get the IP address of the machine which can be seen in the screenshot given below (The Virtual Machine IP Address may be different in your case as it depends on the network configuration). So, let's start by running a Nmap scan to gather information about open ports. We get three open ports by the nmap scan.

Here we get two interesting ports, i.e. port 80 and 3260 port. Let's start with the port 80.

As can be seen in the above screenshot, the default page gives the basic information about this machine like we might get multiple flags on this machine if we follow the right track. As I did not get any other URL to proceed further, so I ran dirbuster on the target machine and got the following output.

Further, I checked the results, but there was nothing interesting. So, I shifted my attention to the ISCSI port. This was something new for me as I had never worked on ISCSI service. So, I did some research on the ISCSI service and found that I will have to configure a package on my machine to interact with the ISCSI service. So, I configured the package by using the apt-get utility. It can be seen in the screenshot given below.

After configuring the required package, I found a few commands which could be used for logging into the server.

In the above screenshot, you may see, that I have run two commands. The first command was used to discover the ISCSI service. The result shows that the ISCSI service is active on the target machine. The second command is used to log in to the server. The result shows that the login to the target machine was successful because the credentials were not configured on the target machine.
Now that we have connected to the target machine let's run another command to explore it further.

First, I used the fdisk -l command which lists down all the attached disks on the system. We can see a partition which is virtually connected to the local machine. Let us mount it and check it out.
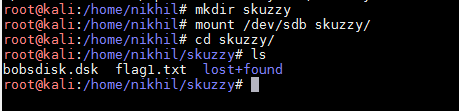
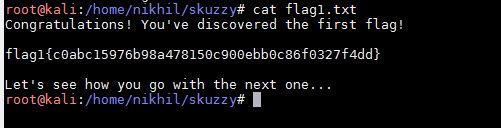
In the above screenshot, Firstly I have created a directory 'skuzzy' then I have used the mount command to mount it to my local machine. After that, I checked the files in the directory and found the first flag of the CTF. You can see the flag in the below screen-shot.
I started exploring other information on the directory and found that there is another disk bobsdisk.dsk in that folder. So, I mounted that disk also. You can see that in the below screenshot.

There were a few files in this folder. Let's view the files one by one. First of all, I opened the ToAlice.eml file. The file content can be seen in the below screenshot.

After reading the file, you may see that this a puzzle kind of message which contains a clue that there is an encrypted file which is using AES 256-bit encryption and the key can be brute forced. The other encrypted file must be ToAlice.csv.enc. Moreover, in the end, we can see that there is another flag that is the FLAG 2.
After this, I installed a package to brute force the key that is mentioned in the message above. This is shown in the below screenshot.

Once the package got successfully installed on my machine, I used another command to brute force on the encryption key. It can be seen in the screenshot given below.

As we can see in the above screenshot, we have finally found the key. Let us use this key to decrypt the file ToAlice.csv.enc. You can see this in the below screenshot.

The file has been successfully decrypted. It again gives some kind of hash values and one more flag that is the FLAG 3. Apart from the flag, there are two hash values. It hints that these are web pages. So, I run the first file on my browser, and you may see the screenshot below.

The URL shows just image content. After analyzing the source code of the page, I found a base64 encoding string in the comment section. The string is shown in the below screenshot.

After this, I used the burp decoder to decode the base64 value, and the result can be seen in the below screenshot.

This message does not give any clue to proceed further. I also tried Dirbuster on this URL to identify further entry points in the application but could not find anything.
So, I ran the second hash value on my browser. It was another website. This can be seen in the screenshot given below.
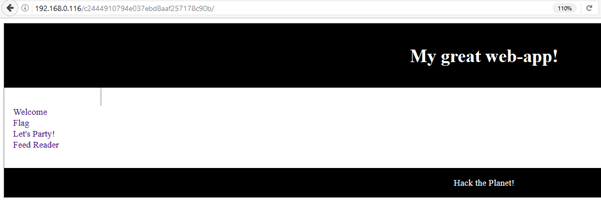
After quickly reviewing the site, I observed that there is a 'Feed Reader' URL in the application which seems to be vulnerable for RFI (remote file inclusion)/LFI (Local File Inclusion). It can be seen in the screenshot given below.

So, I started the Apache service on my machine and tried to run the code on the target machine, but there was again a hurdle. It was asking for authentication key. It can be seen in the following screenshot.

So, this means that I cannot succeed by RFI so instead of that I tried LFI to check the source code of the PHP files. However, it was also not easy to read the files through LFI. You may check the message in the below screenshot.

After that, I noticed that there was base64 encoding on every web page, so I decided to check the contents of all the pages to find any further clue. I used the PHP base64 filter for LFI which prints the base64 encoded source code on the browser. I tried this with each and every file and got the required result in a flag.php file. It can be seen in the below screenshot.

After decoding the flag.php file, I got the FLAG 4. The fourth flag can be seen in the screenshot given below.

There is one more message in the file which hints that we have almost reached the shell. After this, I checked the source code of another file reader.php.

I quickly decoded it using the Burp decoder. There was some interesting code in the file. That is shown in the following screenshot.

From the above code, we can understand two important points which we need to remember to proceed further.
- We need to find a key to put in the key parameter for the RFI to work on reader.php
- The key has 47 characters and is sha256 encoded.
- Moreover, the sha256 of the key is also given in $secret variable in the code.
The Flag 4 is exactly 47 characters, and when I checked the sha256 of FLAG 4, it exactly matched to the one which is given in the $secret variable.
After that, I used the PHP reverse shell to take the reverse shell of the target machine. This can be seen in the screenshot given below.

The PHP reverse shell granted me access, but that was only apache access. I need to escalate it to root to get the shell access finally. This would be the last step for this machine. I ran my favorite two commands; this can be seen in the following screenshot.

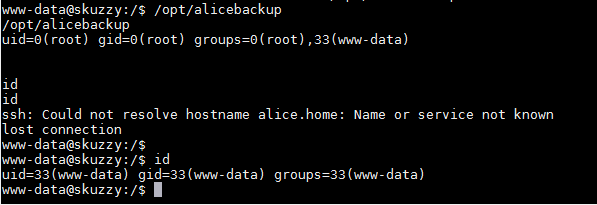
First one is a python command which gives stable access on the target machine. After that, I ran another command which gave a list of all the root programs that can be run as a normal user. After taking a quick look at the programs, I noticed there was one program which was new opt/alicabackup, and this was configured by the user. So, I ran this program, and you may see the result in the below screenshot.
When we see the output of this command, it shows that the program is closed. So, I decided to debug the program. First of all, I tried the strings command to check available strings in the program. You may check the strings from the below screenshot.

In the above screenshot, we can see that there is a clue. There is an scp call which seems interesting. The trick is to create a small shell script named scp and modify the path environment variable.

Finally, we have the root as well as the FLAG 5.
This was a really challenging VM with lots of hints and flag. I hope this might have helped you. We will learn to solve some more CTFs in my articles.
References:
https://www.vulnhub.com/entry/ew_skuzzy-1,184/
https://www.vortex.id.au/ctf/Ew_Skuzzy.ova.tgz (Download URL 1)
https://download.vulnhub.com/ewskuzzy/Ew_Skuzzy.ova.tgz (Download URL 2)
What should you learn next?
https://download.vulnhub.com/ewskuzzy/Ew_Skuzzy.ova.tgz.torrent (Torrent Download of the VM)
In this Series
- Ew! Skuzzy CTF Walkthrough
- THE PLANETS EARTH: CTF walkthrough, part 1
- EMPIRE BREAKOUT: VulnHub CTF walkthrough
- JANGOW: 1.0.1: CTF walkthrough
- FINDING MY FRIEND 1 VulnHub CTF Walkthrough - Part 2
- FINDING MY FRIEND: 1 VulnHub CTF Walkthrough - Part 1
- HOGWARTS: DOBBY VulnHub CTF Walkthrough
- HACKATHONCTF: 2 VulnHub CTF Walkthrough
- EMPIRE: LUPINONE VulnHub CTF Walkthrough, Part 2
- EMPIRE: LUPINONE VulnHub CTF Walkthrough, Part 1
- HOGWARTS: BELLATRIX VulnHub CTF walkthrough
- Beelzebub: 1 VulnHub CTF walkthrough
- CORROSION: 1 VulnHub CTF Walkthrough Part 2
- CORROSION: 1 Vulnhub CTF walkthrough, part 1
- EVILBOX: ONE VulnHub CTF Walkthrough
- DEATHNOTE: 1 VulnHub CTF walkthrough
- MONEY HEIST: 1.0.1 VulnHub CTF walkthrough
- HACKADEMIC: RTB1 VulnHub CTF walkthrough
- DOUBLETROUBLE 1 VulnHub CTF walkthrough, part 3
- DOUBLETROUBLE 1 VulnHub CTF walkthrough, part 2
- DOUBLETROUBLE 1 Vulnhub CTF Walkthrough Part 1
- LOOZ 1 VulnHub CTF Walkthrough
- DIGITALWORLD.LOCAL: FALL Vulnhub CTF walkthrough
- HACKER KID 1.0.1: VulnHub CTF walkthrough part 2
- HACKER KID 1.0.1 VulnHub CTF Walkthrough Part 1
- HACKSUDO: THOR VulnHub CTF walkthrough
- THOTH TECH 1: VulnHub CTF Walkthrough
- FUNBOX UNDER CONSTRUCTION: VulnHub CTF Walkthrough
- Hackable ||| VulnHub CTF Walkthrough Part 1
- JETTY: 1 VulnHub CTF Walkthrough
- FUNBOX: SCRIPTKIDDIE VulnHub capture the flag walkthrough
- HMS: 1 VulnHub CTF Walkthrough
- DR4G0N B4LL: 1 VulnHub CTF Walkthrough
- PYLINGTON 1: VulnHub CTF Walkthrough
- DARKHOLE: 1 VulnHub CTF Walkthrough
- R-TEMIS: 1 VulnHub CTF walkthrough
- HACKABLE: II CTF Walkthrough
- MOMENTUM: 1 VulnHub CTF walkthrough
- NASEF1: LOCATING TARGET VulnHub CTF Walkthrough
- HACKSUDO: PROXIMACENTAURI VulnHub CTF Walkthrough, Part 2
- THE PLANETS: MERCURY VulnHub CTF Walkthrough
- HACKSUDO: PROXIMACENTAURI VulnHub CTF Walkthrough, Part 1
- VULNCMS: 1 VulnHub CTF walkthrough part 2
- VULNCMS: 1 VulnHub CTF Walkthrough, Part 1
- Ripper: 1 VulnHub CTF walkthrough
- PYEXP 1: VulnHub CTF walkthrough
- ADMX: 1.0.1: VulnHub CTF Walkthrough
- COLDDBOX: EASY VulnHub CTF Walkthrough
- HACKSUDO: 1.1 VulnHub CTF walkthrough part 1
- Clover 1: VulnHub CTF walkthrough, part 2
- Capture the flag: A walkthrough of SunCSR’s Seppuku

Get certified and advance your career
- Exam Pass Guarantee
- Live instruction
- CompTIA, ISACA, (ISC)², Cisco, Microsoft and more!

Capture the flag (CTF)
Capture the flag (CTF)
Capture the flag (CTF)

Capture the flag (CTF)