Cryptography 101 with SSL

To Start With
Whenever you are connecting to a site via HTTPS, the complete session is encrypted and all the application data is sent over a secured encrypted channel.

Learn Applied Cryptography
HTTPS (Hypertext Transfer Protocol Secure) is not a protocol in itself but the SSL/TLS protocol tied on top of HTTP protocol. So basically, Transport Layer Security (TLS) and Secure Socket Layer (SSL) are the protocols which provide secure communication over the internet between the client and the server.
But how does this all work? From the moment you type https://www.example.com and it downloads the website for you, there are plenty of operations going in the background.
Key Concepts
Before we proceed, let's discuss why we need a secure channel and which key concepts are involved here.
Consider a scenario where Alice wants to perform an online transaction with Bob and she is sharing her credit card information with Bob. So her main worries would be:-
- Confidentiality/Privacy: Whatever information Alice shares with Bob, she wants to keep it private and confidential and safe from any eavesdropper.
- Authentication: Alice also wants to make sure that whatever information she wants to share with Bob is actually shared with Bob and not with an imposter acting as Bob.
- Message Integrity: The other point is that the message which Alice has sent to Bob should reach Bob without being altered on the way. Payment of Rs.500 shouldn't become payment of Rs.5000 when it reaches Bob.
There are various cryptographic algorithms and terms needed to understand these key concepts in an SSL session. We will look at those pieces briefly one by one and then join them together to form the complete protocol.
Cryptographic Terms
-
Encryption
The process of converting a plaintext message into a ciphertext message (non-readable format) with the help of secret key is called encryption and converting ciphertext to plaintext is called decryption. This ciphertext message is meaningless to any eavesdropper without the key for decryption.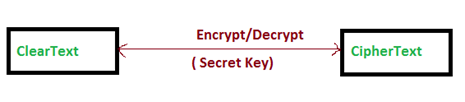
This helps to achieve the confidentiality of the message sent from Alice to Bob. There are two ways commonly used for encryption: Asymmetric and Symmetric. In asymmetric, two different keys are used for the process while in symmetric encryption, both parties use the same key. -
Symmetric Encryption
Here, Alice and Bob both use the same private key to encrypt and decrypt the message and any eavesdropper without the access to the key, can't read the original message.
E Secret Key (Plaintext) = Ciphertext
D Secret Key (Ciphertext) = Plaintext
-
Public Key Cryptography/Asymmetric Encryption
This makes use of pair of keys, public key and a private key. Alice would use Bob's public key to encrypt the message, which can only be decrypted by Bob's private key. Even though Bob's public key is accessible to everyone, no one except Bob can decrypt the message without the private key. Hence Alice can be sure that message would only be read by Bob.
E Public Key (Plaintext) = CipherText
D Private Key (CipherText) = Plaintext
-
Key Exchange Algorithms
As we have seen in the description above, the whole secret lies in the private key. So how would Alice and Bob share the private keys? For symmetric encryption, the private key needs to be shared between both the communicating parties and, to achieve that, various key exchange algorithms have come into the picture, such as Diffie Hellman and RSA. They use public key cryptography (asymmetric key) to share the secret private key.
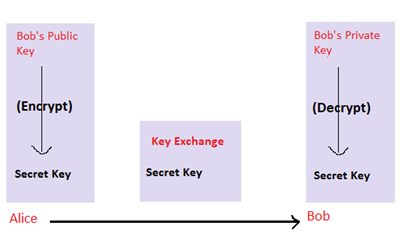
Here, the secret key is encrypted by Alice, using Bob's public key, and sent to Bob. Bob then decrypts this using his private key and gets the secret key.
-
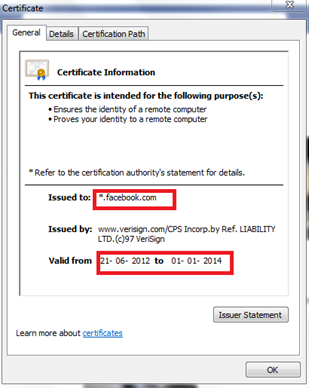
Digital Certificates
Now, to use Bob's public key, Alice should be aware of the Bob's public key. The problem now is how to discover other's public key. The solution here is Bob's digital certificate, which contains information about him and his public key. When Alice contacts Bob for the first time, the certificate would be downloaded by Alice's browser and the browser will extract the public key.
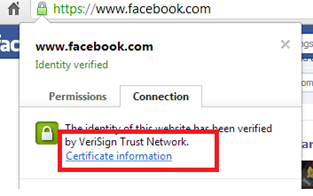
Sample certificate for facebook.com looks like:
And the public key can be found in the details: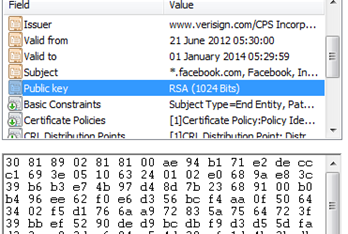
- PKI/CA
The next problem is to determine that the public key and the certificate belong to the user they claim to belong to. To solve this problem, the cryptography world has PKI (Public Key Infrastructure), which is a collection of people, policies, software, and hardware to manage everything related to digital certificates. They certify the association of a public key with the domain and its owner. There are various key components such as the Certification Authority (CA), Validation Authority (VA), Registration Authority (RA), etc., involved in this process. -
Certification Authority (CA)
CA's are basically the third-party authorities which are trusted both by Alice and Bob (i.e., by the owner and the user). CA's bind the public key to the owner by digitally signing the certificate with their own private key, saying that "this public key belongs to this owner, in our case Bob." If the user (i.e., Alice), trusts the CA and can identify its authentication by its signature, it would trust Bob with its public key.
For example, if you click on the green lock beside https, you can check that the certificate is verified by VeriSign, which is a third-party authority.
-
Digital Signature/ Message Integrity
In the last section, I referred to the certificate being digitally signed by CA. How does a digital signature work? With a digital certificate, we want to be sure of authenticity and message integrity. This is achieved by a public key crypto algorithm.Let's consider a scenario where a website wants to send its "Terms of Use" document to the clients. The purpose here is not the privacy of the document but authenticity and integrity. The site's public key is available to all the clients by its digital certificate. Steps involved would be: - Site owner would take a hash of the entire document and this hash is called message digest.
- He would encrypt this message digest with his private key. This is called his digital signature.
Digital Signature = E Private Key (Message Digest)
- He would then send the document to his clients signed with his digital signature.
- The clients receive the digital signature of the site along with the document.
- They would calculate the hash of the document received using the same hashing algorithm.
- Clients would then decrypt the digital signature with the site's public key. After decryption, they would get the message digest sent by site owner.
Message Digest = D Public Key (Digital Signature)
- Clients would then match the hash of the document created by them with the message digest.
- And if they match, this ensures that document was received unhampered and the signature was legitimate.
This ensures authentication as well as message integrity.
Similarly, in the old scenario, when the browser receives Bob's certificate signed by CA, they will match the integrity of the certificate and authenticity of the CA by verifying the signature.
SSL Protocol
At the application layer, when Alice queries any HTTPS site, she gets a digital certificate from the site and a secure communication channel is established. But, at lower layers of TCP/IP stack, there are plenty of packets travelling between Alice and site to initiate that secure channel.
The SSL handshake plays a crucial role in the complete process by syncing client and server as to the encryption methods and keys to use for further communication. Let's look at the detailed SSL process. Wireshark has been used to capture the packets.
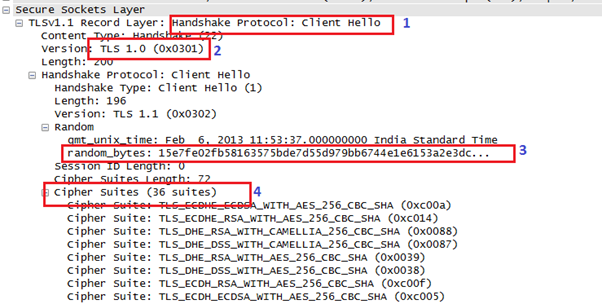
Step 1: Client Hello
The client's browser sends the website a handshake record with multiple fields as seen below.
Step 2: Server Hello
Server responds with "Server Hello" handshake record.
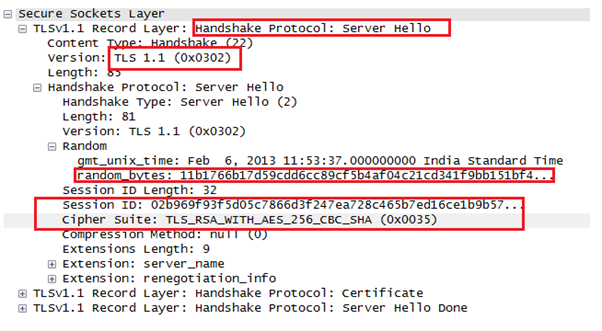
Here the server replies with the TLS version and its own 28 random bytes, which will be used in conjunction with the client's 28 random bytes later on. The server also creates a new session and sends the client the session ID for further communication. The server decides on the cipher suite that will be used for secure communication between them. As we can see, here it is TLS_RSA_WITH_AES_256_CBC_SHA. RSA is the key exchange algorithm used for digital certificate, AES_256 is the symmetric key encryption algorithm, CBC is the cipher mode, and SHA is the hashing algorithm used for message integrity.

Along with the handshake record, the server also sends a certificate record with the issuer and owner details, the validity of the certificate and the owner's public key.
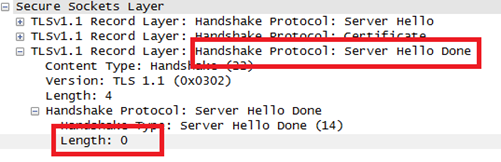
Sometimes, even clients need to authenticate themselves to the server with the certificates. In this case, the server sends a "Server Hello Done" message to the client saying it doesn't need any certificate.
Step 3: Compute Premaster Secret
Once the client receives the server's certificate, it authenticates the details and, after the authentication is successful, the client moves on to the next step. Here, the client generates a 48-byte random number using a Pseudo Random Generator called premaster secret. This is to be securely communicated to the server, since this will be further used in the keys generation.
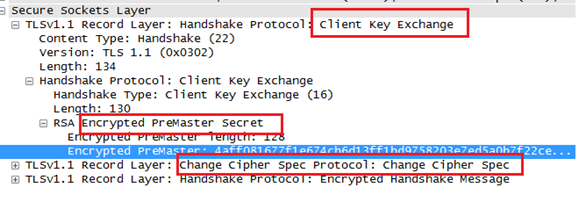
As seen before, the server has picked up "RSA" as the key exchange mechanism and, using RSA, this premaster secret would be communicated to the server by the client. This premaster secret would be used to compute master secret and key block. Step 4 and Step 5 describe the computation.
There is another record sent, "Change Cipher Spec," which indicates that after this, the communication will be encrypted using the agreed-upon keys and algorithm.
The last record sent by the client in this communication is "Encrypted Handshake Message," containing hash and MAC of the previous handshake messages using the SHA hashing algorithm.
Step 4: Compute Master Secret
By now, both sides know the 48-byte premaster secret, the 28-byte client random number and the 28-byte server random number. Using these values and a pseudo random number generator, both client and server calculate the 48-byte master secret value.
As per the specification, the 48-byte master secret is calculated as:
master_secret = PRF(pre_master_secret, "master secret",ClientHello.random + ServerHello.random)
Step 5: Compute Key Block
With the above calculated master secret, both client and server calculate the key block.
As per the specification:
key_block = PRF(SecurityParameters.master_secret,"key expansion",
Here, master_secret is the entropy source. This key_block is then divided into different blocks to obtain different sets of keys, such as a client write MAC secret, a server write MAC secret, a client write key, a server write key, a client write IV, and a server write IV.
Step 6: Server confirms Encryption
The server tries to decrypt the "Encrypted Message" record sent by client and verifies the hash and MAC. If it doesn't match, the SSL handshake fails and the connection is closed.
If the server successfully verifies the encryption, it sends the client a "Change Cipher Spec" record, saying that "All the messages after this would be encrypted." Along with this, it also sends Encrypted Handshake Message."
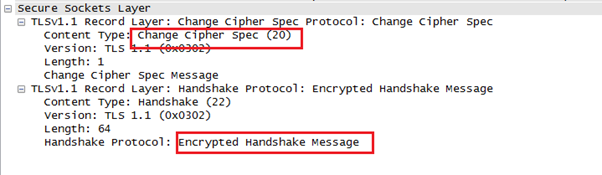
The client performs similar verification with the server's handshake message and, once successful, proceeds to the last step.
Step 7: Encrypt Application Data
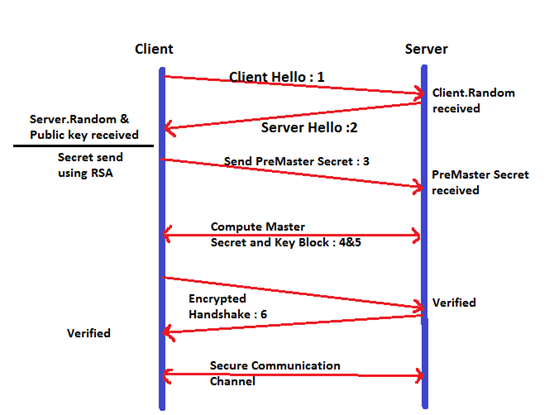
Using the keys calculated above, the client and server initiate a secure communication and data further sent is encrypted.

This picture shows the overall communication:
Learn Applied Cryptography
References:-
- Specification : http://tools.ietf.org/html/rfc2246#page-43
- Public Key Crypto : http://en.wikipedia.org/wiki/Public-key_cryptography
- PKI : http://en.wikipedia.org/wiki/Public_key_infrastructure
- SSL : http://en.wikipedia.org/wiki/Secure_Sockets_Layer
Learn applied cryptography and cryptanalysis
What you'll learn:
- Cryptography fundamentals
- Public key infrastructure
- Blockchain technology
- SSL and TLS
- And more
In this Series
- Cryptography 101 with SSL
- How does hashing work: Examples and video walkthrough
- How does encryption work? Examples and video walkthrough
- Planning for post-quantum cryptography: Impact, challenges and next steps
- Beginner’s guide to the basics of data encryption
- Structures of cryptography
- Role of digital signatures in asymmetric cryptography
- What is homomorphic encryption?
- Encryption and etcd: The key to securing Kubernetes
- Quantum cyberattacks: Preparing your organization for the unknown
- An Introduction to asymmetric vs symmetric cryptography
- Breaking misused stream ciphers
- Entropy calculations
- Blockchain and asymmetric cryptography
- Security of the PKI ecosystem
- Elliptic curve cryptography
- Methods for attacking full disk encryption
- Introduction to Public Key Infrastructure (PKI)
- Introduction to the TLS/SSL cryptography protocol
- Introduction to Diffie-Hellman Key Exchange
- Introduction to the Rivest-Shamir-Adleman (RSA) encryption algorithm
- Introduction to full disk encryption
- 8 reasons you may not want to use VPNs
- Rivest Cipher 4 (RC4)
- Understanding stream ciphers in cryptography
- Cryptography Errors
- Understanding block ciphers in cryptography
- How to mitigate Credential Management Vulnerabilities
- How To Exploit Credential Management Vulnerabilities
- Poor Credential Management
- How Is Cryptography Used In Applications?
- Decrypting Downloaded Files
- Introduction to hash functions
- Introduction to Asymmetric Cryptography
- The Advanced Encryption Standard (AES)
- Fundamentals of symmetric and asymmetric cryptography
- Case Studies in Poor Password Management
- The ultimate guide to encryption key management
- Principles of cryptography
- Encryption vs Encoding
- Introduction to Cryptanalysis
- Secure Credential Management
- Introduction to Blockchain
- Blockchain Technology
- Virtual Private Networks (VPNs)
- Public Key Infrastructure: Architecture & Security
- Hash Functions
- Asymmetric Cryptography
- Fundamentals of Cryptography
- Symmetric Cryptography
- Introduction to cryptography

Get certified and advance your career
- Exam Pass Guarantee
- Live instruction
- CompTIA, ISACA, (ISC)², Cisco, Microsoft and more!

