Cracking the Defender: The Deobfuscated Code

Introduction
So far we've taken a look at the obfuscation routine and how it deobfuscates the instructions in the loc_4033D1. At the beginning point, the overview navigator will look like it shown on the picture below:


Upon executing the program, new functions will be discovered because the code is deobfuscated. The new overview navigator will look like this:

We can see that there are additional blue regions that correspond to functions. Additionally, there is also more instructions (brown area) rather than data items (grey area); this is because the data instructions were changed into the code instructions as a result of a code deobfuscation. We've also already determined that the deobfuscated instructions are from 0x004034DD – 0x004041FD with occasional data elements.
Analyzing Deobfuscated Code
The first instructions of the deobfuscated code are presented on the picture below:
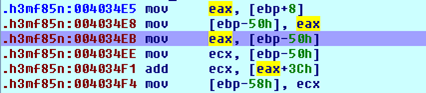
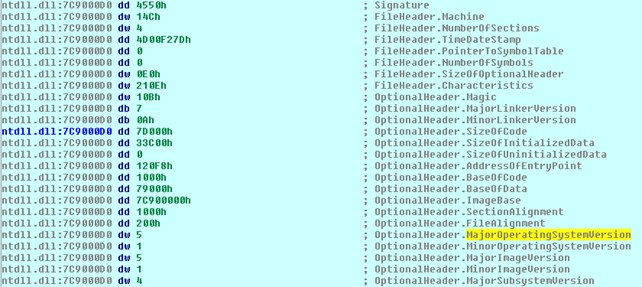
The first instruction loads the previously saved base address of the ntdll.dll library into register eax and then stores it at stack the offset location [ebp – 50]. The same value 0x7C900000 is then stored into the ecx register and the value stored at [0x7C90003C] is added to 0x7C900000. Let's take a look at which value is located at the address 0x7C90003C; we can see that on the picture below: it's 0x000000D0. So the value in the ecx register that's later stored at the [ebp-58] is 0x7C9000D0.

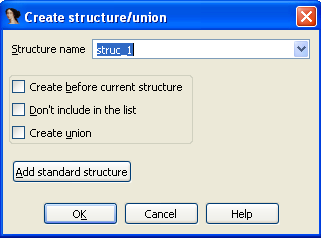
What just happened? It appears that the program has just read some value from the ntdll.dll library's header (notice the "This program cannot be run in DOS mode" on the picture above – this is a clear indication that we're looking at the PE executable file: either exe or dll: in this case this is ntdll.dll DLL file). Then we can also apply the IMAGE_DOS_HEADER to the ntdll.dll. We can do that by first going to the Structures window and pressing the Insert key, which will open the following pop-up dialog:
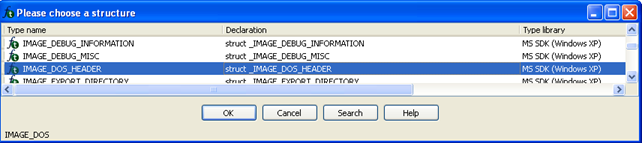
We need to click on the "Add standard structure" button and select the IMAGE_DOS_HEADER structure, as seen on the picture below. After adding that structure, we can apply it to the various memory locations in Ida's database.
Now we need to apply that structure to the base address of the ntdll.dll file by going to its base address 0x7C900000 and clicking on the Edit – Struct var, selecting IMAGE_DOS_HEADER and pressing OK. After that, we must also expand the structure at the 0x7C900000 location by pressing the '+' key. The applied structure can be seen on the picture below:
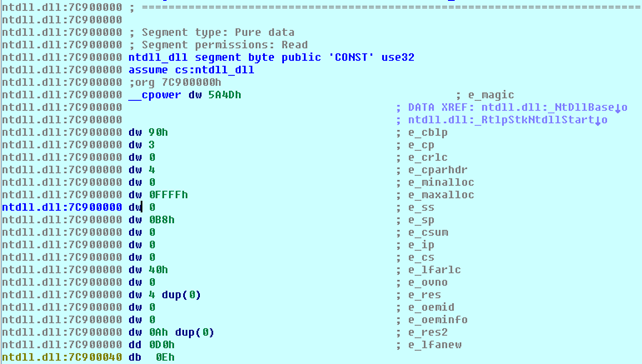
Now the values in the structure have comments that correspond to the actual members of the structure; we no longer only have some bytes that don't mean anything, but have the comments appended and we immediately know what each byte means. Let's also take a look at the corresponding bytes, presented in the hex view:

We can see that the bytes in the hex view and in the disassembly view are exactly the same. We must keep in mind that the db means 1 byte, dw 2 bytes and dd 4 bytes. The only weird thing is the "dw 4 dup(0)", which means that we're operating with an array that has 4 elements all initialized at 0 and every element is 2 bytes in size (hence the dw); this means that the total size of the array is 8 zero bytes. If we calculate the bytes from the hex view, we can see that their number actually corresponds to the disassembly view. The bytes that we're interested at address 0x7C90003C, which are the "dd 0D0h" bytes, means that we have 4 bytes where 3 bytes are 0x00 and the last byte is 0xD0. These bytes correspond to the e_lfanew entry in the DLL header. If we Google what this field means, we'll find an explanation that the e_lfanew is a 4-byte offset into the file where the PE file header is located. This field is used to find the PE file header in the DLL file, which occurs soon after that MSDOS header.
We've just found out that the PE header is located at the offset 0x30, which means that we can apply the IMAGE_NT_HEADERS structure the same way as we did before with the IMAGE_DOS_HEADER structure to the address 0x7C9000D0. If we do that we'll get the following comments which explain the PE header structure in detail:
So the initial code segment, located at address 0x004034E5, is loading the address of the PE header of the ntdll.dll file into the register ecx and later to the [ebp-58h] location. Let's present the picture again, just to be clear about that.

Now let's take a look at the next piece of code presented on the picture below:
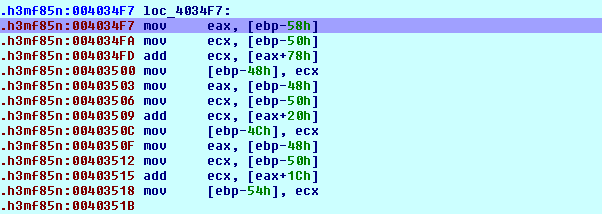
We can see that we're loading the address 0x7C9000D0 into register eax and address 0x7C900000 into register ecx and then adding the value stored at address 0x7C9000D0+0x78 to the ntdll base address. The actual address we're accessing is the 0x7C900148. That address is presented on the picture below (never mind that the actual address isn't right, this is just how Ida presents the addresses where we've applied structures too: all have the same address as the base address of the structure):

This means that we're adding the value 0x3400 to the value 0x7C900000, which makes the 0x7C903400 address. After that, we're also storing the same value into the [ebp-48h] and into the eax register. The next thing that happens is we're adding the value at 0x7C903420 to 0x7C900000 and storing the result into ecx. The value at 0x7C903420 address holds the value 0x48B8, which is presented below:

This means that we're storing the value 0x7C9048B8 into the [ebp-4Ch]. In the next step, we're also reading the value 0x3428 from the picture above and storing the address 0x7C903428 it into the [ebp-54h].
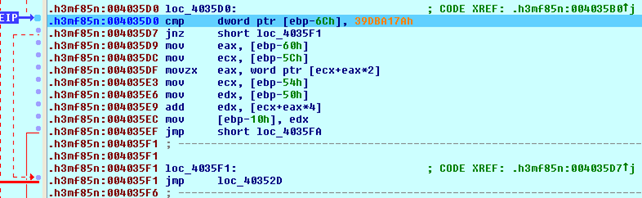
Here we can see that we're comparing the value from [ebp-6Ch] to the 0x39DBA17A constant. If the value is not equal, we're jumping to loc_4035F1, which consequentially jumps back to loc_40352D. The value in the [ebp-6Ch] is being calculated right before that code, and is presented on the picture below:
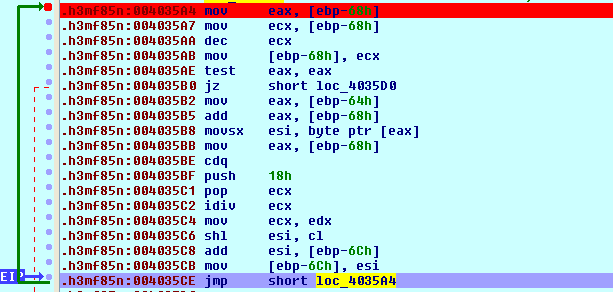
We can see that we're taking the value from [ebp-68h], decreasing it by 1 and storing it at the same location. When that location contains the value 0, we're breaking out of the loop and jumping to the loc_4035D0 location, which was presented on the previous picture that compares the value at [ebp-6Ch] to constant 0x39DBA17A. We won't go into details about this function, but we must keep in mind that this is the function that calculates the checksum of the ntdll's export function and then compares it to the 0x39DBA17A constant below. Rather than evaluating this instruction by instruction, we can set the breakpoint at the 0x004035E9 instruction, which calculated the exact address of the function we're looking for and is only accessible when the checksum matches. The picture below presents the registers after executing that instruction:
It's clear from the picture above that the program calls the NtAllocateVirtualMemory function from the ntdll.dll library file. The address of that function is stored at the [ebp-10h], which is later called at the 0x0040367C address: "0040367C call dword ptr [ebp-10h]". The code that follows copies the ntdll file into the previously reserved address space in memory and then calls the function sub_4030E5, which we can see on the picture below:

The sub_4030E5 Function
Let's analyze the sub_4030E5 function just for the fun of it. Let's present the start of the disassembly instructions of that function:
The function is first creating a new stack frame and reserving 0x310 bytes for the local variables. After that, we're entering a very interesting loop, as can be seen on the picture below:
With the jz instruction we're jumping to the "mov esi, edx" instruction, which stores the value from register edx into register esi. But the important thing is what happens next; we comparing the value in esi with the constant 0x190BC2. If the values are equal, we're ending the loop and moving on with the program execution. Otherwise, we're continuing the execution of the loop. First, we're adding the constant 8 to the address in the ecx register and reading the value from that address into register esi, then comparing that value with the value in ebx. When entering that block for the first time, the ecx register contains the value 0x087E0000. This is why we're actually reading the value from the address 0x087E0008 and other consecutive addresses. The values at those addresses are presented on the picture below:

The ebx register contains the value 0x00000000, which means that we'll be reading every other value from address 0x087E0008 onwards until reading the value 0x00190BC2 or reaching the end of the data structure (the 0x00000000 value). If we place a breakpoint on the address 0x0040311E and run the program, the breakpoint will be hit right at the moment when the value at the address stored in register ecx matches the 0x00190BC2 constant. When that happens, the value in ecx register is 0x087E0420. If we take a look at the memory address,, we can see that this is truly the case:

What's happening in this case is that the program is going through the export table of the ntdll.dll library trying to match the checksum of a function with constant 0x00190BC2.
Here we're reading the next 4 bytes from the currently found address into register ecx. This means that the register ecx will contain the value 0x0000C1AE (take a look at the previous image where we've dumped the memory). This is also the reason why we've been reading every other 4 bytes and leaving the middle four bytes alone when matching the checksum; I guess the middle 4 bytes hold some specific information regarding the previous checksum value, so that every checksum value has it's corresponding additional 4 bytes used for something which we currently don't know yet. Then we're adding the value in register edi to the value in register ecx and storing the value on the stack at offset [ebp+var_C]. Later, in the same function, we're calling this value, which means that we've probably calculated some kind of address.

If we place a breakpoint to that function and run the program, the breakpoint is hit right at the moment where we can step into the function being called. When we step into the function, we're actually executing the following code:

We're pushing the value 0x00156DC5 to the stack and returning to that function. The function then starts… as presented on the picture below:
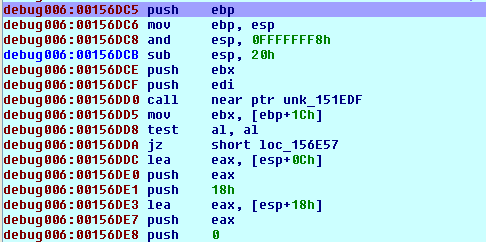
We won't go into details what this function does; let's just say that it calls multiple functions, which we'll take a look at here. The function calls the following functions:
[plain]
debug006:00156DD0 call near ptr unk_151EDF
debug006:00156DED call off_174998
debug006:00156E09 call near ptr unk_16C977
debug006:00156E6D call off_174990
Let's take a look at the code of every single function call. First, we have the function at address 0x00151EDF. Its code is presented below:

We can see that function does nothing special; it just initialized the stack for the function call to data cross-reference off_141280 that holds the value of the kernel32_WaitForSingleObject function:

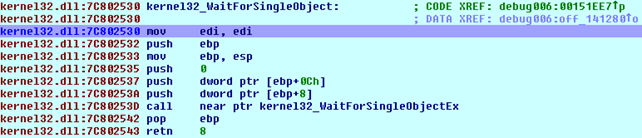
If we step into the function, it's clear that the function WaitForSingleObject from the kernel32 DLL is being called. This can be seen on the picture below:
Let's continue to the next function at address 0x00174998, where it's immediately evident that the NtQueryInformationProcess function is being called:

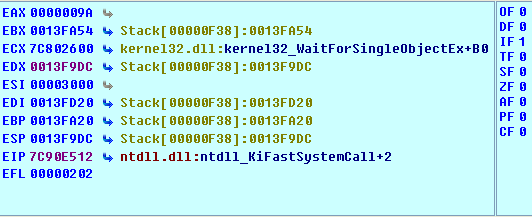
If we step into the function at address 0x7C90D808, it's clear that the KiFastSystemCall function is being called, as seen on the picture below:

We can see that we're moving the value of esp into the register edx. The registers, before executing the sysenter instruction, are presented below:
Upon stepping into the sysenter instruction, we're immediately taken to the previously called function, which is NtQueryInformationProcess. You can see that on the picture below (notice the EIP pointing at the retn instruction after the function call):

Let's take a look at the next function call at address 0x0016C977. The code at that function is too big to fit it into a picture, which is why I'm presenting only the function calls at that function, which can be seen below:
[plain]
debug006:0016C977 ; ---------------------------------------------------------------------------
debug006:0016C977
debug006:0016C977 loc_16C977: ; CODE XREF: debug006:00156E09#p
debug006:0016C984 call off_141270
debug006:0016C99F call off_1411D8
debug006:0016C9B5 call off_141214
debug006:0016C9C0 call off_1412BC
debug006:0016C9CA leave
debug006:0016C9CB retn 4
The call to off_141270 causes subsequent calls to the following functions: kernel32_CreateToolhelp32Snapshot, kernel32_GetCurrentProcessId, kernel32_CloseHandle and others. The call at off_1411D8 causes the program to call kernel32_Thread32First. Finally, the call at off_1412BC causes the program to call kernel32_CloseHandle.
The function call at off_174990 calls the instructions presented on the picture below:

This essentially calls the function loc_7C90D1B8 presented below:

And those instructions then call the KiFastSystemCall presented on the picture below:

Conclusion
We've seen how to deobfusate the obfuscated code in Ida and presented the way how to apply various structures to the executable, which may come in handy if the malware is trying to grab some value from the executable PE header. We've also taken a look at the sub_4030E5 function that calls various system functions in the kernel32.dll library.
References

Become a certified reverse engineer!
[1] Chris Eagle, The IDA Pro Book: The unofficial guide to the world's most popular disassembler.
- Exam Pass Guarantee
- Live expert instruction
- Hands-on labs
- CREA exam voucher
In this Series
- Cracking the Defender: The Deobfuscated Code
- Kali Linux: Top 8 tools for reverse engineering
- Stacks and Heap
- Top 8 reverse engineering tools for cyber security professionals [updated 2021]
- Arrays, Structs and Linked Lists
- Reverse engineering obfuscated assemblies [updated 2019]
- Crack Me Challenge Part 4 [Updated 2019]
- Writing windows kernel mode driver [Updated 2019]
- Assembly programming with Visual Studio.NET
- The basics of IDA pro
- Reverse engineering tools
- Hacking tools: Reverse engineering
- Reverse engineering a JavaScript obfuscated dropper
- Reverse Engineering – LAB 3
- Exploiting Protostar – Stack 0-3
- Reversing Binary: Spotting Bug without Source Code
- Reverse engineering virtual machine protected binaries
- Introduction to Reverse Engineering
- Pafish (Paranoid Fish)
- Extending Debuggers
- Encrypted code reverse engineering: Bypassing obfuscation
- Buffer Overflow Attack & Defense
- Invoking Assembly Code in C#
- iOS Application Security Part 32 - Automating tasks with iOS Reverse Engineering Toolkit (iRET)
- Hooking IDT
- A Guide to Debugging Android Binaries
- Kernel debugging with Qemu and WinDbg
- Shared Folders with Samba and Qemu
- Testing Hooks via the Windows Debugger – An Introduction to RevEngX
- Reverse Engineering with Reflector
- Applied Reverse Engineering with IDA Pro
- Injecting spyware in an EXE (code injection)
- Disassembler Mechanized Part 4: DLL Injector Development
- Disassembler Mechanized Part 3: Code Injection Operation
- Debugging TLS callbacks
- Disassembler Mechanized Part 2: Generating C# and MSIL code
- System address map initialization in x86/x64 architecture part 2: PCI express-based systems
- Coding of Disassembler
- Applied cracking & byte patching with IDA Pro
- .NET reversing with Reflexil
- Reversing firmware part 1
- Reverse Engineering with Reflector: Part 1
- Remoting Technology
- Reverse engineering with OllyDbg
- Understanding Session Fixation
- Optimizing Managed Code Execution
- File system manipulation
- The BodgeIt store part two
- The BodgeIt store part one
- Understanding Windows Internal Call Structure
- Pin: Dynamic Binary Instrumentation Framework

Get certified and advance your career
- Exam Pass Guarantee
- Live instruction
- CompTIA, ISACA, (ISC)², Cisco, Microsoft and more!

Reverse engineering
Reverse engineering
Reverse engineering
Top 8 reverse engineering tools for cyber security professionals [updated 2021]
Reverse engineering