Cloud VPN Security Recommendations

Introduction
A VPN (Virtual Private Network) enables connections between clients and servers from multiple different internal networks across a public network (like the Internet) as if the nodes were located in the same private network. Since the communication is transferred across the public network, it must be properly encrypted to prevent eavesdropping. When a user is connected to the VPN connection, he/she can access the extended network services the same way as if they were located with its private network.
There are two types of VPNs: the remote-access VPN used to connect a device to a network and site-to-site VPN used when connecting two networks together. A VPN can be used for multiple different scenarios, like allowing employees to securely access the company's internal network even when outside the office (remote-access VPN), connecting two remote offices together into one internal private network (site-to-site VPN), etc.

There are different implementations of the VPN protocols, including the ones listed below (summarized after [1]):
- Internet Protocol Security (IPsec): a widely used VPN implementation that uses IPv4 and operates on layer 2, where the packet is encapsulated into an IPsec header and sent to its endpoint.
- Transport Layer Security (SSL/TLS): another widely used VPN implementation that's most often incorporated with OpenVPN, which we'll take a look in this article. OpenVPN is an SSL-based VPN that uses SSL certificates to encrypt the data in transit.
- Datagram Transport Layer Security (DTLS)
- Microsoft Point-to-Point Encryption (MPPE)
- Microsoft Secure Socket Tunneling Protocol (SSTP)
- Secure Shell (SSH) VPN
Pentesting OpenVPN
Depending on the type of VPN we're checking during our penetration test, there are different procedures that will drive our testing. Despite the type of VPN being used, the basic steps to pentest the VPN are the following:
-
Reconnaissance: the first step is determining which type of VPN we're dealing with in order to plan how to proceed with the attack. We can do that with a simple port scan by using an open-source tool like Nmap or any other tool with port scanning capabilities. The purpose is determining the type of VPN implementation we're dealing with, which is often bound to a default port. Usually the following ports are involved with VPN services: UDP 500 (IPSec), TCP 1723, TCP 443 (SSL VPN) and UDP 1194 (OpenVPN).
- Exploitation: the phase is under direct influence of the type of the VPN we're dealing with. When testing network-based IPSec VPN, we can rely on the Ike-scan program to perform the testing. First, we can identify the VPN product and its version and search for related vulnerabilities online; there are vulnerabilities for different vendors like Cisco or CheckPoint regarding the VPN services that we can use to our advantage. When dealing with SSL VPN, we could theoretically use the tools used for SSL pentesting, and in some cases we can do that, but most tools out there support TCP protocol only, where UDP isn't supported. One of the most critical vulnerabilities this year has been the HeartBleed vulnerability, which affects the OpenSSL library that OpenVPN is also using. Therefore, if OpenVPN is using a vulnerable version of the OpenSSL library, the service can be exploited by malicious attackers and the whole server can be compromised. This is why we have to take every security precaution in order to protect our network.
- Credentials: when the connection with a VPN server is initiated, a client must present a valid passphrase or a certificate to prove that it's authorized to use the server. If the VPN server is only using passphrases, we should instead configure to use certificates with each of the passphrases to improve security. I've often seen a VPN server using only user credentials to authenticate to the VPN server; not to mention some of the user passwords were quite simple and easy to guess within a few bruteforcing attempts. That is certainly something we have to keep in mind when conducting a penetration test of the VPN server or when setting up such a server for our own network.
Recommendations for Hardening OpenVPN
To harden the OpenVPN security, we have to edit its configuration file, usually passed to the OpenVPN daemon by the --config command-line option. If we use the "ps -ef" command and grep the OpenVPN processes, we can see where the configuration file is located and view it accordingly.
Table 1: Security configuration options in openvpn.conf
> tls-auth server.tls-auth 0
> user nobody
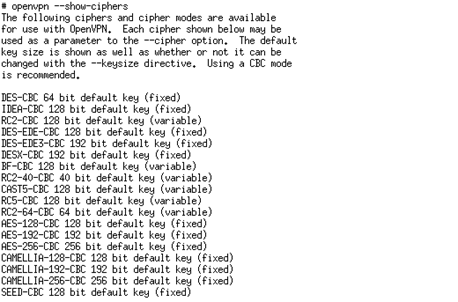 It's advisable that a 256-bit cipher is used to increase security. Note that a strong cipher will have slight impact on the performance of OpenVPN server, especially on the SSL/TLS handshake, but the slowdown is negligible and gain is tremendous. We can use the following configuration line to switch to a strong symmetric cipher:
Conclusion
It goes without saying that when a hacker stumbles upon an open VPN port, he will most likely check it for different security holes. Therefore, we have to properly protect our VPN server in order to secure our users and our whole internal network. If an attacker is able to compromise the VPN service, he can get access to our whole network.
Some of the administrators might argue that the VPN service is very secure by itself and needs no additional protection, but such predictions have been proved incorrect in the past. One such vulnerability was found in April 2014, named the HeartBleed vulnerability, which can be used to dump memory from the OpenVPN daemon process. Therefore, if an attacker is able to determine that VPN service is running on some port, he might be able to dump arbitrary memory from the server or possibly even take control of the server. Once such a vulnerability is discovered, we must patch it as soon as possible, but properly a hardened service should give an attacker as little access to the server as possible. Imagine a new devastating vulnerability being found in OpenVPN/OpenSSL in the future; a secure service running under an unprivileged account might be just what you need to protect yourself from being a victim of cyber attack.
References
[1] Virtual private network,
https://en.wikipedia.org/wiki/Virtual_private_network.

[2] Hardening OpenVPN Security,
https://openvpn.net/index.php/open-source/documentation/howto.html#security.

- 12 pre-built training plans
- Employer-requested skills
- Personalized, hands-on training
In this Series
- Cloud VPN Security Recommendations
- Free Valentine's Day cybersecurity cards: Keep your love secure!
- How to design effective cybersecurity policies
- What is attack surface management and how it makes the enterprise more secure
- Is a cybersecurity boot camp worth it?
- The aftermath: An analysis of recent security breaches
- Understanding cybersecurity breaches: Types, common causes and potential risks
- Breaking the Silo: Integrating Email Security with XDR
- What is Security Service Edge (SSE)?
- Cybersecurity in Biden’s era
- Password security: Using Active Directory password policy
- Inside a DDoS attack against a bank: What happened and how it was stopped
- Inside Capital One’s game-changing breach: What happened and key lessons
- A DevSecOps process for ransomware prevention
- What is Digital Risk Protection (DRP)?
- How to choose and harden your VPN: Best practices from NSA & CISA
- Will immersive technology evolve or solve cybercrime?
- Twitch and YouTube abuse: How to stop online harassment
- Can your personality indicate how you’ll react to a cyberthreat?
- The 5 biggest cryptocurrency heists of all time
- Pay GDPR? No thanks, we’d rather pay cybercriminals
- Customer data protection: A comprehensive cybersecurity guide for companies
- Online certification opportunities: 4 vendors who offer online certification exams [updated 2021]
- FLoC delayed: what does this mean for security and privacy?
- Stolen company credentials used within hours, study says
- Don’t use CAPTCHA? Here are 9 CAPTCHA alternatives
- 10 ways to build a cybersecurity team that sticks
- Verizon DBIR 2021 summary: 7 things you should know
- 2021 cybersecurity executive order: Everything you need to know
- Kali Linux: Top 5 tools for stress testing
- Android security: 7 tips and tricks to secure you and your workforce [updated 2021]
- Mobile emulator farms: What are they and how they work
- 3 tracking technologies and their impact on privacy
- In-game currency & money laundering schemes: Fortnite, World of Warcraft & more
- Quantitative risk analysis [updated 2021]
- Understanding DNS sinkholes - A weapon against malware [updated 2021]
- Python for network penetration testing: An overview
- Python for exploit development: Common vulnerabilities and exploits
- Python for exploit development: All about buffer overflows
- Python language basics: understanding exception handling
- Python for pentesting: Programming, exploits and attacks
- Increasing security by hardening the CI/CD build infrastructure
- Pros and cons of public vs internal container image repositories
- CI/CD container security considerations
- Vulnerability scanning inside and outside the container
- How Docker primitives secure container environments
- Top 4 Zapier security risks
- Common container misconfigurations and how to prevent them
- Building container images using Dockerfile best practices
- Securing containers using Docker isolation
- Introduction to container security

Get certified and advance your career
- Exam Pass Guarantee
- Live instruction
- CompTIA, ISACA, (ISC)², Cisco, Microsoft and more!

General security
Free Valentine's Day cybersecurity cards: Keep your love secure!

General security
General security