Building Cryptographically Secure Cloud Applications

1. Introduction to the Problem
Crypton is an open-source project provided by SpiderOak with the purpose of solving privacy and security problems through cloud applications. Before introducing the solution, we must first talk about the problem. The main problem with cloud-based applications is that the user's data is stored in the cloud and therefore can be accessed and read by anyone having access to the server—namely the cloud service provider (CSP). Not to mention that, if an attacker was able to penetrate the CSP's defenses, he might also be able to access the client's data. That being said, Crypton is a framework that can be used for building cryptographically secure cloud applications, which means that the client's data is securely stored in the cloud in encrypted form—only the client possesses the knowledge to decrypt its data. Crypton does all the cryptography behind the scenes, so developers don't have to bother with it. If everybody is trying to use their own cryptographic methods to provide zero-knowledge cloud-based applications, there would definitely be discrepancies, probably some more vulnerable than others, but none would fit the profile perfectly.
2. Presenting the Solution
With Crypton, we can build secure cloud-based applications where all the encryption and decryption of the client's data is done on the client side of the communication, before the data is actually sent to the cloud. This results in encrypted data being stored on the cloud. Depending on how we programmed the applications, all of the data we stored in the cloud could be encrypted. Of course, it's not always necessary to encrypt everything, because sometimes it may be more efficient to work with unencrypted data. This is because some of the data isn't so important that it needs to be encrypted and, by not encrypting it, we're saving a few CPU cycles, which would normally need to be spent by the encryption and decryption process. There are also other server-side optimizations that can be done on unencrypted data that can't be done on encrypted data, such as searching through the data itself. If we would like to do a simple search over the encrypted data in the cloud, all the data must be sent to the client, where it's decrypted, after which the search algorithm can do its job. But that results in whole database that needs to be sent over a network consuming bandwidth before a single search through the data can be done.
Note that the Crypton documentation states that Crypton is not yet ready for the production environment [1], but hopefully we'll spread the word around the Internet to attract more developers who are willing to test and possibly contribute to it.

3. Crypton Diary Overview
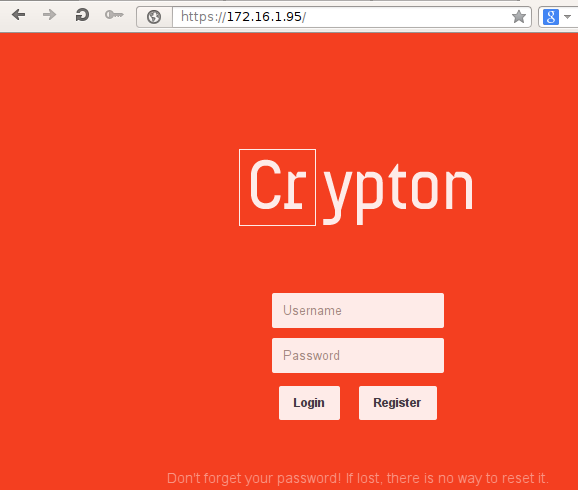
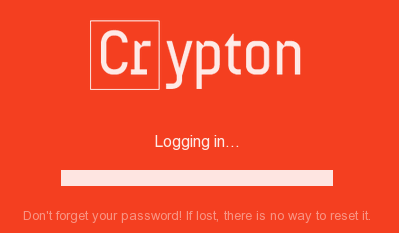
Let's now take a look at the Crypton Diary example application, which was written with security in mind. The Diary application uses Crypton to encrypt the user's data and is accessible at https://diary.crypton.io/, which is presented on the picture below.
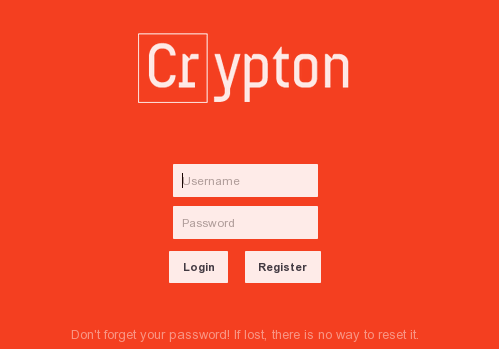
We can see that there is an input form where we can enter our username and password. There's also a login button, which logs us into the application, and a register button, which allows a new account to be registered. Let's first create a new account by inputting crypton:crypton into the username and password input fields. When pressing the register button, the cryptographic keys will automatically be created and we'll be logged into the application. In the picture below, we can see the Diary application once we've logged-in. There is an input box where we can input some text about our life. To save the message, we can press the "Save" button and, to delete the message, we need to press the "Delete" button.
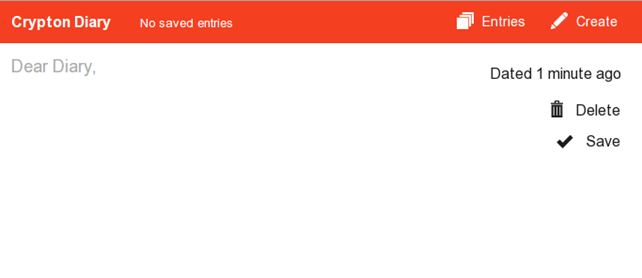
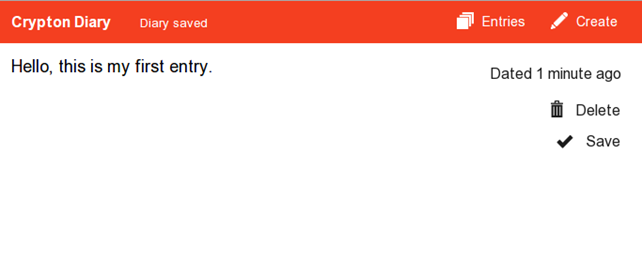
The menu contains two buttons: "Entries," which lists all the saved message entries, and "Create," which creates a new message entry. Let's input a new message, "Hello, this is my first entry." and save it.
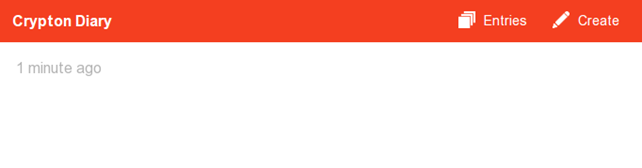
Once the message has been saved, we can see it if we click on the "Entries" menu button, which will present entries based on when we've saved them. There is currently just one message, which was saved 1 minute ago.
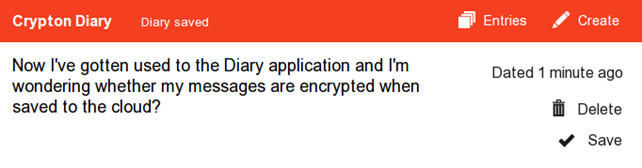
Let's now create a second entry with the text: "Now I've gotten used to the Diary application and I'm wondering whether my messages are encrypted when saved to the cloud?" as shown below:
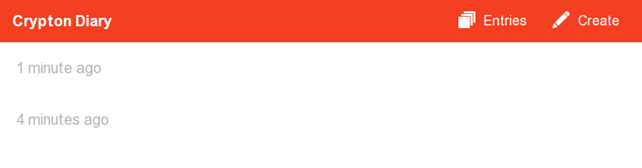
Now there are two messages presented if we enter the "Entries" menu again:
This is the basic usage of the application. If you've followed the article, you can see that we're already wondering whether the messages are being stored in encrypted form. This is a valid and important question that we're trying to address in this article. Just from using the web application normally, we don't know the answer to that question, because we haven't programmed the application ourselves: For all we know, the messages might also be stored in clear-text. There is a simple check that we can use to confirm whether the messages are secure: We can start an intercepting proxy, catch the messages being sent to the server, and see for ourselves. If we start Wireshark, we won't get any meaningful results, because the messages are transmitted over HTTPS, which uses an encrypted layer. Rather than trying to figure out how to see HTTPS decrypted messages in Wireshark, let's start the Burp intercepting proxy and see the messages in clear-text. The picture below presents a request being sent to the server once we save a Diary message:
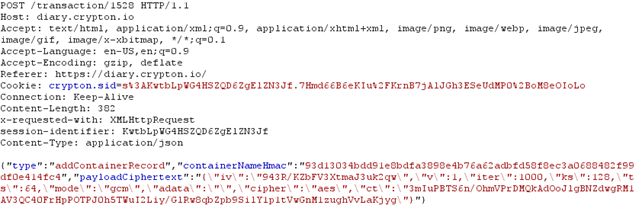
Notice that we're dealing with a POST request going to https://diary.crypton.io/transaction/1528. The request body contains a JSON message, which describes a single transaction with the following fields: type, containerNameHmac, and payloadCiphertext. The payloadCiphertext contains the encrypted version of our payload, which confirms that encrypted version of the text is being stored on the cloud. Of course there are ways in which the application can still read the cipher-text of our encrypted text. When we registered, the application could store our password in clear-text and use it to decrypt our messages. In the remainder of the article we'll try to find out whether this is true or not, so bear with me here.
4. Getting Crypton
To get Crypton, we must first install all the dependencies mentioned in [1]; basically we need to install the git revision control system, the postgresql database, and the node.js JavaScript library. After all dependencies have been successfully installed, we can clone the Crypton repository from the SpiderOak Github profile and build it with make. Note that Crypton uses the following Node.JS libraries, because we need to be aware of them when developing a cryptographically secure application with Crypton:
- Karma—a tool that allows us to execute JavaScript in web browsers.
- Mocha—a simple JavaScript test framework.
- Mockery—This allows a simple and easy-to-use API that we can use to hook mocks.
- Should.
- Uglify—A JavaScript parser and beautifier library.
- Bcrypt—An implementation of BCrypt encryption algorithm.
- Commander—This provides a command-line interface.
- Redis—A client to connect to Redis NoSQL database.
- Cors—A library for enabling cross-origin resource sharing in web applications.
- Express—A web application framework.
- Node-UUID—This generates universally unique identifiers.
- Sinon—A test framework.
- Colors—This provides colors in the console.
- Connect—A HTTP server framework.
- Cookie—For cookie management.
- Cryptojs—This provides various secure cryptographic algorithms.
- Lusca—this provides application security for Express.
- PG—A PostgreSQL client.
- Socket.IO—This provides web socket API for real-time applications.
We must also install Redis server version > 2.6, which we can do with the commands below. I'm specifically mentioning those commands, because otherwise you'll end up with an older version of Redis.
[plain]
# sudo apt-get install -y python-software-properties
# sudo add-apt-repository -y ppa:rwky/redis
# sudo apt-get update
# sudo apt-get install -y redis-server
Prior to cloning and installing the Crypton repository, you should also download the latest version of Node.JS and install it. We won't go into the steps now, since they are properly documented on the [1] website. Finally, we should clone the Crypton repository from Github and enter the created directory.
[plain]
# git clone -b sharing https://github.com/SpiderOak/crypton/ crypton
# cd crypton/
Once we're in the Crypton directory, we must first run the "check_dependencies.sh" script, which verifies that every dependency has been properly installed. After that, we can simply run make, which should read the Makefile in the directory and execute the commands written in it. Basically, Makefile runs the make command in the client/, server/ and integration_tests/ directories, which contain Makefiles. Note that I hadn't been able to successfully build Crypton by running make in its base directory. I had to enter server/ and client/ directories and manually run the make command in each of them. In the server directory, we also have to run the "sudo npm link" command to create proper system symbolic links that so the crypton executable is in PATH and can be executed from anywhere. On an Ubuntu system. the /usr/local/bin/crypton symlink is created. In the client directory, we also have to execute the make command – if you receive the following error, it means that karma cannot be found.
[plain]
# make
cat src/core.js src/account.js src/session.js src/container.js src/transaction.js src/peer.js src/message.js src/diff.js src/vendor/*.js > dist/crypton.js
make: ./node_modules/.bin/karma: Command not found
make: *** [test-unit] Error 127
To solve the error we need to install karma manually with npm install and link to its binary executable with the commands below.
[plain]
# cd client/
# npm install karma
# cd node_modules/.bin/
# ln -sf ../karma/bin/karma .
# cd -
# make
In this article, we'll present a Diary example, for which we need to enter the client/examples/diary/ directory and start Crypton. Because Crypton will start a web server listening on privileged port 443, we need to invoke it with sudo privileges. Below, we can see that the HTTPS server was successfully started and is listening on port 443:
[plain]
# sudo crypton
[info] loading config
[info] config file not specified, using example
[info] loading datastore
[debug] listening for container updates
[info] configuring server
connect.limit() will be removed in connect 3.0
connect.multipart() will be removed in connect 3.0
visit https://github.com/senchalabs/connect/wiki/Connect-3.0 for alternatives
connect.limit() will be removed in connect 3.0
[info] loading routes
[info] starting HTTPS server
[info] HTTPS server listening on port 443
[info] starting socket.io
info - socket.io started
After that, we can visit the webpage, where the Crypton Diary application is now running. We can see that below:
-
Crypton Diary Internals
In the previous section, we saw how to get Crypton and how to run the Crypton Diary application. Now we'll take a look at what happens behind the curtains to see how the information is being stored on the server side.
Let's first see how the Redis database is used. We can connect to the database with the redis-cli command and then enter arbitrary Redis commands. We can execute "keys *" to display all keys currently stored in the database. Prior to actually connecting to Diary Crypton with our web browser, there will be no keys stored in the Redis database, as can be seen below:
[plain]
# redis-cli
127.0.0.1:6379> keys *
(empty list or set)
After we enter the Crypton Diary web address in a web browser and connect to the website, a new key for our session is created. Our session key below is "crypton.sid:to3U1feDnhB5tr1kwXhXxQVq". The first mget command displays the value of our session key before we have authenticated to the Diary application and the second mget command displays the value of session key after successful authentication. Notice that when we have authenticated to the web application, an accountId is added to the JSON value stored in our session key; this binds our account to the session key.
[plain]
127.0.0.1:6379> keys *
1) "crypton.sid:to3U1feDnhB5tr1kwXhXxQVq"
127.0.0.1:6379> mget "crypton.sid:to3U1feDnhB5tr1kwXhXxQVq"
1) "{"cookie":{"originalMaxAge":null,"expires":null,"secure":true,"httpOnly":true,"path":"/"}}"
127.0.0.1:6379> mget "crypton.sid:to3U1feDnhB5tr1kwXhXxQVq"
1) "{"cookie":{"originalMaxAge":null,"expires":null,"secure":true,"httpOnly":true,"path":"/"},"accountId":15}"
If we save an entry in the database, the contents of the Redis DB will not change, because the actual data is stored in the PostgreSQL database. When we think about it, it makes sense to store session data only in the Redis DB, since the contents of the Redis database does not persist on restarts, since they are kept in memory only—and it would be a shame if our Diary entries were lost because we stored it in Redis database, which was wiped out upon service restart. Therefore, all the data needs to be stored on an actual hard drive in PostgreSQL database.
We can also connect to the PostgreSQL database by using the psql command. Remember that, by default, the PostgreSQL user on Ubuntu has a blank default password, so we should be able to connect to the DB without entering a password. In the output below, we've connected to the PostgreSQL crypton_test database and displayed all tables with dt command.
[plain]
# sudo -u postgres psql
postgres=# connect crypton_test
crypton_test=# dt
public | account | table | crypton_test_user
public | base_keyring | table | crypton_test_user
public | container | table | crypton_test_user
public | container_record | table | crypton_test_user
public | container_session_key | table | crypton_test_user
public | container_session_key_share | table | crypton_test_user
public | message | table | crypton_test_user
public | transaction | table | crypton_test_user
public | transaction_add_container | table | crypton_test_user
public | transaction_add_container_record | table | crypton_test_user
public | transaction_add_container_session_key | table | crypton_test_user
public | transaction_add_container_session_key_share | table | crypton_test_user
public | transaction_add_message | table | crypton_test_user
public | transaction_delete_container | table | crypton_test_user
public | transaction_delete_container_session_key_share | table | crypton_test_user
public | transaction_delete_message | table | crypton_test_user
Let's create another user by registering temp:temp user. The user should be stored in the account table, which contains the following information after the creation of a new user. Notice there is no password stored anywhere, nor is the password hash stored.
[plain]
crypton_test=# select * from account;
account_id | creation_time | username | base_keyring_id | deletion_time
------------+----------------------------+----------+-----------------+---------------
1 | 2014-03-17 12:41:15.118183 | pizza | 2 |
4 | 2014-03-17 12:41:17.473174 | testuser | 5 |
17 | 2014-03-17 12:54:25.929092 | temp | 18 |
We can also search through the PostgreSQL database and we won't be able to find a stored message entered through the Diary application in clear-text form; everything is encrypted as it should be, which gives us the confirmation we've been looking for.
We've also mentioned that Crypton still has a long way to go, because it's a young project indeed. One problem occurs if we enter the "admin)',nname:" as our username. At such point the "logging in" message is displayed on the screen indefinitely. After a while. the user might realize that the application has stopped working and close the browser tab.
If we look at the messages being logged in the background we can see the following request, where it's evident that the request returned 404 Not Found message. This is because every backslash '' character is transformed into a normal slash '/' character, thus changing the URL structure. The same happens if we input the normal slash, which is not transformed, but still changes the URL format.
[plain]
info 404 POST /account/admin)',/nname:
The application accepts that after the /account/ there comes the name of the user followed by optional slash, but in our case we're actually adding another element of the URL, which the application doesn't recognize. In this use case, the application should notify us that we should be using special characters when inputting username, if special characters are indeed not valid. In case the application wants to allow special characters as part of the username, they should be properly encoded.
Conclusion
We've seen that Crypton is a great project that can take care of security for us when building a cloud application, because it automatically encrypts/decrypts the messages for us, so we can store them in a cloud without revealing any information to the CSP. At this point, I would like to thank SpiderOak for releasing such a great project to open source, and all current developers for doing a good job. Crypton still has a long way to go, so any help from other developers around the world is appreciated and will be gladly accepted. We need to strive toward a safer future, where our data will is securely and privately stored in the cloud by being encrypted and Crypton is one way of achieving it.
References
[1] Crypton, Getting Started,

In this Series
- Building Cryptographically Secure Cloud Applications
- DevSecOps: Moving from “shift left” to “born left”
- What’s new in the OWASP Top 10 for 2023?
- DevSecOps: Continuous Integration Continuous Delivery (CI-CD) tools
- Introduction to DevSecOps and its evolution and statistics
- MongoDB (part 3): How to secure data
- MongoDB (part 2): How to manage data using CRUD operations
- MongoDB (part 1): How to design a schemaless, NoSQL database
- Understanding the DevSecOps Pipeline
- API Security: How to take a layered approach to protect your data
- How to find the perfect security partner for your company
- Security gives your company a competitive advantage
- 3 major flaws of the black-box approach to security testing
- Can bug bounty programs replace dedicated security testing?
- The 7 steps of ethical hacking
- Laravel authorization best practices and tips
- Learn how to do application security right in your organization
- How to use authorization in Laravel: Gates, policies, roles and permissions
- Is your company testing security often enough?
- Authentication vs. authorization: Which one should you use, and when?
- Why your company should prioritize security vulnerabilities by severity
- There’s no such thing as “done” with application security
- Understanding hackers: The insider threat
- Understanding hackers: The 5 primary types of external attackers
- Want to improve the security of your application? Think like a hacker
- 5 problems with securing applications
- Why you should build security into your system, rather than bolt it on
- Why a skills shortage is one of the biggest security challenges for companies
- How should your company think about investing in security?
- How to carry out a watering hole attack: Examples and video walkthrough
- How cross-site scripting attacks work: Examples and video walkthrough
- How SQL injection attacks work: Examples and video walkthrough
- Securing the Kubernetes cluster
- How to run a software composition analysis tool
- How to run a SAST (static application security test): tips & tools
- How to run an interactive application security test (IAST): Tips & tools
- How to run a dynamic application security test (DAST): Tips & tools
- Introduction to Kubernetes security
- Key findings from ESG’s Modern Application Development Security report
- Microsoft’s Project OneFuzz Framework with Azure: Overview and concerns
- Software maturity models for AppSec initiatives
- Best free and open source SQL injection tools [updated 2021]
- Pysa 101: Overview of Facebook’s open-source Python code analysis tool
- Improving web application security with purple teams
- Open-source application security flaws: What you should know and how to spot them
- Android app security: Over 12,000 popular Android apps contain undocumented backdoors
- 13 common web app vulnerabilities not included in the OWASP Top 10
- Fuzzing, security testing and tips for a career in AppSec
- 14 best open-source web application vulnerability scanners [updated for 2020]
- 6 ways to address the OWASP top 10 vulnerabilities
- Ways to protect your mobile applications against hacking

Get certified and advance your career
- Exam Pass Guarantee
- Live instruction
- CompTIA, ISACA, (ISC)², Cisco, Microsoft and more!

Application security
Application security
Application security
DevSecOps: Continuous Integration Continuous Delivery (CI-CD) tools
Application security