Android Application Security Testing Guide: Part 2

In our last part of this series (Android Application Security Testing Guide: Part 1), we discussed static analysis of Android APK files on the security background, and we tried to find any sensitive information which we can collect. In this part, we will head to our second phase, i.e. Dynamic Testing. But before going further, don't you want to test your skills you learned in the first part? I have created a small challenge for this. The below link will take you to an APK file I have uploaded to Dropbox. You have to download the APK file and perform a thorough static analysis on it. The challenge is to find out the email ID which is hardcoded in the APK file.
LINK: http://bit.ly/1aLIYvW

11 courses, 8+ hours of training
HINT: Email ID contains "sam" as string.
For those who were unable to find the link of m0biliz3r, here is the link.
For starting off with dynamic testing, we first need to install the application into the emulator. Either we can install the application from Play Store directly (if available), or we can use the APK file if the client has provided us with this.
The first step in installing the application in the emulator is of course to open the emulator. Then we will use ADB (Android Debug Bridge), as this provides an excellent interface between the emulator and our computer machine. For both cases, we will need our emulator up and running.
To start the emulator, you can follow any of the two approaches. You can click on AppUse Dashboard, go to the Android tab and then click on "Launch Emulator". This will start the emulator in the default settings saved in AppUse. If you want to customize the settings, then go for manual approach. For this go to "/AppUse/Android/android-sdk-linux_86/tools/".
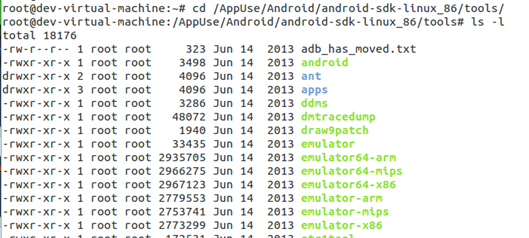
Image 1: Contents of "tools" directory
To launch the emulator, type in the following command:
./android avd
And the AVD (Android Virtual Device) Manager window will come up. This window will list down all the virtual devices you have created (if any) along with their respective configurations. By default, AppUse comes along with a default device, so your AVD manager must list it as shown in image below.
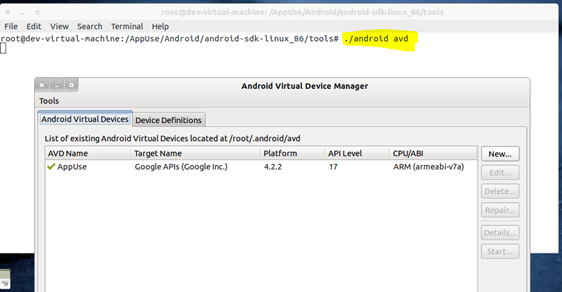
Image 2: Basic Android Virtual Device Manager
By using the new option, you can either create a new device of your own choice with configurations you want, or can customize the existing one. The edit dialogue box will look something like the below image.
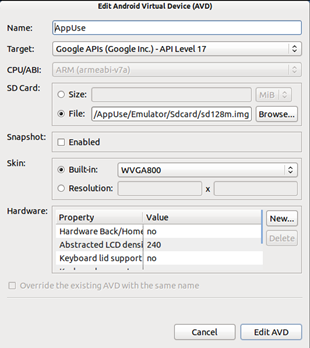
Image 3: Edit Android Virtual Device Dialog Box
Please also note down that the emulator keeps on running through with various updates. Also with the launch of the new version of Android OS, there are certain packages you might wish to install. Al these things can also be done from AVD Manager. In case you wish to install a new one, or want to see the installed packages, go to "Tools" in the menu bar and select "manage SDK". Android SDK Manager will come up, and it will list the available packages as well as the installed packages. The packages which are already installed will have a check mark in the check box before them, as shown in the image below.
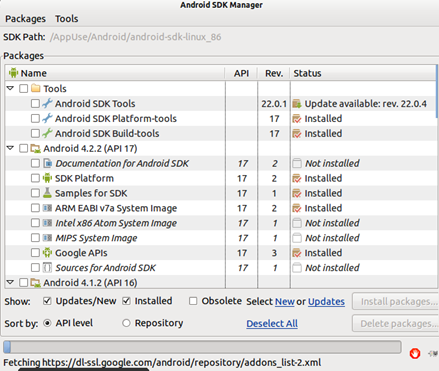
Image 4: SDK manager
To install any new package, mark the check box in front of the package and install on "Install X Package(s)" where X is the number of packages selected. With the similar approach, you can delete the packages. Keep in mind that this step will require an Internet connection obviously, as you are going to download some packages.
Fine, so once we are done with editing the SDK and AVD, go back to the main window of AVD Manager and start the machine. It will ask you to enter any runtime customization (if required), like clear old data, or define a new custom screen size.
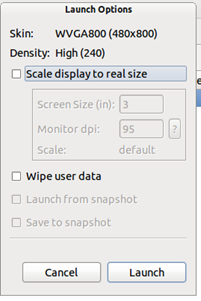
Image 5: Dialogue box popping up just before the launch of the emulator
Once done, launch it. The emulator will start and this might take some time, so get loaded with patience. Once it is loaded, enter your emulator and enjoy the look and feel. Yeah, I mean it. Enjoying the look and feel can comprise of exploring your virtual device and different settings, and if you own an Android phone, you can compare the features as well. If you don't see certain features, you must be missing out on some packages.
A PIC OF A RUNNING EMULATOR
Ahh! So finally, let's go ahead with installing the application into the emulator. Get the APK ready in your AppUse machine and go to the following path:
/AppUse/Android/android-sdk-linux_86/platform-tools
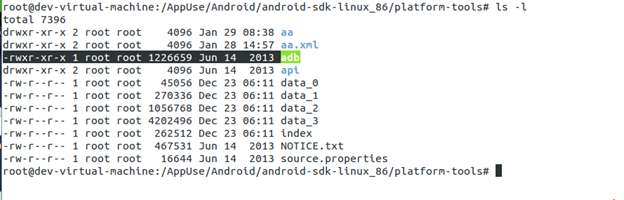
Image 6: ADB in "platform-tools" directory
As we already discussed, ADB stands for Android Debug Bridge and helps you do a lot of tasks on the emulator from your machine. Installing the application is one of them.
adb install <name of APK>
If you want to install it to sdcard, i.e. external memory, then you can use -s. Once done, go back to your emulator and check if you have that application installed or not. As the application installs, it goes to the APPS menu as well as in the list of the installed applications in the application manager. You can use any of these places for ensuring the installment of your application. As soon as the app gets installed, check if you can use the application properly, all the functions are working, etc. Once the prequalification is done, we will start off with dynamic testing.
As already mentioned, in dynamic testing we will focus purely on the way the application is processing the requests on the server side. To be able to get more control on the requests and response, we will need an intermediate proxy which will enable us to see the raw requests and responses going to and from the server. For this, we will use Burp Suite. So let's start configuring our proxy.
To configure the proxy go to Settings. A screen something like the below one will come up. Select "More".
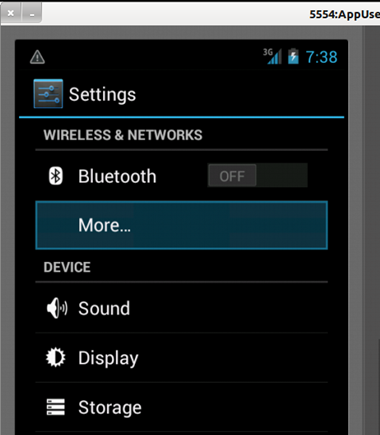
Image 7: Settings options in the emulator
In the next menu, select "Mobile Networks".
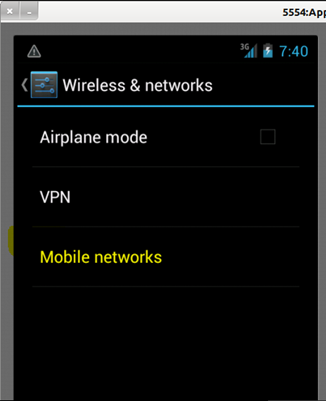
Image 8: Options in "Wireless & networks" section
Select Access Point Names option as shown in the image.
Image 9: Mobile network settings
No, there must be a mobile network already configured, and the name of the network will be "Telkila", as shown in the image below. Choose this network.
Image 10: Access Point Names List
The next window will give you an option to configure a proxy on this network. In case you have more than one network coming in the APNs list, make sure you select the one which you would be using to test the application.
Put the IP address of your interface where you will be listening the traffic, i.e. where you will run Burp. Down to that, put the port number on which you want to listen. By default it's 8080 in Burp, but feel free to change it, just make sure you have same port number configured at both end points, i.e. in Burp and in this menu. Use the image below to get more ideas on how to configure your proxy.
Image 11: Proxy configuration in the emulator
By saving these settings, you will have successfully configured the emulator to route the traffic through this IP on 8080 port, i.e. our Android VM is configured to send all the web traffic to our web proxy. So the next step must be to set up the web proxy. We have lot of web interception proxies available in market, but for this demonstration purpose, I would suggest you use Burp, as it is one of the most popular proxies. Use the professional version or the free one. Appuse already has the free version of BurpSuite in its arsenal. To open it up, go to directory:
/Appuse/Pentest/Burp
and type:
java -jar burpsuite_v1.5.jar (the name of the jar file may change so please check it using "ls").
Here I have configured the other version of Burp, so will use the command as shown in the figure. This will open the Burp Interface to you.
Image 12: Screenshot of BurpSuite
Now go to the "Proxy" tab, select the "Options" tab. Select the default configured interface, and click on "Edit".
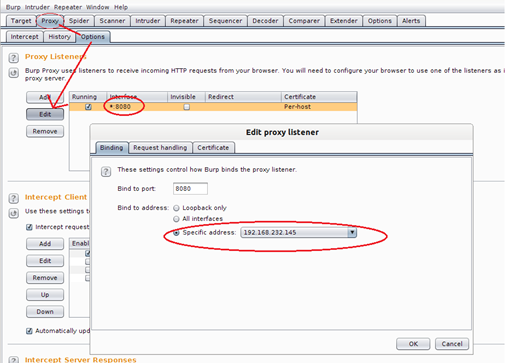
Image 13: BurpSuite Proxy Configuration
If you are already familiar with Burp, use it your way, but if you are using it for the first time, make the settings exactly same as above. In the specific address option, select the IP address you want to listen to traffic on. If you have an emulator on one machine (say A) and BurpSuite on other one (say B), then in the emulator's proxy settings you have to put the IP address of B machine. Similarly, at B, you will have to mention in Burp that you want to specifically listen on this IP.
Another catch here is that you can choose the "All interfaces" option, but this might create a lot of traffic for you if you have other interfaces also working in your machine, and due to lot of requests response going through, you might miss the important one.
So once you are done with all this hustle and bustle, let's go back to our emulator and check if we can intercept the traffic or not. First of all, set the interception to be on as shown in the figure.
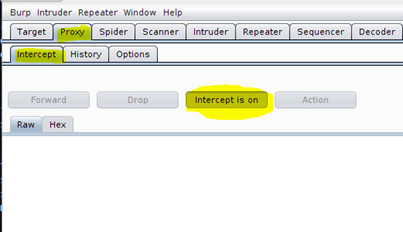
Image 14: Proxy > Intercept > "intercept is on"
Now start the browser in the emulator and open any site using HTTP protocol. (Yes, I said HTTP and not HTTPS. We will solve the HTTPS issue later on in the next part of this series.) So for example, let's open http://3ncrypt0r.blogspot.com. This must not open the browser until and unless you will forward it. Now go to Burp, and you will see a GET request to 3ncrypt0r.blogspot.com waiting for your action.
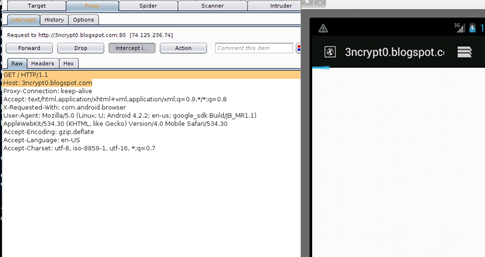
Image 15: Raw HTTP Request intercepted in BurpSuite
As soon as you will click "Forward", it will go to the server and as the server will respond back, and you will see the response in Burp. Now there are chances that you might not see any response in Burp. If that's the case, go to the options tab in the proxy section and mark the check box against "Intercept response based on the following rules", as shown in the figure.
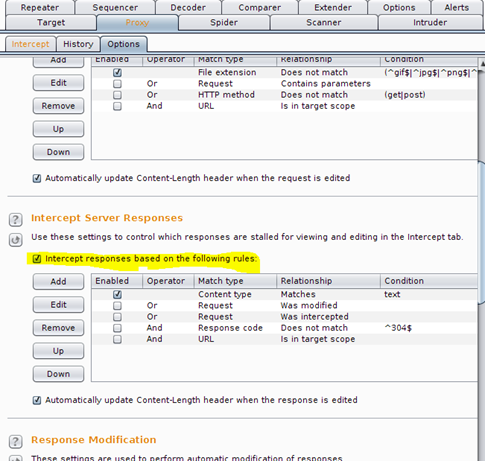
Image 16: BurpSuite Configuration for getting HTTP responses
This being done, you will start receiving responses in Burp.
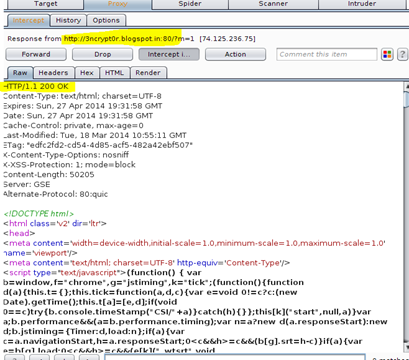
Image 17: HTTP Response captured in BurpSuite
Now again when you will click on "Forward", the response will go the browser and you must be able to see the web page in the browser. So this was a basic manual proxy configuration for testing your application dynamically, i.e. on server side logics and communications. You can use any other intermediate proxies like Charles Proxy, ZAP, etc. I used Burp as I am more handy and comfortable with Burp.
So we discussed the basic setup for doing dynamic testing of our applications. No doubt there are certain catches which you will encounter while doing this, for example:

11 courses, 8+ hours of training
-
Issues with SSL traffic which goes on HTTPS protocol.
-
Applications which use a specific mobile network and hence you will not be able to test them on the emulator.
-
Frequent issues you might face with the emulator.
Don't worry about that; we have a lot of things to be covered later and we will definitely solve all these problems. While I write the next article, you practice the things you learned in this article. There are a lot of vulnerable applications which come by default in Appuse and Android Tamer.

Learn how to secure systems with 11 courses from Infosec Skills instructor and #1 best-selling author Ted Harrington.
- Hack your system
- Establish your threat model
- Spend wisely
- And more
In this Series
- Android Application Security Testing Guide: Part 2
- DevSecOps: Moving from “shift left” to “born left”
- What’s new in the OWASP Top 10 for 2023?
- DevSecOps: Continuous Integration Continuous Delivery (CI-CD) tools
- Introduction to DevSecOps and its evolution and statistics
- MongoDB (part 3): How to secure data
- MongoDB (part 2): How to manage data using CRUD operations
- MongoDB (part 1): How to design a schemaless, NoSQL database
- Understanding the DevSecOps Pipeline
- API Security: How to take a layered approach to protect your data
- How to find the perfect security partner for your company
- Security gives your company a competitive advantage
- 3 major flaws of the black-box approach to security testing
- Can bug bounty programs replace dedicated security testing?
- The 7 steps of ethical hacking
- Laravel authorization best practices and tips
- Learn how to do application security right in your organization
- How to use authorization in Laravel: Gates, policies, roles and permissions
- Is your company testing security often enough?
- Authentication vs. authorization: Which one should you use, and when?
- Why your company should prioritize security vulnerabilities by severity
- There’s no such thing as “done” with application security
- Understanding hackers: The insider threat
- Understanding hackers: The 5 primary types of external attackers
- Want to improve the security of your application? Think like a hacker
- 5 problems with securing applications
- Why you should build security into your system, rather than bolt it on
- Why a skills shortage is one of the biggest security challenges for companies
- How should your company think about investing in security?
- How to carry out a watering hole attack: Examples and video walkthrough
- How cross-site scripting attacks work: Examples and video walkthrough
- How SQL injection attacks work: Examples and video walkthrough
- Securing the Kubernetes cluster
- How to run a software composition analysis tool
- How to run a SAST (static application security test): tips & tools
- How to run an interactive application security test (IAST): Tips & tools
- How to run a dynamic application security test (DAST): Tips & tools
- Introduction to Kubernetes security
- Key findings from ESG’s Modern Application Development Security report
- Microsoft’s Project OneFuzz Framework with Azure: Overview and concerns
- Software maturity models for AppSec initiatives
- Best free and open source SQL injection tools [updated 2021]
- Pysa 101: Overview of Facebook’s open-source Python code analysis tool
- Improving web application security with purple teams
- Open-source application security flaws: What you should know and how to spot them
- Android app security: Over 12,000 popular Android apps contain undocumented backdoors
- 13 common web app vulnerabilities not included in the OWASP Top 10
- Fuzzing, security testing and tips for a career in AppSec
- 14 best open-source web application vulnerability scanners [updated for 2020]
- 6 ways to address the OWASP top 10 vulnerabilities
- Ways to protect your mobile applications against hacking

Get certified and advance your career
- Exam Pass Guarantee
- Live instruction
- CompTIA, ISACA, (ISC)², Cisco, Microsoft and more!

Application security
Application security
Application security
DevSecOps: Continuous Integration Continuous Delivery (CI-CD) tools
Application security