An Introduction to the Xposed Framework for Android Penetration Testing

Introduction
When it comes to the Pen Testing of Android-based applications, the main focus and attention of the Pen Tester is to live in the mindset of the Cyber attacker literally. The Pen Tester must then carry out an attack to see how the software code can be manipulated, what the weak spots of the app are, if there are any backdoors in which private and confidential can be hijacked, or even if there this an unseen "hole" in the app to see if a Trojan Horse can be installed and launch a Botnet style attack.
A Pen Tester can conduct both static and dynamic analyses. With the former, one can try to reverse engineer the app with a tool called "smali," and with the former, Android Hooking and runtime analyses can be conducted.

FREE role-guided training plans
This is where the "XPOSED" framework comes into play and is further discussed in this article.
The Android Runtime & and the Xposed Framework
The Android Runtime
The overall Android Runtime architecture is illustrated in the diagram below:

As one can see, when the Android device is first activated, it goes through a number of key iterations, summarized as follows:
-
The Boot Loader:
This launches the Android OS kernel and initiates the first process known as the "Init"
-
The Init Process:
This activates the various components which run behind the Android OS.
-
The Zygote Process:
Once the Init step has been executed, the Zygote Process is then launched, which is at the heart of the Android OS runtime functionality and invokes the required classes.
-
The Dalvik VM:
The Dalvik VM is the next process to be executed and is responsible for running the mobile apps on the Android device.
-
The BOOT_COMPLETED:
This is a broadcast-based message simply stating that the entire bootup process has been completed from within the Android device after it was first activated.
The Xposed Framework
As can also be seen in the above diagram, the Xposed framework is initiated in between the Init process and the Zygote process. Further, this has been specifically written by an XDA member known as "rovo89". Also, the Xposed framework has various API calls that interact with the Android runtime functionalities. These APIs are illustrated in the diagram below:
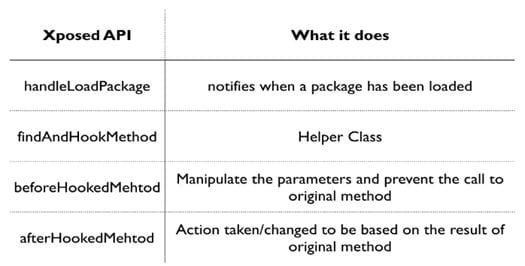
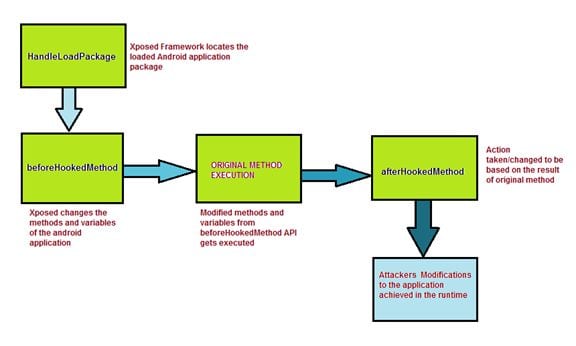
The above diagram depicts the actual flow of the API calls, and it can be summarized as follows:
-
The handleLoadPackage:
This is a functionality that notifies the system when a package has been loaded. The Xposed framework then located this package.
-
The beforeHookedMethod:
This prevents the API call from being formatted back into its original state via a series of various manipulations, via the Xposed Framework.
-
The afterHooked Method:
This is where various actions are taken on the API call, based upon what transpired in the original method. This is where the Android mobile app is most at risk because this is where covert modifications can be made.
Xposed Framework Installation
This section outlines the required steps in to install and deploy the Xposed Framework:
Step1: The Xposed installer can be downloaded from the here. It is important to note that this only works with root access on the Android versions 4.0.3 up to Android 4.4. It is not compatible with the Android versions of Lollipop, Nougat, and O.
Step2: Install the apk on the rooted phone/ emulator by typing the following command:
"adb install package name"
In the illustration below, I have already installed the Xposed, and it shows error on the terminal:

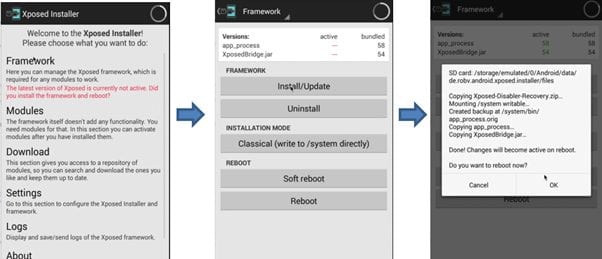
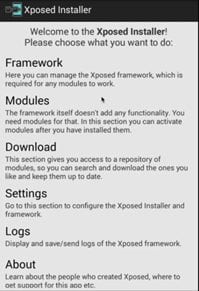
Step3: Once the Xposed installer has been installed:
- Click on the framework;
- Then click on Install/Update.
It will then ask for a reboot once the installation is complete, as illustrated in the screenshots below:
Step4: Xposed is now up and running.
Installing and Creating Modules of Xposed
The Xposed Framework modules are nothing, but custom created android .apk files to modify the runtime of an android mobile app that is being Pen Tested. To develop Xposed modules, rovo89 provides a simple and easy tutorial here at this link. The Infosec Institute also has some tutorials on the same topic here.
We now provide an example of installing an Xposed module by circumventing the SSL pining of an Android mobile app.
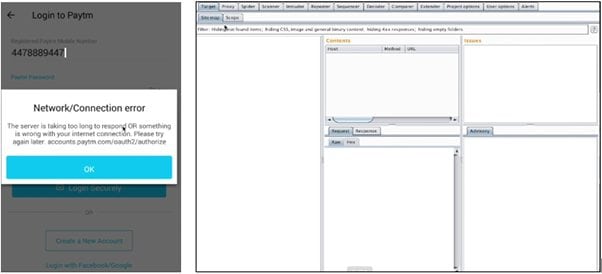
In the diagrams illustrated below, we have a Paytm Android mobile app which does not allow the interception of network traffic going through the burp proxy.
The following sequence of steps permits the installation of an Xposed Framework Module:
Step1: Download the JustTrustMe apk (Xposed Module) from here
"JustTrustMe" is an Xposed module that disables the SSL certificate with a process known as "Cert Pinning."
Step2: To install the
JustTrustMe module, drag and drop the apk if you are using an emulator or type the following command "adb install ./JustTrustMe.apk
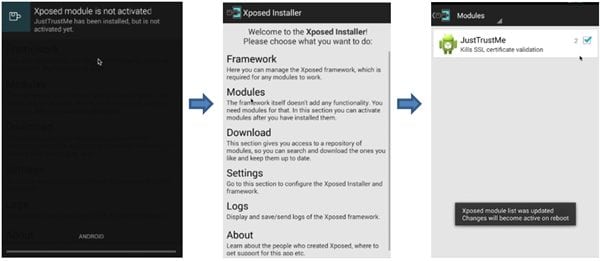
To activate the Xposed module, navigate to the module section and from there, enable it. To launch the module, reboot your Android device.
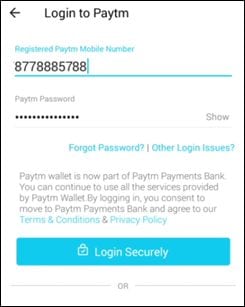
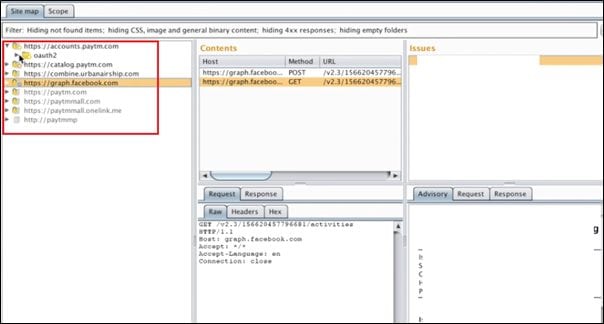
After installing the Xposed module, the interception of traffic of Paytm app through burp proxy. This is illustrated in the screenshots below:

What should you learn next?
Conclusions
The Xposed framework can be leveraged to Pen Test any Android mobile app in various fashions. However, the main disadvantage of it is that this framework is that after the installation of it, of any of the installed modules requires multiple Android device bootups.

- 12 pre-built training plans
- Employer-requested skills
- Personalized, hands-on training
In this Series
- An Introduction to the Xposed Framework for Android Penetration Testing
- Intelligence-led pentesting and the evolution of Red Team operations
- Red Teaming: Taking advantage of Certify to attack AD networks
- How ethical hacking and pentesting is changing in 2022
- Ransomware penetration testing: Verifying your ransomware readiness
- Red Teaming: Main tools for wireless penetration tests
- Fundamentals of IoT firmware reverse engineering
- Red Teaming: Top tools and gadgets for physical assessments
- Red teaming: Initial access and foothold
- Top tools for red teaming
- What is penetration testing, anyway?
- Red Teaming: Persistence Techniques
- Red Teaming: Credential dumping techniques
- Top 6 bug bounty programs for cybersecurity professionals
- Tunneling and port forwarding tools used during red teaming assessments
- SigintOS: Signal Intelligence via a single graphical interface
- Top tools for mobile android assessments
- Top tools for mobile iOS assessments
- Red Team: C2 frameworks for pentesting
- Inside 1,602 pentests: Common vulnerabilities, findings and fixes
- Red teaming tutorial: Active directory pentesting approach and tools
- Red Team tutorial: A walkthrough on memory injection techniques
- Python for active defense: Monitoring
- Python for active defense: Network
- Python for active defense: Decoys
- How to write a port scanner in Python in 5 minutes: Example and walkthrough
- Using Python for MITRE ATT&CK and data encrypted for impact
- Explore Python for MITRE ATT&CK exfiltration and non-application layer protocol
- Explore Python for MITRE ATT&CK command-and-control
- Explore Python for MITRE ATT&CK email collection and clipboard data
- Explore Python for MITRE ATT&CK lateral movement and remote services
- Explore Python for MITRE ATT&CK account and directory discovery
- Explore Python for MITRE ATT&CK credential access and network sniffing
- Top 10 security tools for bug bounty hunters
- Kali Linux: Top 5 tools for password attacks
- Kali Linux: Top 5 tools for post exploitation
- Kali Linux: Top 5 tools for database security assessments
- Kali Linux: Top 5 tools for information gathering
- Kali Linux: Top 5 tools for sniffing and spoofing
- Kali Linux: Top 8 tools for wireless attacks
- Kali Linux: Top 5 tools for penetration testing reporting
- Kali Linux overview: 14 uses for digital forensics and pentesting
- Top 19 Kali Linux tools for vulnerability assessments
- Explore Python for MITRE ATT&CK persistence
- Explore Python for MITRE ATT&CK defense evasion
- Explore Python for MITRE ATT&CK privilege escalation
- Explore Python for MITRE ATT&CK initial access
- Top 18 tools for vulnerability exploitation in Kali Linux
- Explore Python for MITRE PRE-ATT&CK, network scanning and Scapy
- Kali Linux: Top 5 tools for social engineering
- Basic snort rules syntax and usage [updated 2021]

Get certified and advance your career
- Exam Pass Guarantee
- Live instruction
- CompTIA, ISACA, (ISC)², Cisco, Microsoft and more!

Penetration testing
Intelligence-led pentesting and the evolution of Red Team operations

Penetration testing
Red Teaming: Taking advantage of Certify to attack AD networks
Penetration testing
Penetration testing
Ransomware penetration testing: Verifying your ransomware readiness