Advanced .NET Assembly Internals [Updated 2019]

Abstract
In the previous article of this series, we gained an understanding of the assembly loading process, its format and anatomy. This article looks at advanced concepts of assemblies, such as their classification in the form of private and shared assemblies, strong names, security, and global assembly caches. We'll also gain an understanding about publisher policy and code base attributes related to an assemblies and the manipulation of their configurations. We briefly illustrate the delay signing and probing process of both types of assemblies.

Assembly Classification
Assemblies are the indispensable building blocks of functionality of any kind in the .NET jurisdiction. When the managed code is compiled into a format, the unit of execution is called an assembly. The assemblies are far more reliable, more secure, well-behaved, and easy to manage. An assembly can take on form of an EXE or DLL for libraries on which other programs and libraries may depend. Regardless of whether you create an EXE or DLL, an assembly always follows the portable executable/common object file format (PE/COFF), the common format for binary code on windows.
We can broadly classify assemblies as Private and Shared assembly, based on the origin of their location and accessibility to the client.
Private Assembly
Private assemblies are the simplest type that normally ships with software. They are intended to be used only with that software, which means that you have much more control what software uses them. A private assembly is found either in the same directory or within one of its subdirectories. Unlike COM components, a private assembly would not register itself to create a global presence on the system. In fact, private assemblies have a feature of traditional DLLs in that they are private to the client and files could be copied to the client's application directory and no other application would have to know about them.
Private assemblies are the normal way to build assemblies, especially when an application and its components are built within the same infrastructure. Technically speaking, the code library that we have created so far in samples in the previous articles samples has been considered as private assemblies. Private assemblies have of the fewest management issues and can be installed and uninstalled without any fear of breaking other applications. They don't even need to be strongly named.
A private assembly is entirely self-contained; the process of deploying is simple. You simply place the appropriate files in a suitable folder in the file system. You don't need to make an entry into system registry.
The following sample shows the creation of simple private assembly as;
[c language="sharp"]
using System;
namespace PrivateAssem
{
public class Test
{
private int X;
public Test(int x)
{
this.X = x;
}
public int CalSquare()
{
return (X*X);
}
}
}
Test.cs
When we compile this code, PrivateAssem.dll file is created in the solution folder for further reference in other client projects.
Shared Assembly
A shared assembly is a collection of types and resources. The main difference between private and shared assemblies is that a single copy of a share assembly can be used across several applications on the same machine whereas a private assembly is used once. Furthermore, a copy of a private assembly is placed in the solution reference directory. As a rule of thumb, when you are building libraries that need to be used by a variety of applications, shared assemblies can be quite helpful in that they can be updated to new versions very easily.
It is obligatory to follow some semantics when using shared assemblies as such; they must be unique and therefore must have a unique name called strong name. Shared assemblies will mostly be used when a vendor, different from that of the application, builds the component, or when a large application is split into subprojects.
Global Assembly Cache (GAC)
The global assembly cache (GAC) is a repository cache for globally available assemblies. The existing framework class libraries (FCL) that are shipped with .NET are usually stored in GAC; from there they are referenced by the client applications.
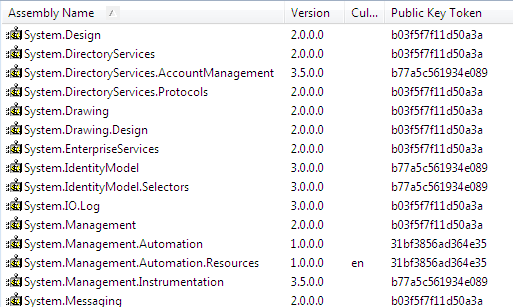
The GAC viewer can be displayed using shfusion.dll, which is a windows shell extension to view and manipulate the contents of the cache. With GAC we can view the global assembly name, type, version, culture, and the public key token.
Note:
you cannot install an executable (*.exe) assembly into GAC. Only an assembly that takes the *.dll extension can be deployed as a shared assembly
The following figure shows the GAC viewer which is opened by going into <windir>Assembly folder as;
Inside <windir>Assembly folder, you can find multiple GACxxx directories and NativeImages_<runtime version> directory. The GACxxx directories contain shared assemblies and GAC_MSIL contains the pure CIL coded assemblies. With NativeImages_<runtime version>, you can find the assemblies compiled to native code.
A shared assembly is not deployed within the same directory as a private assembly is. Rather, it is installed in the global assembly cache. But some private assemblies can also be found there. Such magic can be performed by the native image generator utility. If a private assembly is compiled to native code using the native image generator, the compiled native code goes into GAC.
Native Image Generator
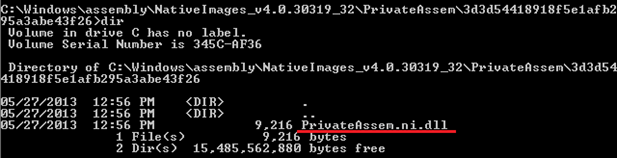
We can compile the IL code to native code at installation time. This way the program can start faster because compilation during runtime is no longer necessary. The ngen.exe utility installs the native image in the native image cache. Here, we deploy the previously created PrivateAssem.dll assembly into GAC with the following;

After executing this command, your private assembly is installed in the GAC. You can view this as follows:
Creating Shared Assembly
In order to fully get the understanding, we shall explore how to create and use assemblies with strong name implantation and how to deploy them in GAC with the GACUTIL.exe utility. This section describes the following operations;
- Building Shared Assembly
- Generating Strong Name
- Installing shared assembly into GAC
- Delay Signing
Building Shared Assembly
Building a shared assembly is not much different from creating private assemblies. The following sample creates a simple library project that encapsulates calculating maximum number.
[c language="sharp"]
using System;
namespace SharedAssem
{
public class Magic
{
private int x,y;
public Magic(int x,int y)
{
this.x = x;
this.y = y;
public int cal()
{
return Math.Max(x, y);
}
}
}
Generating Strong Name
Before you can deploy an assembly to the GAC, you must assign it a strong name, which is used to uniquely identify the publisher of a given .NET binary. As a rule of thumb, the shared assembly must be globally unique but there is a possibility that some other person has created an assembly using the same name. However, this problem is solved by generating a strong name. The strong name is accompanied by the following items:
- Name of the assembly itself;
- Version number;
- Public key, which ensures that strong name is unique;
- Culture
To provide a strong name for an assembly, first step is to generate public/private key data using the .NET framework utility sn.exe, which generates a file with the *.snk extension that contains data for two distinct but mathematically related keys. Here is the process of creating a strong name:
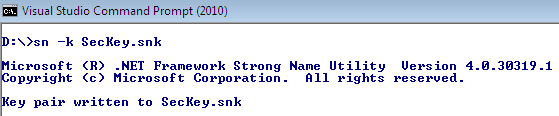
After executing this command, the SecKey.snk file is created, which is used by the shared assembly in two ways. First, make the following entry in the AssemblyInfo.cs file as;
[assembly: AssemblyKeyFile(@"D:SecKey.snk")]
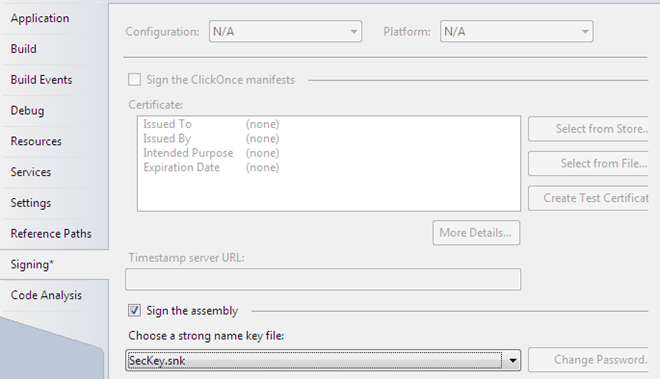
Second, open the property of the project and go to Signing tab, check the "Sign the assembly" option and choose the SecKey.snk file:
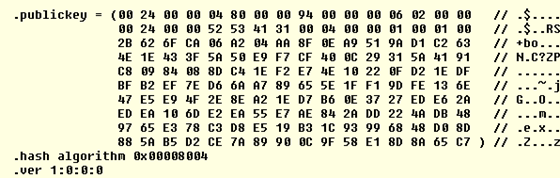
At compile time, a digital signature is generated and embedded into the assembly, based in part on public and private key data. You can view the public key entry into CIL code as follows:
Installing Shared Assembly in GAC
The final step is to deploy SharedAssem.dll in GAC. First open the Visual Studio command prompt with admin right and go to project bin folder:

Once you have done so, you can verify whether the library has been deployed successfully into GAC or not by using this command:

Delay Signing
The private key of a company should be safely stored and usually all developers will not be given access to it. That is why the signature of the assembly is added at later date, such as just before distribution. Without using a key, you cannot test the assembly and install it in GAC. So type the following commands:
First create a new unique private key pair for our assembly:
Sn –k test.snk
Since we don't want to give the key pair file containing both private and public key, we will extract the public key from our key pair:
Sn test.snk pKey.snk
The public key is extracted to the file called pKey.snk. Now add the reference of the pKey.snk file in the signing portion as earlier.
Finally, build the application and you will get the following error:
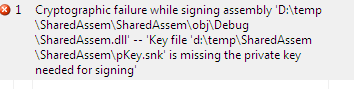
This happens because we still have not set up our assembly to skip the private key signing process. We can turn off the verification using this command:
Sn /vr SharedAssem.dll
Using Shared Assembly
When you install the shared assembly into the GAC and try to browse it using Windows Explorer, you will not find any GAC_MSIL there. In .NET 4.0, the deployed assembly is shifted to the <windir>Microsoft.NETAssemblyGAC_MSIL folder.
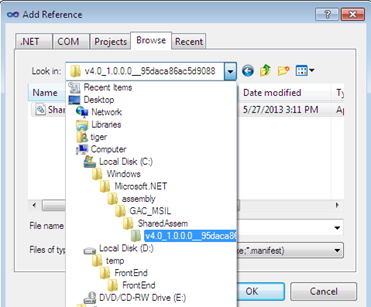
When you are building applications that use a shared assembly, the only difference from using a private assembly is in how you reference the library with Visual Studio IDE. But there is no difference, as far as the tool is concerned; you still use the Add Reference and browse the shared assembly from the earlier mentioned path as follows;
Therefore, import the SharedAssem library into the source file and put the following code:
[c language="sharp"]
using System;
namespace FrontEnd
{
class Program
{
static void Main(string[] args)
{
Magic obj = new Magic(5,7);
Console.WriteLine("Maximum Number: {0}",obj.cal());
Console.ReadLine();
}
}
}
Assembly Configuration
Version Control
Image that you have shipped version 1.0.0.0 of the SharedAssem.dll assembly and later discover a major bug or change code due to some new specification. One corrective solution would be to correct the problem and rebuild the assembly and finally redistribute it to the client. In such a case, the client has no clue about the new definitions and the application might not work properly.
A better solution is to create a new version of the existing assembly in which all the changes are made so that the client can run two version of an assembly in parallel.
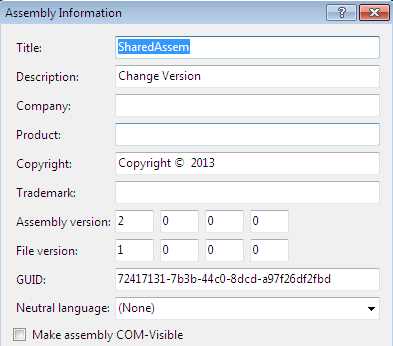
The following image shows the version 1.0.0.0 of the old SharedAssem.dll assembly:

Now we do some modification to the original SharedAssem.dll file as per the new specifications. The most important point is that we change the version number to 2.0.0.0 this time and rebuild this assembly and finally redistribute it. The changes should be as follows:
Finally install this newly updated assembly using GACUTIL.exe; now, if you look at your project Bin/Debug folder, you see that you have a new version of the assembly to use. Here you can choose which version you want to use during Add Reference.

From the aforementioned two versions of the same DLLs, we can resolve the inherent "DLL Hell" problem. We can redirect our client to a new version of an assembly without having to build the client application again. It is just required to configure our client FrontEnd.exe.config file as follows:
[xml]
<?xml version="1.0" encoding="utf-8" ?>
<configuration>
<assemblyBinding xmlns="urns:schemas-microsoft-com:asm.v1">
<dependentAssembly>
<assemblyIdentity name="SharedAssem" publicKeyToken="B77A5C561934E089" culture="neutral"/>
<bindingRedirect oldVersion="1.0.0.0" newVersion="2.0.0.0" />
</dependentAssembly>
</assemblyBinding>
</configuration>
Assembly Probing
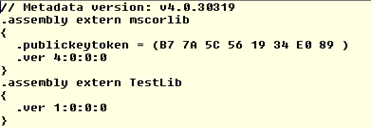
The .NET runtime resolves the location of a private assembly using probing. Probing is the process of mapping an external assembly request to the location of the requested binary file. An assembly can be loaded either implicitly or explicitly. An implicit request uses the reference of the external library file to the source code file, which can be seen by the .assembly token in MSIL code.
In the following sample, we are using the reference of an external TestLib.dll file into the console base application to utilize its functionality. Here you can see the TestLib entry in the metadata as follows:
An explicit load request happens programmatically using late binding and reflection in which LoadFrom() and Load() method use an external assembly reference:
Assembly am= Assembly.Load("TestLib");
The CLR extracts the friendly name of the assembly and begins probing the client's application directory for a file name TestLib.dll. If this file cannot be located, an attempt is made to locate an executable assembly based on the same friendly name. If both attempts fail, then runtime throws a FileNotFoundException error.
CodeBase
In some circumstances, you need to load an assembly that is not resident into GAC, and then probing would help. Your company has a policy that critical assemblies are not put into GAC. Rather. they are put into a company secure repository. So you have to redirect your application to look for these assemblies in the central repository. You can do this by setting CodeBase attribute in your application configuration file:
[xml]
<dependentAssembly>
<assemblyIdentity name="SharedAssem" publicKeyToken="B77A5C561934E089" codeBase="" version="2.0" href="d:secureNewGAC" />
</dependentAssembly>
Publisher Policy
Assume that you have an assembly used by some applications. What can be done if a bug is found in the shared assembly? Yes, you can use configuration files to redirect to the new version of this shared assembly. But probably some applications don't know this new version. They still face this problem. Using publisher policy, you can fix this problem for all applications that are using that shared assembly. Publisher policy only applied to the shared assemblies that are deployed in the GAC.
In order to create a publisher policy file, first make the following change in the application configuration:
[xml]
<dependentAssembly>
<assemblyIdentity name="SharedAssem" publicKeyToken="B77A5C561934E089" />
<bindingRedirect oldVersion="1.0.0.0-2.0.0.0" newVersion="2.0.0.0" />
</dependentAssembly>
Then, to associate the publisher policy file with the shared assembly, it is necessary to create a publisher policy assembly and put this into GAC. This can be done using al.exe utility, as follow:
al /linkresource:App.config /out:policy.1.0.SharedAssem.dll /keyfile:....SecKey.snk
Finally add this publisher policy assembly into GAC by using gacutil.exe, as follows:
Gacutil –I policy.1.0.SharedAssem.dll
Conclusion

In this article, we have learned the difference between private and shared assemblies and we have seen how the two types are created. With private assemblies, you don't need to care about the uniqueness and versioning issues because these assemblies are copied and only used by a single application. Shared assemblies, on the other hand, require you use a key for uniqueness and to define the version. This article also shows the side-by-side execution of a shared assembly and discusses the assembly central repository in GAC, where we have seen the installation of shared assembly. Finally, you learned how probing, codebase and publisher policy work with assemblies.

Learn how to secure systems with 11 courses from Infosec Skills instructor and #1 best-selling author Ted Harrington.
- Hack your system
- Establish your threat model
- Spend wisely
- And more
In this Series
- Advanced .NET Assembly Internals [Updated 2019]
- DevSecOps: Moving from “shift left” to “born left”
- What’s new in the OWASP Top 10 for 2023?
- DevSecOps: Continuous Integration Continuous Delivery (CI-CD) tools
- Introduction to DevSecOps and its evolution and statistics
- MongoDB (part 3): How to secure data
- MongoDB (part 2): How to manage data using CRUD operations
- MongoDB (part 1): How to design a schemaless, NoSQL database
- Understanding the DevSecOps Pipeline
- API Security: How to take a layered approach to protect your data
- How to find the perfect security partner for your company
- Security gives your company a competitive advantage
- 3 major flaws of the black-box approach to security testing
- Can bug bounty programs replace dedicated security testing?
- The 7 steps of ethical hacking
- Laravel authorization best practices and tips
- Learn how to do application security right in your organization
- How to use authorization in Laravel: Gates, policies, roles and permissions
- Is your company testing security often enough?
- Authentication vs. authorization: Which one should you use, and when?
- Why your company should prioritize security vulnerabilities by severity
- There’s no such thing as “done” with application security
- Understanding hackers: The insider threat
- Understanding hackers: The 5 primary types of external attackers
- Want to improve the security of your application? Think like a hacker
- 5 problems with securing applications
- Why you should build security into your system, rather than bolt it on
- Why a skills shortage is one of the biggest security challenges for companies
- How should your company think about investing in security?
- How to carry out a watering hole attack: Examples and video walkthrough
- How cross-site scripting attacks work: Examples and video walkthrough
- How SQL injection attacks work: Examples and video walkthrough
- Securing the Kubernetes cluster
- How to run a software composition analysis tool
- How to run a SAST (static application security test): tips & tools
- How to run an interactive application security test (IAST): Tips & tools
- How to run a dynamic application security test (DAST): Tips & tools
- Introduction to Kubernetes security
- Key findings from ESG’s Modern Application Development Security report
- Microsoft’s Project OneFuzz Framework with Azure: Overview and concerns
- Software maturity models for AppSec initiatives
- Best free and open source SQL injection tools [updated 2021]
- Pysa 101: Overview of Facebook’s open-source Python code analysis tool
- Improving web application security with purple teams
- Open-source application security flaws: What you should know and how to spot them
- Android app security: Over 12,000 popular Android apps contain undocumented backdoors
- 13 common web app vulnerabilities not included in the OWASP Top 10
- Fuzzing, security testing and tips for a career in AppSec
- 14 best open-source web application vulnerability scanners [updated for 2020]
- 6 ways to address the OWASP top 10 vulnerabilities
- Ways to protect your mobile applications against hacking

Get certified and advance your career
- Exam Pass Guarantee
- Live instruction
- CompTIA, ISACA, (ISC)², Cisco, Microsoft and more!

Application security
Application security
Application security
DevSecOps: Continuous Integration Continuous Delivery (CI-CD) tools
Application security