The ASP.NET Internals

ASP.NET Configuration Options
The most important configurations in the web.config file will be described in this section:

Become a certified reverse engineer!
<authenticaton>
The authentication tag is used at the application level and is used to identify the client. There are four authentication modes we can choose from when setting this element. Those modes are the following: None, Windows, Forms, Passport. If we don't need any authentication, we can simply set the authentication mode to none. We can also use Windows authentication mode if we would like IIS to handle the authentication for us; in a usual scenario, the authentication credentials are sent to the IIS server, whose job is to check the validity of them and respond appropriately. The IIS gives us four standard authentication options that we can use: Anonymous, Basic, Digest and Windows integrated. Forms use web application forms to collect the user supplied username and password and validate them. With passport authentication, we're actually using Microsoft's Passport database to authenticate against, which is good because users don't need to constantly re-register on various sites, but it costs a bit of money to use.
Let's take a look at the authentication tag as used by the default application, which can be created by the Visual Studio:
<authentication mode="Forms">
<forms loginUrl="~/Account/Login.aspx" timeout="2880" />
</authentication>
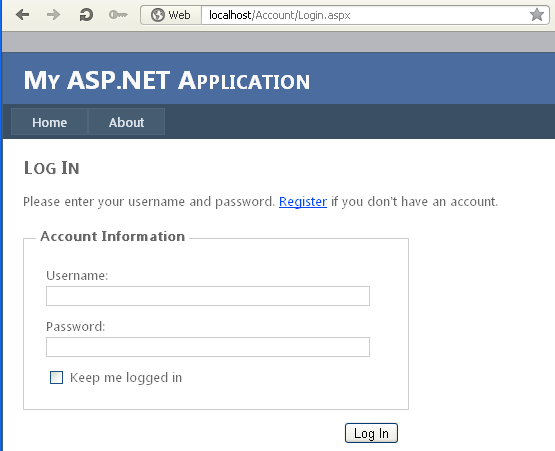
We can see that we need to login with the Forms authentication mode if we're trying to access the Account/Login.aspx website. This can be seen on the picture below, where we can clearly see that we need to input the right username and password to successfully authenticate:
<authorization>
The next important field is <authorization> that controls the clients' access to the resources in the same directory. Inside this element, we can use either <allow> or <deny> elements, where both of them can be used to allow/deny access to users and resources. We can use different attributes with those two elements to give/deny the exact group of users certain permissions. The attributes are the following:
- users: we can use a list of user names which we allow/deny access to certain resources, but there are also two other characters that have a special meaning. The ? character can be used to specify anonymous users, while all users are specified with the * character.
- roles: we can specify a list of roles which are allowed/denied to access certain resource.
- verbs: we can specify a list of HTTP methods to which the access is allowed/denied.
Let's take a look at the default Visual Studio application's Account/directory that contains the following web.config configuration file:
[xml]
<?xml version="1.0"?>
<location path="Register.aspx">
<system.web>
<authorization>
<allow users="*"/>
</authorization>
</system.web>
<system.web>
<authorization>
<deny users="?"/>
</authorization>
</configuration>
[/xml]
In the above configuration, we're specifying that all users are allowed access to the Register.aspx resource, while by default anonymous users are not allowed to access anything else.
<compilation>
The compilation element is used to define the compiler settings. There are a number of attributes that we can use with the compilation element, but the following are the most useful:
- debug: specifies if the debugging information should be printed to web browser.
- defaultLanguage: specifies in which language the application was written in.
- targetFramework: specifies the ASP.NET target framework which is used to compile the application.
Let's take a look at the default Visual Studio application that contains the following <compilation> settings:
[xml]
<compilation debug="true" targetFramework="4.0" />
We've asked the application to print debugging information and telling it that it was compiled for the 4.0 ASP.NET target framework. We can also see this information in the project's properties under the Application > Target framework setting.
ScriptResource and WebResource
From Microsoft ASP.NET 2.0, we can embed static files, like html files, css files, image files and scripts in assembly as .resources. But then we need a handle to access those resources, which is exactly what the WebResource.axd provides. This is why the WebResource.axd file is used to retrieve assembly resources and send them as a response to the request in a web browser. When we send a request to the WebResource.axd, the handler will look up the web resource identifier and try to load the assembly that contains the resource. If successful, it will get the data from the .resource assembly and send it to the client. The URL for WebResource.axd looks like this:
[plain]
WebResource.axd?d=<encrypted_id>&t=<time_stamp>
The d parameter is used as an ID to request the resource we want, while the t parameter is the time stamp that is used to check whether the resource has changed from when it was last requested.
The question arises: why would we even want to use WebResource.axd, when we can simply serve static files normally? The answer is that we can deploy web applications easier and faster because we need to deploy a smaller number of files, not to mention that we need to maintain them.
Let's take a look at the current default Visual Studio application's files as they appear in the Solution Explorer; this can be seen on the picture below:
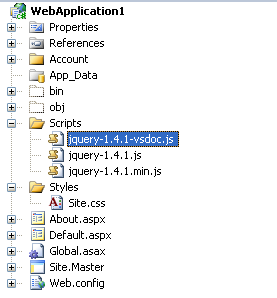
We can see that we're using a number of static files like jquery.js files, as well as the Site.css style sheet. To use WebResources.axd instead, we need to create a new directory called Resources/ at the document root of the web application (actually we can name the folder anything we want, but let's just name it Resources as advised). Right click on the project and select Add New Folder and name the folder Resources. The project tree will now look like presented on the picture below:
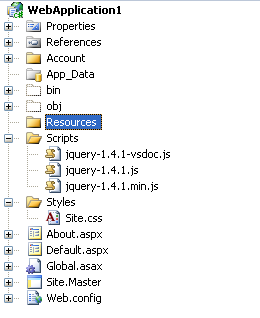
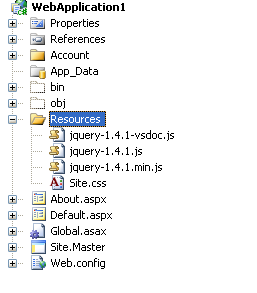
Notice that the Resources folder has been added to the list. After that, we need to add some static files to the Resources directory. We can do that by simply dragging and dropping; we'll drag each jsquery.js script as well as the Site.css files to the newly created Resources directory. After that, the Scripts and Styles directories are not needed anymore and we can delete them. The new project's tree structure now looks like this:
If we try to restart the web page now, it shouldn't load correctly, since we moved the css style sheet file. On the picture below, we can see that this is indeed true, because the css style sheet wasn't read by the website, since it's not available in the previous location anymore:
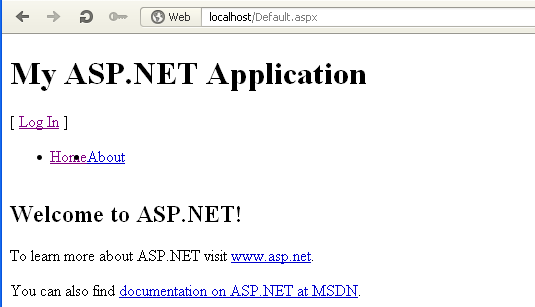
If we look at the source code of the web page, we can see that it's trying to access the Styles/Site.css CSS file, but obviously it can't, since the web page doesn't have any style applied to it. But let's nevertheless try to access that file to check whether it's available or not. On the picture below, we can clearly see that the Site.css file is unreachable.
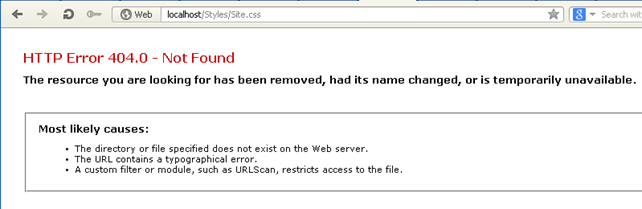
So we just proved that if we move the Site.css style sheet file to some other directory, the application won't find it and the web page will not be able to load it; this isn't exactly something new or hard to understand, but we're doing it because we want to make a point that if we remove the Site.css now, the site won't be able to use it, but we'll later add it by using the WebResource.axd and that's when the site should look like it did at the beginning, with the style sheet applied.
So the first thing we need to do is to prepare the web resources that we've just added to the Resources directory. We need to select all of the files in there and right-click on them, then select Properties. The following windows should open:
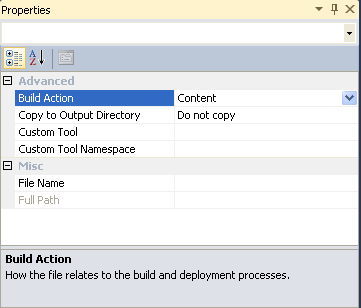
Clearly we can see that the Build Action is the setting we need to change. Notice at the bottom of the picture where it says that the Build Action option specifies how the file should be built and deployed. Currently the field holds a value Content, because each file we selected has this option set; remember that the files are loaded normally now, by linking to them in the HTML as follows:
[plain]
<link href="Styles/Site.css" rel="stylesheet" type="text/css" />
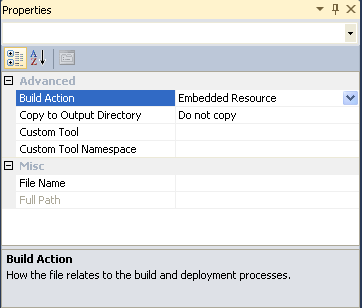
We need to change the Build Action to "Embedded Resource", as can be seen on the picture below:
Next, we need to register the resources as WebResource; we can do that with the WebResource attribute. We can place it in any .cs file, but it wouldn't be very good if we would have web resources registered in various places. For this reason, it's best to register all files in the Properties/AssemblyInfo.cs file by using the WebResource attribute. The syntax for registering resources as WebResource in any .cs file is as follows:
[plain]
[assembly: WebResource("webresource_name", "content_type")]
The webresource_name is the name of the resource that we're trying to embed in the assembly. The content_type is the MIME type of the resource. First we need to put the following line on the top of the AssemblyInfo.cs to enable the use of the WebResource:
[plain]
using System.Web.UI;
After that, we can register the resources normally with the WebResource. To register all previously moved static files we can write something like the following code and add it at the end of the AssemblyInfo.cs file:
[plain]
/*
* Web Resources
*/
[assembly: WebResource("WebApplication1.Resources.Site.css", "text/css")]
[assembly: WebResource("WebApplication1.Resources.jquery-1.4.1-vsdoc.js", "text/javascript")]
[assembly: WebResource("WebApplication1.Resources.jquery-1.4.1.js", "text/javascript")]
[assembly: WebResource("WebApplication1.Resources.jquery-1.4.1.min.js", "text/javascript")]
Notice that the name of the resources is comprised with the project name, which is WebApplication1, followed by the folder name Resources where they are located, followed by the actual name of each resource. The second argument is the MIME type of each resource that is sent as a Content-Type HTTP header in a response and may be used by the web browser in various ways. We used the "text/css" MIME type for style sheets, while the JavaScript files use the "text/javascript" MIME type.
We've just registered our added resources as web resources, but we still have to get the URL of each resource to be able to access them. We already said that before the web page used the following code to request the resource, which is then downloaded and applied to the web page.
[plain]
<link href="Styles/Site.css" rel="stylesheet" type="text/css" />
This wouldn't work now, however, since the resources have been relocated to some other file and it's not defined as a Content resource anymore, but as an EmbeddedResource. This is why we need to access it differently, with the use of the WebResource.axd script that accepts the d parameter, which is the ID of the resource we would like to access. But how do we get the value of the d parameter, which is needed to access the resource? This can be done by calling the GetWebResourceUrl function that accepts two arguments: the first argument specifies the type of the server-side resource and a resource name. To use this method, we must first create the instance of the ClientScriptManager class to which the function belongs. We can put that in the Default.aspx.cs file, which can then look like this:
[plain]
namespace WebApplication1
{
public partial class _Default : System.Web.UI.Page
{
void Page_Init(object sender, EventArgs e)
ClientScriptManager cs = Page.ClientScript;
HtmlLink myHtmlLink = new HtmlLink();
myHtmlLink.Href = cs.GetWebResourceUrl(typeof(SiteMaster), "WebApplication1.Resources.Site.css");
cs.RegisterClientScriptResource(typeof(SiteMaster), "WebApplication1.Resources.Site.css");
myHtmlLink.Attributes.Add("rel", "stylesheet");
string[] resourceNames = Assembly.GetExecutingAssembly().GetManifestResourceNames();
foreach (string res in resourceNames)
{
Debug.WriteLine("Resource name: "+res);
}
}
}
We loaded the "WebApplication1.Resources.Site.css" CSS resource and added it to the header of the web page. At the end of the function, we're also printing all the resources to verify if they got loaded successfully.
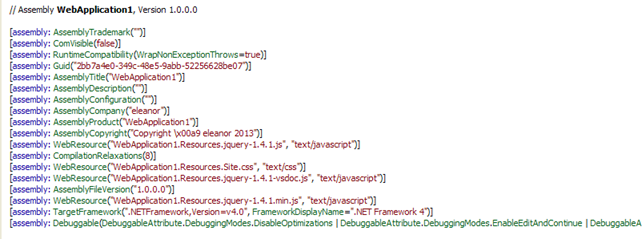
If we run the application now, we should see that the CSS file is indeed loaded and working. We've just used the WebResource.axd to get access to our CSS resource file; we won't repeat the steps for the JavaScript files, because they are primarily the same. If there are any problems loading the resource files, we can download Reflector, that's accessible here: http://www.reflector.net/, and look inside the generated DLL files located in the bin/ directory of the application. The .NET Reflector looks like the picture below:
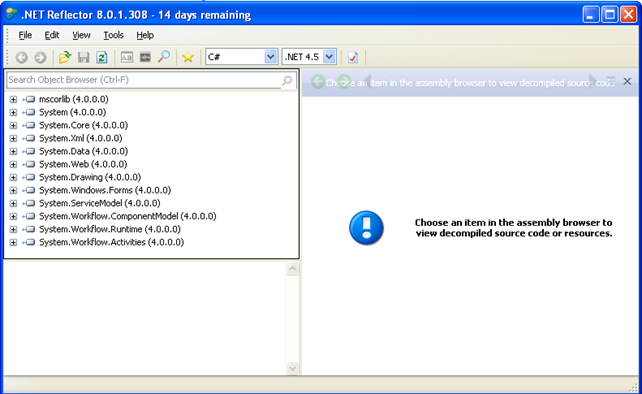
If we look at the WebApplication1, we can clearly see that the path to the resources is correct, as can also be seen on the picture below:
If the resources are still not loaded correctly, there's a nice tip here: http://stackoverflow.com/questions/320484/webresource-hell-resource-cannot-be-found
It suggests that we should call GetWebResourceUrl function with the type of our .master file. In our case, the master file contains the class SiteMaster, which we should use as the first parameter to the GetWebResourceUrl function. After that, everything should work just fine.
Let's verify that the CSS files have indeed been loaded successfully. On the picture below we can see that we've accessed the CSS file through the WebResource.axd and that the CSS is actually visible and being read correctly.
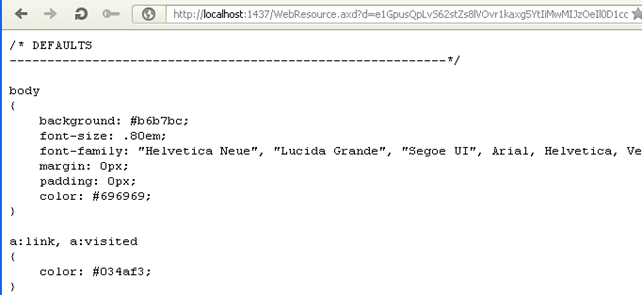
We can see that we can successfully get our hands on the resources with using the WebResource.axd, which is located at document root, according to the URIs in the source of a web page. However, there isn't actually a WebResource.axd file in the document root of the application; this is because .axd files are implemented as HTTP handlers, so they don't exist as an ASP.NET web page. If we look at the web.config configuration file accessible in C:WINDOWSMicrosoft.NETFrameworkv4.0.30319Config directory, we can see the following, which directly relates to our WebResource.axd handler:
[plain]
<add path="WebResource.axd" verb="GET" type="System.Web.Handlers.AssemblyResourceLoader" validate="True" />
If a request comes from to the WebResource.axd, use the AssemblyResourceLoader HTTP handler to handle the request. This fully explains that the WebResource.axd file is just a HTTP handler implemented by the .NET framework to take requests and return the resources from the assembled files.
Conclusion
Become a certified reverse engineer!
We've seen how we can embed static files inside the compiler assembly file, which enabled us to have every static resource available in a single file. This was a more complete introduction to the WebResource.axd and ASP.NET, and this is the basis to understanding the Oracle Padding attack.
- Exam Pass Guarantee
- Live expert instruction
- Hands-on labs
- CREA exam voucher
In this Series
- The ASP.NET Internals
- Kali Linux: Top 8 tools for reverse engineering
- Stacks and Heap
- Top 8 reverse engineering tools for cyber security professionals [updated 2021]
- Arrays, Structs and Linked Lists
- Reverse engineering obfuscated assemblies [updated 2019]
- Crack Me Challenge Part 4 [Updated 2019]
- Writing windows kernel mode driver [Updated 2019]
- Assembly programming with Visual Studio.NET
- The basics of IDA pro
- Reverse engineering tools
- Hacking tools: Reverse engineering
- Reverse engineering a JavaScript obfuscated dropper
- Reverse Engineering – LAB 3
- Exploiting Protostar – Stack 0-3
- Reversing Binary: Spotting Bug without Source Code
- Reverse engineering virtual machine protected binaries
- Introduction to Reverse Engineering
- Pafish (Paranoid Fish)
- Extending Debuggers
- Encrypted code reverse engineering: Bypassing obfuscation
- Buffer Overflow Attack & Defense
- Invoking Assembly Code in C#
- iOS Application Security Part 32 - Automating tasks with iOS Reverse Engineering Toolkit (iRET)
- Hooking IDT
- A Guide to Debugging Android Binaries
- Kernel debugging with Qemu and WinDbg
- Shared Folders with Samba and Qemu
- Testing Hooks via the Windows Debugger – An Introduction to RevEngX
- Reverse Engineering with Reflector
- Applied Reverse Engineering with IDA Pro
- Injecting spyware in an EXE (code injection)
- Disassembler Mechanized Part 4: DLL Injector Development
- Disassembler Mechanized Part 3: Code Injection Operation
- Debugging TLS callbacks
- Disassembler Mechanized Part 2: Generating C# and MSIL code
- System address map initialization in x86/x64 architecture part 2: PCI express-based systems
- Coding of Disassembler
- Applied cracking & byte patching with IDA Pro
- .NET reversing with Reflexil
- Reversing firmware part 1
- Reverse Engineering with Reflector: Part 1
- Remoting Technology
- Reverse engineering with OllyDbg
- Understanding Session Fixation
- Optimizing Managed Code Execution
- File system manipulation
- The BodgeIt store part two
- The BodgeIt store part one
- Understanding Windows Internal Call Structure
- Pin: Dynamic Binary Instrumentation Framework

Get certified and advance your career
- Exam Pass Guarantee
- Live instruction
- CompTIA, ISACA, (ISC)², Cisco, Microsoft and more!

Reverse engineering
Reverse engineering
Reverse engineering
Top 8 reverse engineering tools for cyber security professionals [updated 2021]
Reverse engineering