SSL Pinning in UWP Apps

Introduction and Background:
In the previous article, we have discussed some of the common checks we need to make while testing Windows application traffic.
A quick recap of our discussion in the previous article:
Earn two pentesting certifications at once!
Enroll in one boot camp to earn both your Certified Ethical Hacker (CEH) and CompTIA PenTest+ certifications — backed with an Exam Pass Guarantee.
- Apps may make HTTP connections and send sensitive data in clear text, which will put the application in risk.
- Apps may ignore SSL warnings making the app potentially vulnerable to MiTM attacks.
- Even if developers safely implement SSL connections in the app by not ignoring SSL warnings, it is still possible for the attacker to intercept the traffic. By adding PortSwigger CA certificate to our machine's trust store, one can see the SSL traffic in Burp without getting any errors on the client application.
The bottom line is, the so-called secure SSL implementation we have seen may minimize the chances of remote attackers performing MiTM attacks as they have to present a trusted certificate. But, attackers who are targeting the application can still add the root CA certificate to their trust store and analyze the traffic of the application, which is one of the key elements during an assessment. Preventing someone from being able to analyze the app traffic will be one good way to increase the efforts that an attacker has to put to be able to attack the application successfully. Though it doesn't give you 100% assurance that the app will be safe, it will surely increase the amount of time required to attack the application. If you still didn't guess what we are going to discuss, it is SSL pinning.
[download]
SSL Pinning:
The concept of SSL Pinning is introduced to prevent this possibility of adding a certificate to the device's trust store and compromising the SSL connections. With SSL pinning, it is assumed that the app knows which servers it communicates with. We get the details of the SSL certificate of this server and add it to the application. Now, the application doesn't need to rely on the device's trust store, rather it makes it's own checks verifying if it is communicating with the server whose certificate details are already stored inside this application. This is how SSL pinning works.
Enough theory!
Let us discuss how SSL Pinning can be practically implemented in UWP Applications. If you want to practice while reading the article, download the sample application from the Downloads section. The app is implemented to run against the same server we used in the previous article. So, make sure that the VM is running.
Credentials for the server: securestore:securestore
App's functionality:
Launch the application, and you should see the following screen.

This app only trusts the server; we have downloaded, and it throws errors when connected to any other server using HTTPS.
To test this, enter the IP address of the Ubuntu Server into the application as shown in the figure below and click Connect to the server.

You should see a success message as shown in the figure below.

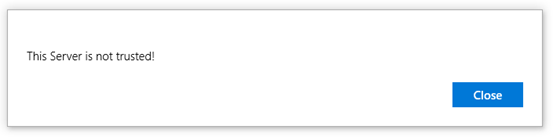
If you enter any other address and try to make the connection, it will throw an error as shown in the figure below.
Implementation:
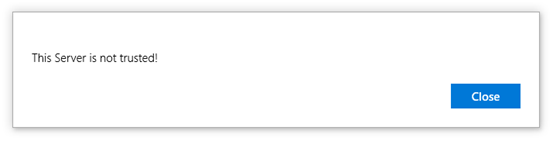
To better understand this SSL pinning example, let us try intercepting the traffic using Burp Proxy and enter the IP address of our Ubuntu Server and try connecting to it once again. You should see the same error we have seen above.
You cannot see the traffic of this application in Burp proxy anymore even if you add Burp's root CA certificate to your machine's trust store.
Let us how it is done. There are multiple ways to implement SSL pinning in UWP apps. We have implemented it using one of the samples provided in Microsoft's documentation about building secure apps.
We have taken the thumbprint of the Ubuntu Server's SSL certificate and hard coded it in the application. Before sending any sensitive data to the server, the app will first make a connection to the server and gets the thumbprint of it and verifies if it is matching with the hard coded thumbprint. If it doesn't match, it will throw an error.
When you try to connect to the Ubuntu Server over HTTPS, the following certificate is presented. You can check it by opening the certificate in your browser.

As you can see, we have used a self-signed certificate for demo purposed, but it is still safe to connect as long as SSL pinning is not bypassed.
First, let us take the thumbprint of it to hard code it into the app.
The following SHA1 Fingerprint from the above certificate is the thumbprint we are looking for.
11:11:5C:00:7D:D1:4E:D8:71:94:5A:61:7E:E3:92:4C:EF:44:44:1A
It is in HEX format. Convert each of these values into decimal and save it as a byte array.
The following website can be used to convert hex to decimal online.
http://www.rapidtables.com/convert/number/hex-to-decimal.htm
Just to understand how we implemented SSL Pinning, let us convert the first and last values to their decimal equivalents. The same goes with others.
11 in hex will become 17 in decimal. You can see it in the figure below.

1A in hex will become 26 in decimal. You can see it in the figure below.

Similarly, all the other values can be converted into their decimal equivalents and form a byte array as shown in the following code snippet.

Whenever the app connects to the server, it will make sure that it will dynamically get the thumbprint and check it against the above byte array.
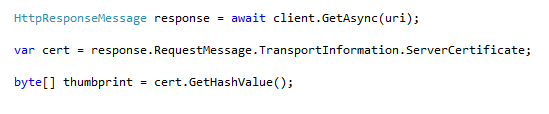
The following code snippet shows that the app is getting the thumbprint and saving it in a variable of type byte array.
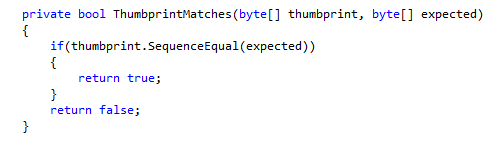
It is then compared against the hardcoded thumbprint using the following piece of code.
If the thumbprint matches, you will be able to make a connection with the server further.
Just for the sake of understanding, following are the byte arrays logged into the Visual Studio console when the app is connected through burp proxy.

The first-byte array in the above figure is taken by the app from the certificate presented by Burp. The second-byte array is the expected one, which is hard coded. Since these two are not matching, we have received the following error.
When no proxy is used while connecting to the Ubuntu Server, the thumbprint extracted from the server's certificate and the expected thumbprint are same as shown in the figure below.

Note: The idea behind the above example is to show how SSL pinning works. If a similar implementation is used in Android/iOS apps, it can be easily bypassed by hooking into the app using runtime manipulation tools. So, make sure that your implementation is complex enough, and hooking/patching is not allowed, and the code is obfuscated. Again, all these are to increase the attacker's efforts, but it may not be 100% fool proof in front of a dedicated attacker.
Become a Certified Ethical Hacker, guaranteed!
Get training from anywhere to earn your Certified Ethical Hacker (CEH) Certification — backed with an Exam Pass Guarantee.
Conclusion:
In this article, we have discussed how SSL pinning can be implemented in UWP apps to reduce the chances of attackers being able to intercept app's SSL traffic. Though SSL pinning is a recommended security mechanism to prevent SSL based attacks, it is still possible for a dedicated attacker to bypass it and still intercept the traffic.
Enroll in an Ethical Hacking Boot Camp and earn two of the industry’s most respected certifications — guaranteed.
- CEH exam voucher
- PenTest+ exam voucher
- Exam Pass Guarantee
- Live online hacking training
In this Series
- SSL Pinning in UWP Apps
- Intelligence-led pentesting and the evolution of Red Team operations
- Red Teaming: Taking advantage of Certify to attack AD networks
- How ethical hacking and pentesting is changing in 2022
- Ransomware penetration testing: Verifying your ransomware readiness
- Red Teaming: Main tools for wireless penetration tests
- Fundamentals of IoT firmware reverse engineering
- Red Teaming: Top tools and gadgets for physical assessments
- Red teaming: Initial access and foothold
- Top tools for red teaming
- What is penetration testing, anyway?
- Red Teaming: Persistence Techniques
- Red Teaming: Credential dumping techniques
- Top 6 bug bounty programs for cybersecurity professionals
- Tunneling and port forwarding tools used during red teaming assessments
- SigintOS: Signal Intelligence via a single graphical interface
- Top tools for mobile android assessments
- Top tools for mobile iOS assessments
- Red Team: C2 frameworks for pentesting
- Inside 1,602 pentests: Common vulnerabilities, findings and fixes
- Red teaming tutorial: Active directory pentesting approach and tools
- Red Team tutorial: A walkthrough on memory injection techniques
- Python for active defense: Monitoring
- Python for active defense: Network
- Python for active defense: Decoys
- How to write a port scanner in Python in 5 minutes: Example and walkthrough
- Using Python for MITRE ATT&CK and data encrypted for impact
- Explore Python for MITRE ATT&CK exfiltration and non-application layer protocol
- Explore Python for MITRE ATT&CK command-and-control
- Explore Python for MITRE ATT&CK email collection and clipboard data
- Explore Python for MITRE ATT&CK lateral movement and remote services
- Explore Python for MITRE ATT&CK account and directory discovery
- Explore Python for MITRE ATT&CK credential access and network sniffing
- Top 10 security tools for bug bounty hunters
- Kali Linux: Top 5 tools for password attacks
- Kali Linux: Top 5 tools for post exploitation
- Kali Linux: Top 5 tools for database security assessments
- Kali Linux: Top 5 tools for information gathering
- Kali Linux: Top 5 tools for sniffing and spoofing
- Kali Linux: Top 8 tools for wireless attacks
- Kali Linux: Top 5 tools for penetration testing reporting
- Kali Linux overview: 14 uses for digital forensics and pentesting
- Top 19 Kali Linux tools for vulnerability assessments
- Explore Python for MITRE ATT&CK persistence
- Explore Python for MITRE ATT&CK defense evasion
- Explore Python for MITRE ATT&CK privilege escalation
- Explore Python for MITRE ATT&CK initial access
- Top 18 tools for vulnerability exploitation in Kali Linux
- Explore Python for MITRE PRE-ATT&CK, network scanning and Scapy
- Kali Linux: Top 5 tools for social engineering
- Basic snort rules syntax and usage [updated 2021]

Get certified and advance your career
- Exam Pass Guarantee
- Live instruction
- CompTIA, ISACA, (ISC)², Cisco, Microsoft and more!

Penetration testing
Intelligence-led pentesting and the evolution of Red Team operations

Penetration testing
Red Teaming: Taking advantage of Certify to attack AD networks
Penetration testing
Penetration testing
Ransomware penetration testing: Verifying your ransomware readiness