Reversing Loops

Introduction
Every program nowdays contains branch statements where the decision making happens and loops where we're repeating some piece of code. Obviously, we could write a program that wouldn't use any branching or looping, but such a program wouldn't be very good or optimized. This is why it's safe to assume that every program out there uses branches and loops to do its job.

In this tutorial we'll take a look how looping statements from a higher programming language like C++ are translated to lower assembly language. We'll present a program in C++ code and then compile it toreverse engineer the compiled executable to see how the higher programming concepts are linked into lower programming concepts.
The For Loop
We all know that a 'for loop' is executed until the condition is true, after which the loop is terminated. I think this is best presented with an example, so let's take a look at an example written in C++ language:
[cpp]
#include "stdafx.h"
int _tmain(intargc, _TCHAR* argv[]) {
for(inti=0; i<10; i++) {
printf("Number: %d!n", i);
/* wait */
getchar();
return 0;
}
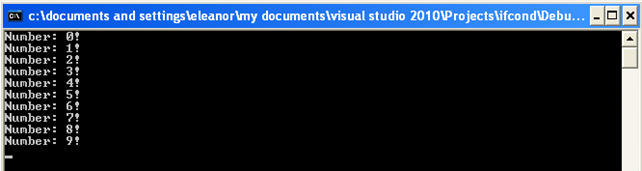
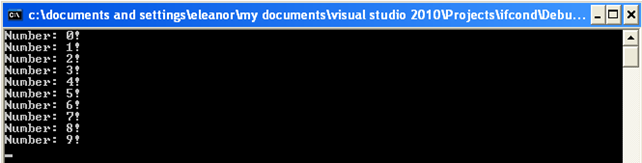
The code is very simple; it contains just one for loop that uses the variable i for a counter, which counts from 0 to 9. When the code is compiled and executed, ten lines will be displayed, each containing the number from 0 to 9 (including). We can see the result of running the program on the picture below:
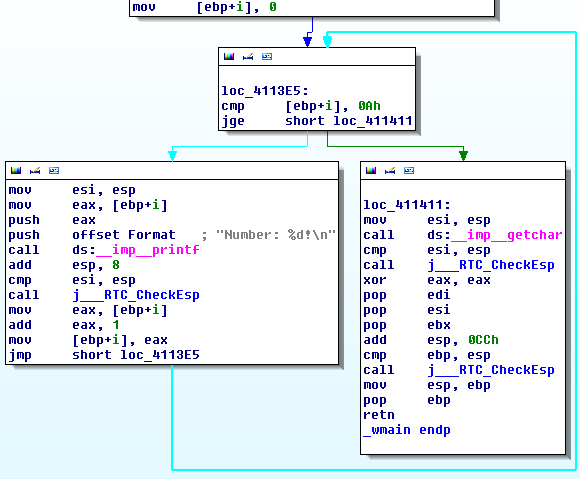
But we would like to see how the code is compiled into low-level assembly instructions. Let's take a look at the graph representation of the program above.
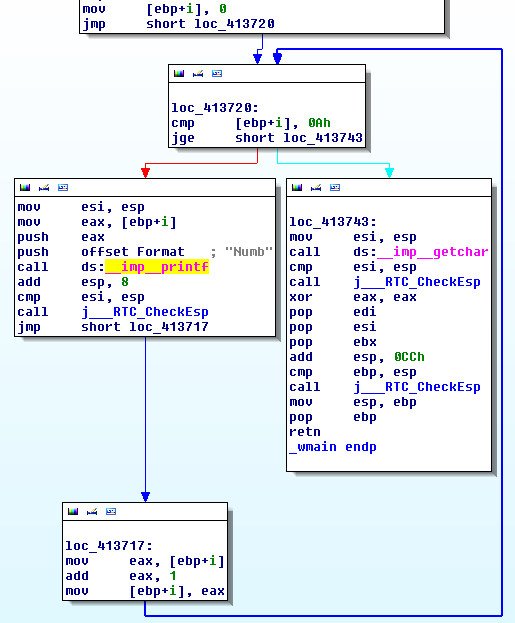
First, the number 0 is stored at the stack offset [ebp+i] and then a jump to the next block happens where we're comparing the value in [ebp+i] to the number 10. If the number is greater or equal to 10 then we're ending the loop and jumping to the right code block that calls the getchar() function to pause the execution of the program. Otherwise we're calling the left block that loads the counter value from [ebp+i] to register eax. Then it pushes the counter and the string to be displayed on the stack as parameters to the printf function and calls the printf function. This is where the actual printing of the strings to the console window occurs. After the function call we're adding the number 8 to the esp stack pointer to delete the two previously pushed parameters on the stack. Then we're jumping to the loc_413717 location where we're storing the counter value from [ebp+i] into register eax, increasing the number in register eax by one and storing the value back at the [ebp+i] location. Then we're jumping back to the loc_413720 to effectively construct a loop.
Let's take a look at a little bit more complex example. The code is presented below:
[cpp]
#include "stdafx.h"
int _tmain(intargc, _TCHAR* argv[]) {
for(inti=0, j=0; i<10 && j<100; i++, j=i*i) {
printf("Number: %d : %d!n", i, j);
/* wait */
getchar();
return 0;
}
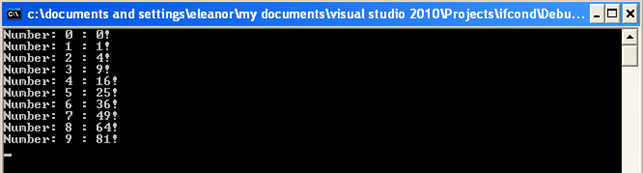
In the code above we're creating two counters i and j, where the counter i should be lower than 10 and the counter j should be lower than 100 (it would be better if the second argument would be lower or equal to 81, because the counter i reaches the maximum number of 9 and i*i = 9*9 = 81, but we'll use 100 because it doesn't matter here). Then we're increasing the counter i by 1 and initializing the counter j to i*i, which calculates the power 2 of the counter i each loop. When the program is compiled and executed, the output should look like this:
The whole graph of the program, as generated by Ida, is presented on the picture below:
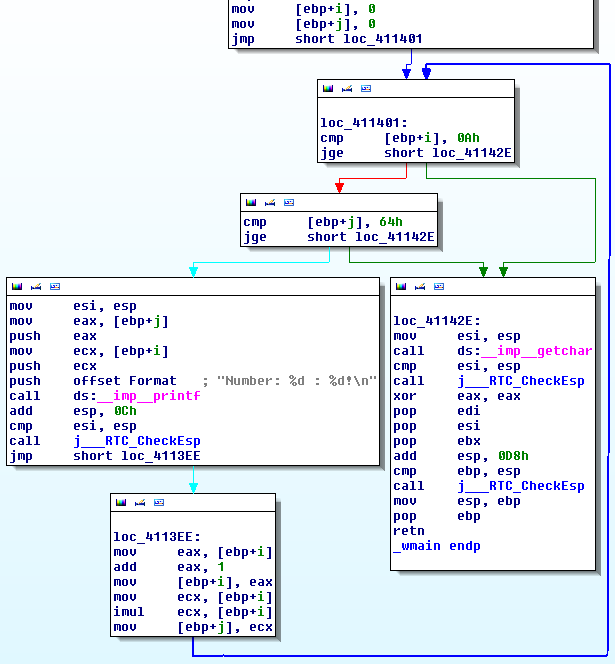
First we're initializing the counter variables [ebp+i] and [ebp+j] to zero and jumping to the next code block, where we're comparing the variable i to number 10. If the counter i is lower than 10, we're executing the next block where we're comparing the counter j to 100. If that is true, we must execute the loop block code where we're printing the "Number %d : %d!" to the console window. After that, we must also take care of increasing the counters. The counter i is loaded into register eax, increased by one and saved to the stack, while the counter j is calculated with a formula i*i. After that, the loop continues. Notice that 'for loops' are quite easy to stop; at first they use some counters, after which the loop body is executed and the counters are being incremented in some way.
The While Loop
In this subsection of the article we'll take a look at the 'while loop'. The code example is presented below:
[cpp]
#include "stdafx.h"
int _tmain(intargc, _TCHAR* argv[]) {
inti=0;
while(i< 10) {
printf("Number: %d!n", i);
i++;
/* wait */
getchar();
return 0;
}
In the example above, we're initializing the counter variable i to zero and using the while loop to print the message to the console window. Each time in the loop we must also increment the counter i, so that the 'while loop' doesn't loop infinitely, because the condition would always be satisfied.
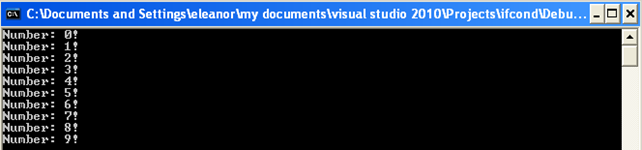
When the program is run and executed, it will display the following to the screen:
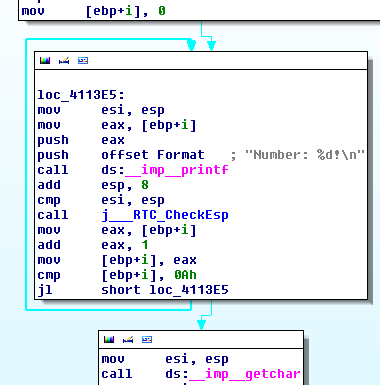
The picture below presents the disassembly graph in Ida of the assembly instructions of the above code where the Visual Studio compiler was used to compile the program:
We've using the counter i that's stored in the stack offset [ebp+i] and it's being initialized to zero at the beginning of the code. After that, the comparison happens, where we're comparing whether the counter i is lower than the number 10. If it is, we're continuing the execution of the program by printing the "Number: %d!" message to the console window. In the body of the 'while loop', we're also incrementing the counter by 1. Otherwise we're jumping to the address loc_411411 and terminating the program. We can see that the code of a 'while loop' is quite similar to the one using the 'for loop', so it's not easy to determine if the program uses the 'while' or 'for' loop. The only indicator is that in 'for loops' the counters are being incremented at a lower address than the function body and we must jump to it after the function body completes its execution, but with while loops, the counter incrementsare part of the function body itself.
The Do-While Loop
Let's first present the program that uses the 'do-while' loop, but it's essentially the same as the previous example where we used the 'while' loop.
[cpp]
#include "stdafx.h"
int _tmain(intargc, _TCHAR* argv[]) {
inti=0;
do {
printf("Number: %d!n", i);
/* wait */
getchar();
return 0;
}
In the program, we're first initializing the counter i to 0 and then printing the "Number: %d!" as long as the counter is smaller than 10. Notice that we didn't put the i++ incrementscounter logic into the 'while' body loop, but into the while condition just to see whether anything is changed from the previous example, where the counter incrementswereplaced in the loop body. First, let's present what the output of the program if we compile and execute it. The result of running the program can be seen below:
Next, let's see how Ida presents the disassembly graph of the compiled executable:
On the picture above, we're first initializing the counter to 0 and storing the result into the stack offset [ebp+i]. After that we're calling the printf function and printing the "Number: %d!" string without checking whether any condition is true. This happens because we're in a 'do-while loop' where the first iteration of the loop always happens regardless of the conditions in place. Next we're increasingthe counter by 1 and checking whether the counter is lower than 0xA (10 in decimal). If this is true, we're repeating the loop, otherwise we're terminating it. We can immediately notice the difference between the 'while' and 'do-while' loop, because in a 'while' loop we're checking whether the condition holds before executing the loop body, while in a 'do-while' loop we're doing that at the end of the loop body.
Conclusion
We've seen various concepts of loops being used in this article. First, we've looked at the 'for' loop which is basically the same as the 'whil'e loop, except that the counter incrementshappen in a separate block, while in the 'while' loop it is part of the loop body. We've also looked at the more complicated 'for' loop example, which produces slightly different code, but not as complicated as it may seem at first glance. We've also looked at the 'do-while' loop, which differs from the 'while' loop, regarding checking the condition at the end of the loop body, while the 'while' loop checks this at the beginning.
At the end of the day, loops are very simple to observe and are quite often seen in the disassembly listing, because where would we be without loops? They must be present in every program: basic as well as complicated programming (where thousands of loops are being used within a single program).
References

Become a certified reverse engineer!
[1] Chris Eagle, The IDA Pro Book: The unofficial guide to the world's most popular disassembler.
- Exam Pass Guarantee
- Live expert instruction
- Hands-on labs
- CREA exam voucher
In this Series
- Reversing Loops
- Kali Linux: Top 8 tools for reverse engineering
- Stacks and Heap
- Top 8 reverse engineering tools for cyber security professionals [updated 2021]
- Arrays, Structs and Linked Lists
- Reverse engineering obfuscated assemblies [updated 2019]
- Crack Me Challenge Part 4 [Updated 2019]
- Writing windows kernel mode driver [Updated 2019]
- Assembly programming with Visual Studio.NET
- The basics of IDA pro
- Reverse engineering tools
- Hacking tools: Reverse engineering
- Reverse engineering a JavaScript obfuscated dropper
- Reverse Engineering – LAB 3
- Exploiting Protostar – Stack 0-3
- Reversing Binary: Spotting Bug without Source Code
- Reverse engineering virtual machine protected binaries
- Introduction to Reverse Engineering
- Pafish (Paranoid Fish)
- Extending Debuggers
- Encrypted code reverse engineering: Bypassing obfuscation
- Buffer Overflow Attack & Defense
- Invoking Assembly Code in C#
- iOS Application Security Part 32 - Automating tasks with iOS Reverse Engineering Toolkit (iRET)
- Hooking IDT
- A Guide to Debugging Android Binaries
- Kernel debugging with Qemu and WinDbg
- Shared Folders with Samba and Qemu
- Testing Hooks via the Windows Debugger – An Introduction to RevEngX
- Reverse Engineering with Reflector
- Applied Reverse Engineering with IDA Pro
- Injecting spyware in an EXE (code injection)
- Disassembler Mechanized Part 4: DLL Injector Development
- Disassembler Mechanized Part 3: Code Injection Operation
- Debugging TLS callbacks
- Disassembler Mechanized Part 2: Generating C# and MSIL code
- System address map initialization in x86/x64 architecture part 2: PCI express-based systems
- Coding of Disassembler
- Applied cracking & byte patching with IDA Pro
- .NET reversing with Reflexil
- Reversing firmware part 1
- Reverse Engineering with Reflector: Part 1
- Remoting Technology
- Reverse engineering with OllyDbg
- Understanding Session Fixation
- Optimizing Managed Code Execution
- File system manipulation
- The BodgeIt store part two
- The BodgeIt store part one
- Understanding Windows Internal Call Structure
- Pin: Dynamic Binary Instrumentation Framework

Get certified and advance your career
- Exam Pass Guarantee
- Live instruction
- CompTIA, ISACA, (ISC)², Cisco, Microsoft and more!

Reverse engineering
Reverse engineering
Reverse engineering
Top 8 reverse engineering tools for cyber security professionals [updated 2021]
Reverse engineering