IoT Radio Communication Attack – Part Two

This is the 2nd part in the series named "IoT Radio Communication Attack." If you have not gone through the first part, please go through it.
Radio Signal Analysis – In the last part I have gone through the various modulation techniques being used in Radio Signal Transmission. The next step is to analyze these radio signals for identifying the type of modulation being done. Once the type of modulation is identified, the data present in the radio signal can be easily extracted by demodulating it. The process is analogous to decryption and encryption.

FREE role-guided training plans
For analyzing the Radio Signal, I will be using some hardware device and software. The hardware device is used for capturing the radio signal and software is needed for processing and modifying the signal. Following are the list of hardware's and software's widely used in capturing and analyzing the Radio Signal.
Hardware – Some hardware Device can capture or receive the Radio signal, and some hardware device can transmit and receive the signal. Based on the capability, a hardware device can be Transmitter or Receiver. A device which can only receive/capture the signal is called as a receiver, and a device which can not only receive but also transmit the signal is called as a transceiver, i.e., Transmitter + Receiver = Transceiver.
The receiver is denoted as Rx, and the transceiver is denoted as Rx/Tx.
The table shown below lists all the Hardware devices which are widely used for Radio Signal Analysis.
Capabilities
Range
Depending upon the frequency of Radio Signal, choice of Hardware will vary. Also, higher the range, costly is the device. For basic radio signal analysis, i.e., just for receiving the data, RTL-SDR is used, and for transmitting the data, HackRF is widely used.
Software – Like Hardware, many software can be used for analysis and processing of the signal. Some of the software's are – GQRX, Gnu Radio Companion (GRC), SDR#, Linrad, Cubic SDR, Inspectrum, HDSDR, etc. On Linux, GQRX and on Windows, SDR# is used widely for analyzing the signal. For processing, the signal Gnu Radio Companion (henceforth GRC) is used. GRC can be used on both Linux and windows.
In this series, I will be using GQRX and GRC for signal processing and analysis. I request you to download the software to your laptop/PC. A simple google search on installing the software will give you tons of resources.
If you do not wish to download the software or if you are looking for a VM having all the software's pre-installed like Kali, you can have a look at Pentoo. Pentoo has been explicitly designed for Radio signal analysis and has all the necessary tools installed in it. You can download the ISO from its official site - http://www.pentoo.ch/download/ and can open it in Virtualbox or VMware Player/Workstation.
Now let's see how to use RTL-SDR for receiving the FM signal. I will be using GQRX for the demo.
RTL-SDR – RTL-SDR is a cheap USB dongle used for only "RECEIVING" the Radio Signal. The price of RTL-SDR is around $20 and is also called as RTL2832U, DVB-T SDR, RTL dongle.
It looks like this –
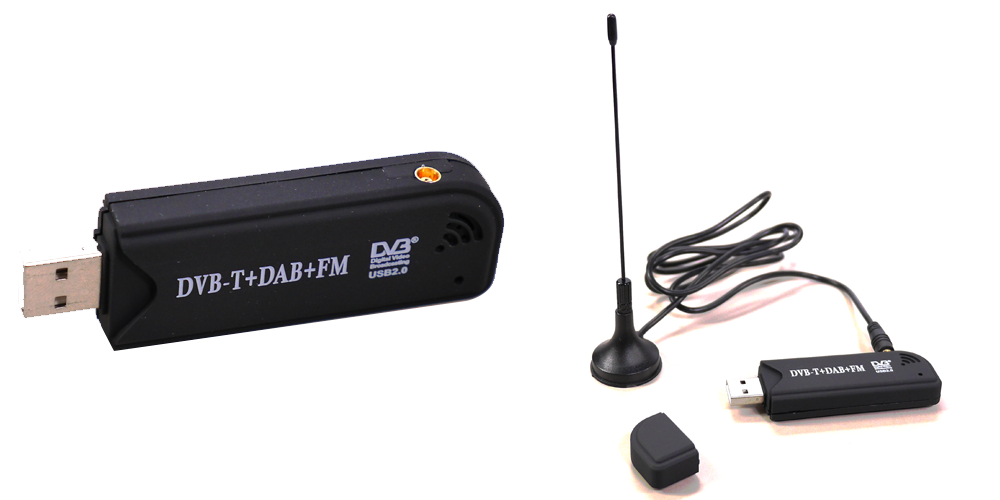
Frequency Range – RTL-SDR can receive any frequency within the range 52Mhz-2200Mhz.
Procedure for Capturing FM Signal – For receiving the FM data one need a receiver for receiving the radio signal and software for demodulating the received data. For receiving the radio signal, I will be using RTL-SDR, and for demodulating the received signal, I will use GQRX. I hope roles of RTL-SDR and GQRX is clear to you.
Now plug in your RTL-SDR into the USB port of the laptop. Run rtl_test command and if you get the output as shown it means RTL-SDR has been detected and is ready to use.
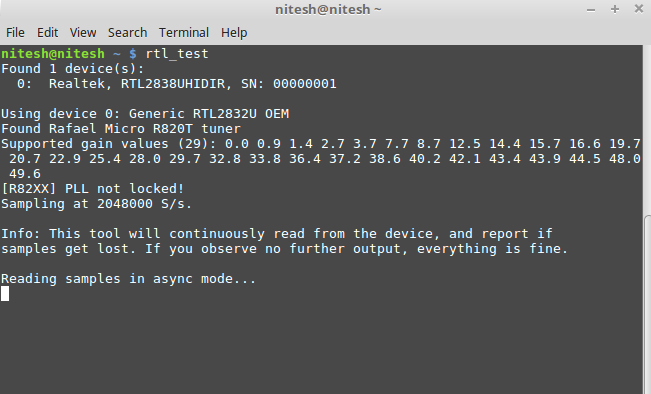
You can press Ctrl+C to stop the test and make RTL-SDR free so that it can be used by GQRX.
Now start GQRX as shown below -

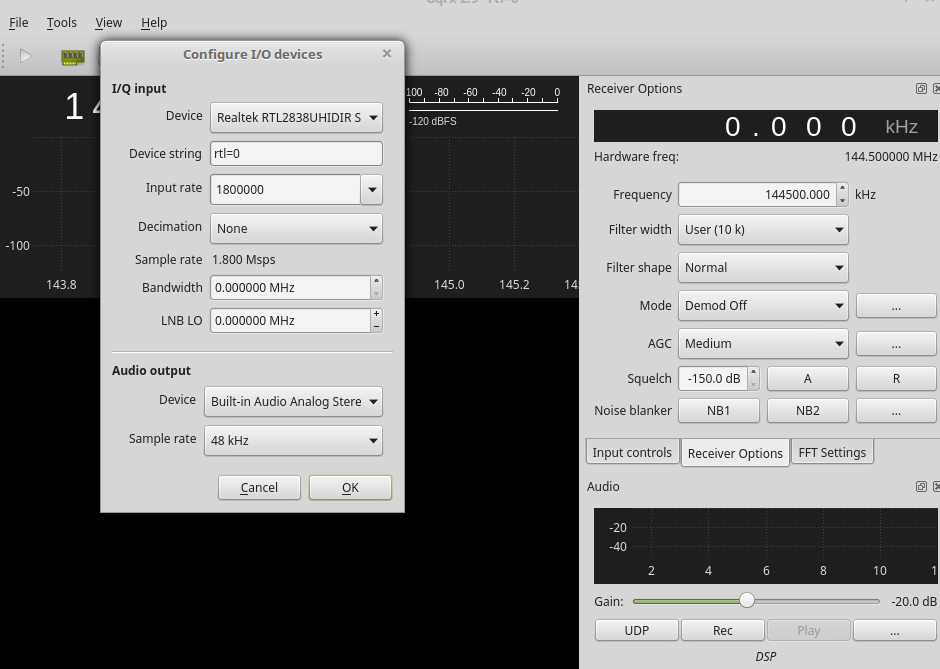
Selecting RTL-SDR as I/O device in GQRX is the first step so it can be used by GQRX. To do this, click on the green icon as shown below. As seen the name of the RTL-SDR device is RTL2838UHIDIRS. The rest of the options can be left as is.
Now it is time to capture the Radio Signals. To make it happen, click on the white icon (on the left of the green icon) as shown below –
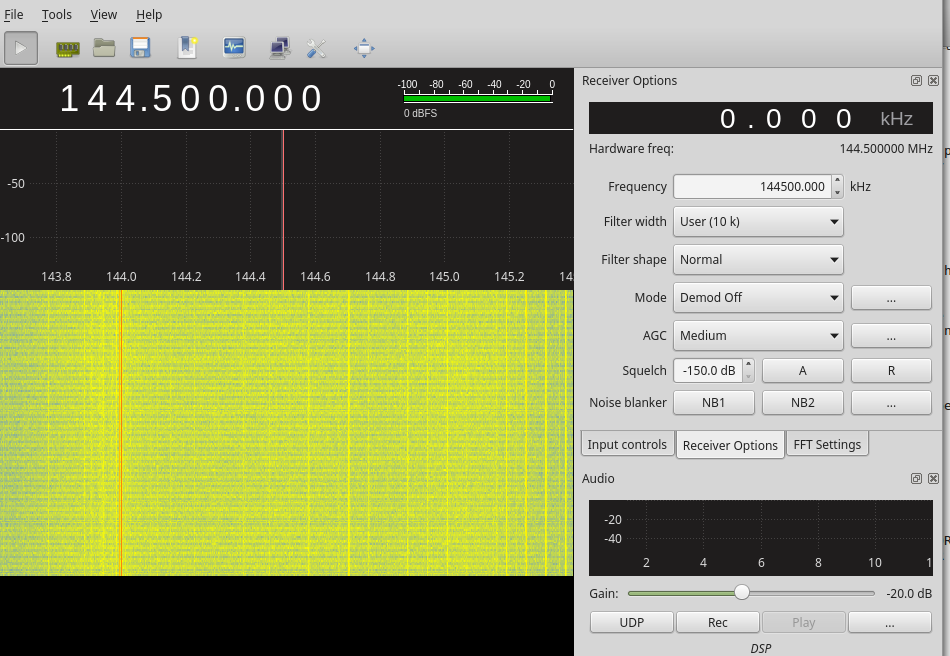
The frequency range for the FM channel is 88-108MHz. So, I will tune RTL-SDR between 88-108Mhz. Click on the frequency i.e.144.50 and tune it to 93.5 MHz as shown. Just click on 144 and change it to 93.5.
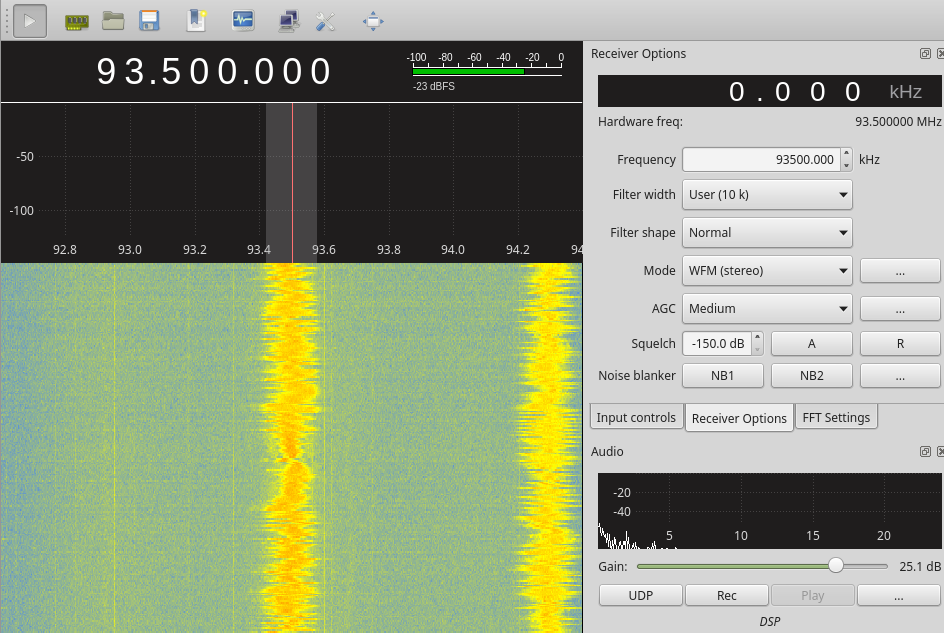
In India, 93.5 is used for listening to a song. It will vary as per your county. So, tune the RTL-SDR accordingly.
As seen above, the red line points to 93.5 Mhz. Below the red line, there are yellow color lines. It represents some data being received, i.e., if at a particular frequency some data is available, GQRX represents in the form of yellow lines. This representation is called as waterfall sink.
Can you listen to a song?
No. Right?
I know you are unable to listen to a song. This is because you have not demodulated the received signal, i.e., FM signal. To do so, select the mode (on the right side) as WFM(stereo) and change the gain (bottom right corner) accordingly to listen to a song clearly. The essential setting is shown below –
So, this is how you listen to an FM. It was easy - just a few settings and done. I.e., while hacking the radio communication of IoT devices, the signal must be processed manually using various blocks in GNURadio. In GNURadio, the signal is processed and demodulated for extracting the data present in the signal.
In the next post, I will explain to you how to process the Radio Signal manually in GNURadio for demodulating the FM signal for listening to a song. This will give us an idea of what happens in the background and how the signal is processed in GQRX.

What should you learn next?
That is it for this post guys. See you in the next post. If you have any issue/doubt, please comment.
Enroll in an Ethical Hacking Boot Camp and earn two of the industry’s most respected certifications — guaranteed.
- CEH exam voucher
- PenTest+ exam voucher
- Exam Pass Guarantee
- Live online hacking training
In this Series
- IoT Radio Communication Attack – Part Two
- The rise of ethical hacking: Protecting businesses in 2024
- How to crack a password: Demo and video walkthrough
- Inside Equifax's massive breach: Demo of the exploit
- Wi-Fi password hack: WPA and WPA2 examples and video walkthrough
- How to hack mobile communications via Unisoc baseband vulnerability
- How to build a hook syscall detector
- Top tools for password-spraying attacks in active directory networks
- NPK: Free tool to crack password hashes with AWS
- Tutorial: How to exfiltrate or execute files in compromised machines with DNS
- Top 19 tools for hardware hacking with Kali Linux
- 20 popular wireless hacking tools [updated 2021]
- 13 popular wireless hacking tools [updated 2021]
- Man-in-the-middle attack: Real-life example and video walkthrough [Updated 2021]
- Decrypting SSL/TLS traffic with Wireshark [updated 2021]
- Dumping a complete database using SQL injection [updated 2021]
- Hacking clients with WPAD (web proxy auto-discovery) protocol [updated 2021]
- Hacking communities in the deep web [updated 2021]
- How to hack Android devices using the StageFright vulnerability [updated 2021]
- Hashcat tutorial for beginners [updated 2021]
- How to hack a phone charger
- What is a side-channel attack?
- Copy-paste compromises
- Hacking Microsoft teams vulnerabilities: A step-by-step guide
- PDF file format: Basic structure [updated 2020]
- 10 most popular password cracking tools [updated 2020]
- Popular tools for brute-force attacks [updated for 2020]
- Top 7 cybersecurity books for ethical hackers in 2020
- How quickly can hackers find exposed data online? Faster than you think …
- Hacking the Tor network: Follow up [updated 2020]
- Podcast/webinar recap: What's new in ethical hacking?
- Ethical hacking: TCP/IP for hackers
- Ethical hacking: SNMP recon
- How hackers check to see if your website is hackable
- Ethical hacking: Stealthy network recon techniques
- Getting started in Red Teaming
- Ethical hacking: IoT hacking tools
- Ethical hacking: BYOD vulnerabilities
- Ethical hacking: Wireless hacking with Kismet
- Ethical hacking: How to hack a web server
- Ethical hacking: Top 6 techniques for attacking two-factor authentication
- Ethical hacking: Port interrogation tools and techniques
- Ethical hacking: Top 10 browser extensions for hacking
- Ethical hacking: Social engineering basics
- Ethical hacking: Breaking windows passwords
- Ethical hacking: Basic malware analysis tools
- Ethical hacking: How to crack long passwords
- Ethical hacking: Passive information gathering with Maltego
- Ethical hacking: Log tampering 101
- Ethical hacking: What is vulnerability identification?
- Ethical hacking: Breaking cryptography (for hackers)

Get certified and advance your career
- Exam Pass Guarantee
- Live instruction
- CompTIA, ISACA, (ISC)², Cisco, Microsoft and more!


