How to Build a Threat-Hunting Tool in 10 Steps

Introduction
If you are planning on building your own threat-hunting tool but don’t know where to start, then this could be just the article for you. We will be taking a look at the specific steps that you will need to follow when building a threat-hunting tool of your own. Each environment is different, and the tool requirements of each one will therefore be completely different depending on the organization’s exposure to threats, but there are important commonalities that we can focus.
The ideal threat-hunting tool should be able to analyze vast amounts of data, especially system logs and system analytics. There are many different application suites out there that can do exactly that, ranging from free and open-source projects all the way to enterprise-grade products that cost thousands of dollars. Whichever route you decide to take, you will have to factor in costs and functionality that will suit your particular needs.
Become a certified threat hunter
Deciding on a Platform to Build From
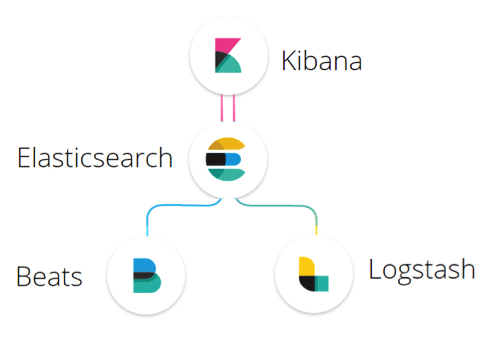
There are many different threat-hunting platforms that you can choose to build your tool from. For our example, we will be using the platform formerly known as ELK Stack, now called Elastic Stack. Elastic Stack is comprised of multiple tools, which are:
- Elasticsearch: A distributed JSON-based search and analytics engine that has been designed to scale horizontally and is both reliable and easy to manage
- Logstash: This is the point at which data ingestion takes place and has many different plugins available
- Kirbana: Lets you visualize your data and turn it into a valuable source of information that’s easy to navigate
- Beats: This is the end-point application that ships data back to Logstash and Elasticsearch
Using all of these components together allows you to monitor your IT environment with a purposefully-designed threat-hunting tool that you can build yourself, with no programming required. If you have the skills to code, then you could even build your own plugins or modules that interact with Elasticsearch, thanks to its RestfulAPIs and JSON components. It has a large community that has written many different client software applications. See the link in Sources below!
Understand Log Flow
In order to use the tool and build it successfully, we need to understand how it collects data. Logs are created in many different locations across the network and then directed to the Elastic Stack suite. These are then sorted through according to your parameters by the Logstash component; the results of this sorting are then sent to Elasticsearch, which searches the results. From there, the search results are compiled into a human-readable format that is easier to make sense of.
It is this picture that allows you to find out if there is any unusual or suspicious activity on your systems. From here, even more data can be extracted using different filters.
Now that we know how each component of our threat hunting tool works, we can look at what is needed for us to download, install and configure Elasticsearch for ourselves.
Getting Started
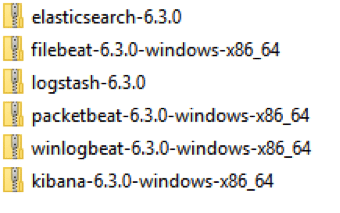
The first port of call is the Elastic Stack download page. From here, users can choose the appropriate packages that pertain to their operating systems and requirements. You need to install some components on the server, and some components on the clients that you wish to monitor. For our install we will be using a few different packages in order to get a monitoring solution up and running, and the example machine will be running Windows Server 2012.
The server components
- Elasticsearch
- Logstash
- Kibana
The client components
- Filebeat
- Packetbeat
- Metriclogbeat
- Winlogbeat
Optional packages
- Non-Sucking Service Manager (NSSM)
- Java
- WinPcap
There are other packages available, but these are not necessary for this install. Simple overviews of the installation process can be found on elastic.co.
Install the Components
Step 1
Download aforementioned packages from elastic.co and save them to a convenient location. Once completed, you should have a similar collection to this, depending on your OS. You should make sure that Java is installed and up-to-date before starting with this installation.
Step 2
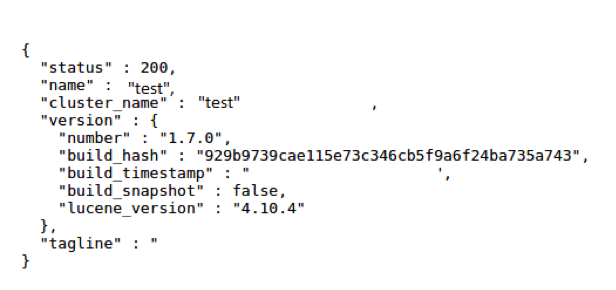
Start installing the packages. We start with Elasticsearch. Simply extract the contents of the zip file into a folder and then navigate to the bin folder. Execute the elasticsearch.bat file and allow the system to install. Once complete, you will be able to open a browser and navigate to http://127.0.0.1:9200 where you will be greeted with the following.
Step 3
Next, navigate to the folder where Kibana has been extracted and open the bin folder. Execute the kibana.bat file to begin the installation. To check if Kibana has installed properly, navigate in a browser to http://127.0.0.1:5601 where you should see the below screen.
Step 4
The next step is to install and run Logstash. Navigate to the folder where it has been extracted and then execute the following command: logstash -e 'input { stdin { } } output { stdout {} }' . This command will let you echo text from the command prompt straight into Logstash. If you type in any string of letters or numbers, you will then see them being returned to you as a log entry. See below example.
 You have now successfully installed the three key components for your threat-hunting tool build, and now all you need to do is begin collecting data!
Step 5
In order to begin collecting data, you need to install all of the endpoint collection applications. In the case of Elastic Stack, these come from the Beats, which are installable, separate components of Elastic Stack. We start by installing Filebeat.
Step 6
Create a directory called C:Program FilesFilebeat. Browse to the location where you extracted the Filebeat zip file and then copy the contents to C:Program FilesFilebeat.
Step 7
Next, open Powershell as administrator and run the following command:
PS > cd 'C:Program FilesFilebeat'
PS > C:Program FilesFilebeat> .install-service-filebeat.ps1
Step 8
Begin configuring Filebeat. An in-depth guide to accomplishing that can be found on elastic.co (see Sources) and will allow you to make the changes that you need to start monitoring relevant data on your network.
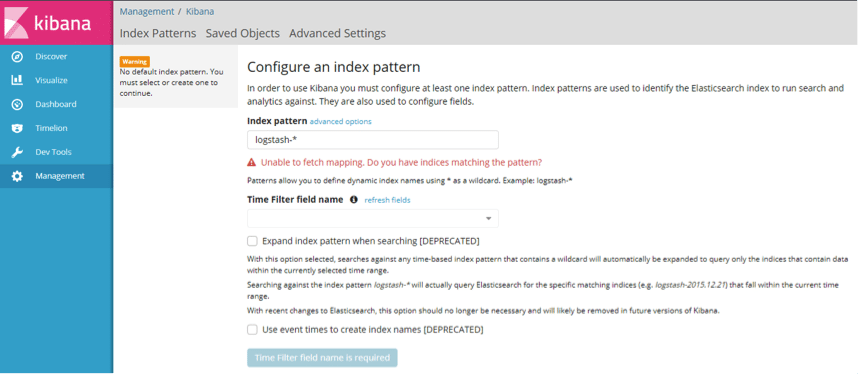
Step 9
If we plan on using the graphical capabilities of Kibana, then we will need to configure Packetbeat to utilize Kibana. Luckily, Packetbeat comes with preconfigured example dashboards that can be used to visualize all of the relevant data. But before we can do that, we need to create an index pattern that will use all of this data.
Run Setup and add the index pattern Packetbeat-*. A full installation guide for Packetbeat can be found under Sources.
Step 10
The final step is to start the Filebeat service, which we do via Powershell:
PS C:Program FilesFilebeat> Start-Service Filebeat
If this has been done successfully then your Elastic Stack installation will now be collecting data from Filebeat! Congratulations!
Conclusion
As we have seen, creating a threat-hunting tool doesn’t need to be difficult! This is just one choice of many, and the product that you decide to use in your own environment or test lab will depend on what data you wish to collect, and how you need to process all of this information. The applicability of each approach will depend entirely upon the threat being targeted and the intended outcome of each search.
Threat-hunting encompasses many different disciplines within cybersecurity, and as such requires many different skills to be mastered and combined with certifications, not to mention work experience. Threat hunting is becoming a highly sought-after skill for modern businesses who are discovering the value of having the in-house skills to deal with potential threats to their operations. Be sure to check out InfoSec Institute’s course listing here to get your threat-hunting career started!
Sources
Installing the Elastic Stack, elastic.co
Getting Started with Filebeat, elastic.co
Community Contributed Clients, elastic.co
Configure Packetbeat, elastic.co
Become a certified threat hunter
Set up the Kibana dashboards, elastic.co
In this Series
- How to Build a Threat-Hunting Tool in 10 Steps
- Compromise assessment or threat hunting? What do organizations need?
- Deception technologies: 4 tools to help you identify threats and mitigate risks
- Threat hunting with Kolide and osquery
- Threat hunting with osquery
- Threat hunting with Cymon API
- Threat hunting with Graylog
- Threat Hunting: Remediation
- Threat-hunting techniques: Conducting the hunt
- Top 10 Free Threat-Hunting Tools
- Threat Hunting: Data Collection and Analysis
- Threat Hunting: Detecting Adversaries
- Threat Hunting: Detecting Threats
- 10 Tips for Effective Threat Hunting
- How to Conduct a Threat Hunt – 10 Steps
- Threat hunting maturity model
- Best Practices for Threat Hunting in Large Networks
- VERIS INCIDENT FRAMEWORK
- Threat Hunting for Mismatched Port – Application Traffic
- Threat Hunting for File Hashes as an IOC
- Threat Hunting for File Names as an IoC
- Threat Hunting for URLs as an IoC
- Threat Hunting for Domains as an IOC
- Threat Hunting and HTML Response Size
- Threat Hunting for Unusual Logon Activity
- Threat Hunting for Swells in Database Read Volume
- Threat Hunting for Unusual DNS Requests
- Threat Hunting for Anomalies in Privileged Account Activity
- 5 Commercial Threat-Hunting Platforms That Can Provide Great Value to Your Hunting Party
- Threat Hunting for Suspicious Registry and System File Changes
- Threat Hunting for DDoS Activity and Geographic Irregularities
- The Current Job Outlook for Threat Hunters
- Threat Hunting and SOC
- Threat Hunting vs. SIEM
- 10 Benefits of Threat Hunting
- Threat Hunting Techniques
- Threat Hunting Methodologies
- Threat hunting: IOCs and artifacts
- How to Become a Threat Hunter
- Threat-Hunting Process
- The Ultimate Guide to Threat Hunting

Get certified and advance your career
- Exam Pass Guarantee
- Live instruction
- CompTIA, ISACA, (ISC)², Cisco, Microsoft and more!

Threat hunting
Threat hunting