Gentoo Hardening Part 1: Introduction to Hardened Profile

Introduction
In this tutorial, we'll talk about how to harden a Linux system to make it more secure. We'll specifically use Gentoo Linux, but the concepts should be fairly similar in other distributions as well. Since the Gentoo Linux is a source distribution (not binary, as most other Linux distributions are), there will be enough details provided to do this in your own Linux distribution, although some steps will not be the same.
Learn Digital Forensics
If we look at the hardened Gentoo project web page located at [1], we can see a couple of projects that can be used to enhance the security of the Linux operation system; they are listed below.
- PaX is a kernel patch that protects us from stack and heap overflows. PaX does this by using ASLR (address space layout randomization), which uses random memory locations in memory. Each shellcode must use an address to jump to embedded in it in order to gain code execution and, because the address of the buffer in memory is randomized, this is much harder to achieve. PaX adds an additional layer of protection by keeping the data used by the program in a non-executable memory region, which means an attacker won't be able to execute the code it managed to write into memory. In order to use PaX, we have to use a PaX-enabled kernel, such as hardened-sources.
- PIE/PIC (position-independent code): Normally, an executable has a fixed base address where they are loaded. This is also the address that is added to the RVAs in order to calculate the address of the functions inside the executable. If the executable is compiled with PIE support, it can be loaded anywhere in memory, while it must be loaded at a fixed address if compiled with no PIE support. The PIE needs to be enabled if we want to use PaX to take advantage of ASLR.
- RELRO (relocation read-only): When we run the executable, the loaded program needs to write into some sections that don't need to be marked as writable after the application was started. Such sections are .ctors, .dtors, .jcr, .dynamic, and .got [4]. If we mark those sections as read-only, an attacker won't be able to use certain attacks that might be used when trying to gain code execution, such as overwriting entries in a GOT table.
- SSP (stack-smashing protector) is used in user-mode; it protects against stack overflows by placing a canary on the stack. When an attacker wants to overflow the return EIP address on the stack, he must also overflow the randomly chosen canary. When that happens, the system can detect that the canary has been overwritten, in which case the application is terminated, thus not allowing an attacker to jump to an arbitrary location in memory and execute code from there.
- RBAC (role-based access control): Note that RBAC is not the same as RSBAC, which we'll present later on. The RBAC is an access control that can be used by SELinux, Grsecurity, etc. By default, the creator of a file has total control over the file, while the RBAC forces the root user to have control of the file, regardless of who created it. Therefore all users on the system must follow the RBAC rules set by administrator of the system.
Additionally, we can also use the following access control systems, which are used to control access between processes and objects. Normally, we have to choose one of the systems outlined below, because only one of the access control systems can be used at a time. Access control systems include the following:
- SELinux (security-enhanced Linux)
- AppArmor (application armor)
- Grsecurity, which contains various patches that can be applied to the kernel to increase the security of a whole system. If we would like to enable Grsecurity in the kernel, we must use a Grsecurity-enabled kernel, which is hardened-sources.
- RSBAC (rule set-based access control): We must use rsbac-sources kernel to build a kernel with rsbac support.
- SMACK
Each of the systems mentioned above can be used to make the exploitation of your system harder for an attacker. Let's say you're running a vulnerable application that's listening on some predefined port that an attacker can connect to from anywhere; we can imagine a FTP server. The installed version of the FTP server contains a vulnerability that can be triggered and exploited by using an overly long APPE FTP command. If the FTP server is not updated, an attacker can exploit the vulnerability to gain total control of the Linux system, but if we harden the system, we might prevent the attacker from doing so. In that case, the vulnerability is still presented in the vulnerable FTP server, but the attacker won't be able to exploit it due to the security enhancements in place.
The Portage Profile
Every Gentoo installation has a Portage profile, which specifies the default USE flags for the whole system. Portage is Gentoo's package management system, which uses many of the system files when installing a system and specific programs. All files that affect the installation of specific package are listed in the portage man page, which can be invoked by executing "man portage." The USE flags are used to specify which functionality within each package we want to compile the package with. We can list the USE flags with "equery uses " command, as shown below:
[python]
# equery uses xterm
[ Legend : U - final flag setting for installation]
[ : I - package is installed with flag ]
[ Colors : set, unset ]
* Found these USE flags for x11-terms/xterm-285:
U I
- - Xaw3d : Add support for the 3d athena widget set
- - toolbar : Enable the xterm toolbar to be built
+ + truetype : Add support for FreeType and/or FreeType2 fonts
+ + unicode : Add support for Unicode
Notice that package xterm has unicode and truetype enabled, but Xaw3d and toolbar disabled; those are the features that we can freely disable/enable, after which we need to recompile the package. By doing that, the package will be able to use Unicode characters, but if we disable the unicode USE flags, the Unicode characters won't be supported anymore.
So, when we select a system profile, we're actually selecting the default USE flags that will be used to build the system with. All the available profiles can be listed by issuing the "eselect profile list" command, as seen below. Notice that the default profile is the one marked with the character '*'?
[python]
# eselect profile list
Available profile symlink targets:
[1] default/linux/amd64/13.0
[2] default/linux/amd64/13.0/selinux
[3] default/linux/amd64/13.0/desktop *
[4] default/linux/amd64/13.0/desktop/gnome
[5] default/linux/amd64/13.0/desktop/kde
[6] default/linux/amd64/13.0/developer
[7] default/linux/amd64/13.0/no-multilib
[8] default/linux/amd64/13.0/x32
[9] hardened/linux/amd64
[10] hardened/linux/amd64/selinux
[11] hardened/linux/amd64/no-multilib
[12] hardened/linux/amd64/no-multilib/selinux
[13] hardened/linux/amd64/x32
[14] hardened/linux/uclibc/amd64
The profiles listed above have the syntaxes shown in the list below.
- Profile number: the number of each profile embedded in the brackets [ and ].
- Profile type: the type of profile, where the normal profiles are specified with the default keyword, while the hardened profiles are listed with hardened keyword.
- Profile subtype: the profile subtype used for the kernel, which can be either linux or bsd.
- Architecture: the architecture of the profile, which can be one of the listed values: x86, amd64, etc.
- Release number: release number of the profile.
- Target:
target of the profile, which can be one of the values, selinux, desktop, developer, etc. The desktop target also has two subtargets kde and gnome.
All the files for profiles are available under /usr/portage/profiles/ directory. The current profile "default/linux/amd64/13.0/desktop" is located in the /usr/portage/profiles/default/linux/amd64/13.0/desktop/ directory and contains the following files.
[python]
# ls /usr/portage/profiles/default/linux/amd64/13.0/desktop/ -l
total 8
-rw-r--r-- 1 portage portage 2 Jan 16 2013 eapi
drwxr-xr-x 2 portage portage 30 Jan 16 2013 gnome
drwxr-xr-x 2 portage portage 30 Jan 16 2013 kde
-rw-r--r-- 1 portage portage 34 Jan 16 2013 parent
The gnome and kde represent the subprofiles, while the parent file is used to pull in additional profiles that constitutes the current profile. The parent file contains the following:
[python]
# cat /usr/portage/profiles/default/linux/amd64/13.0/desktop/parent
..
../../../../../targets/desktop
In order to fully understand the profile we must pull in the parent directory as well as the "/../../../../targets/desktop" directory, which contains the following files:
[python]
# ls /usr/portage/profiles/default/linux/amd64/13.0/
# ls /usr/portage/profiles/targets/desktop/
gnome kde make.defaults package.use
There are multiple files that can be used with each profile, but in our case the following files are used:
- make.defaults:
- package.use
- package.use.stable.mask
- use.mask
- use.stable.mask
- eapi
- package.use
- ...
In addition, the referenced profiles can themselves reference other profiles, which are also pulled in. The most interesting files are make.defaults and package.use. The make.defaults contains all the default USE flags that will be used when building the system. The USE flags can be seen below.
[python]
# cat /usr/portage/profiles/targets/desktop/make.defaults
USE="a52 aac acpi alsa bluetooth branding cairo cdda cdr consolekit cups dbus dri dts dvd dvdr emboss encode exif fam firefox flac gif gpm gtk jpeg lcms ldap libnotify mad mng mp3 mp4 mpeg ogg opengl pango pdf png policykit ppds qt3support qt4 sdl spell startup-notification svg tiff truetype vorbis udev udisks unicode upower usb wxwidgets X xcb x264 xml xv xvid"
[/python]
The package.use file is used to apply certain USE flags to specific packages, which can be seen below. The net-nds/openldap will be compiled with the minimal USE flags.
[python]
# cat /usr/portage/profiles/targets/desktop/package.use | grep -v ^# | grep -v ^$
<gnome-base/gvfs-1.14 gdu -udisks dev-libs/libxml2 python media-libs/libpng apng sys-apps/systemd gudev introspection keymap sys-fs/eudev gudev hwdb introspection keymap >=sys-fs/udev-171 gudev hwdb introspection keymap
>=virtual/udev-171 gudev hwdb introspection keymap
xfce-base/xfdesktop thunar
net-nds/openldap minimal
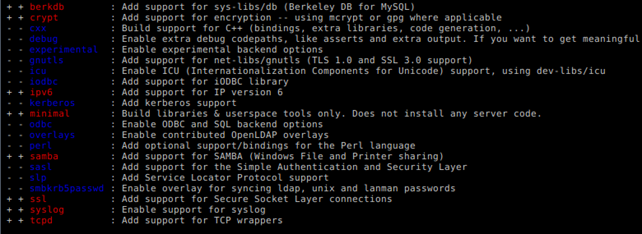
If we run the "equery uses openldap" command, we'll see that the minimal USE flag is enabled. The USE flags that will be used are presented in the picture below, where the red USE flags are enabled and blue USE flags are disabled. Notice that the minimal USE flag is red and therefore enabled.
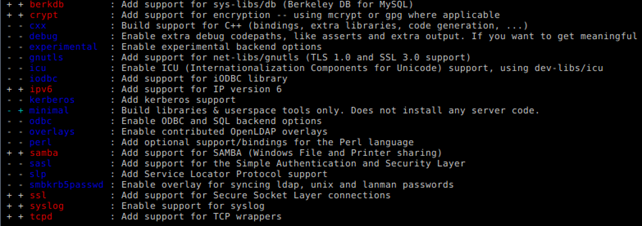
If we edit /usr/portage/profiles/targets/desktop/package.use and comment out the "net-nds/openldap minimal" line and then rerun the "equery uses openldap" command, the minimal USE flag will be disabled, as can be seen below.
Therefore we can see how the USE flags affect the system we're using. In order to select a hardened profile, we must run the command below to set the "hardened/linux/amd64" profile.
[python]
# eselect profile set 9
After setting the profile that we want, we can check whether the change was successful (notice that the '*' character does not specify the "hardened/linux/amd64" profile.
[python]
# eselect profile list
Available profile symlink targets:
[1] default/linux/amd64/13.0
[2] default/linux/amd64/13.0/selinux
[3] default/linux/amd64/13.0/desktop
[4] default/linux/amd64/13.0/desktop/gnome
[5] default/linux/amd64/13.0/desktop/kde
[6] default/linux/amd64/13.0/developer
[7] default/linux/amd64/13.0/no-multilib
[8] default/linux/amd64/13.0/x32
[9] hardened/linux/amd64 *
[10] hardened/linux/amd64/selinux
[11] hardened/linux/amd64/no-multilib
[12] hardened/linux/amd64/no-multilib/selinux
[13] hardened/linux/amd64/x32
[14] hardened/linux/uclibc/amd64
Note that by running the "eselect profile set 9" command we didn't actually change anything in the system. We merely changed the profile that will be used when building and installing packages, which means the new USE flags will be used when packages are being installed. Therefore we must rebuild the system in order for the changes to take effect.
One of the important packages in the system are the ones that are actually used in building process, such as gcc, binutils, and glibc. Those packages are the heart of the Gentoo Linux system, since they are used to compile and link the packages. If we want to apply the hardened profile to those packages, we must rebuild them by issuing the emerge command.
[python]
# emerge virtual/libc sys-devel/gcc sys-devel/binutils
Once the rebuilding is done, we'll have a hardened toolchain ready to start building other packages by using the hardened profile. We also need to set the hardened gcc compiler as default. Note that we can choose gcc with both SSP and PIE enabled or disabled. We can display all available gcc versions with the "gcc-config -l" command, as seen below. The first option, which supports SSP as well as PIE, is already selected, so we don't have to do anything.
[python]
# gcc-config -l
[1] x86_64-pc-linux-gnu-4.5.4 *
[2] x86_64-pc-linux-gnu-4.5.4-hardenednopie
[3] x86_64-pc-linux-gnu-4.5.4-hardenednopiessp
[4] x86_64-pc-linux-gnu-4.5.4-hardenednossp
[5] x86_64-pc-linux-gnu-4.5.4-vanilla
References:
Learn Digital Forensics
[1] Hardened Gentoo http://www.gentoo.org/proj/en/hardened/.
[2] Security-Enhanced Linux http://en.wikipedia.org/wiki/Security-Enhanced_Linux.
[3] RSBAC http://en.wikipedia.org/wiki/RSBAC.
[4] Hardened/Toolchain https://wiki.gentoo.org/wiki/Hardened/Toolchain#RELRO.
[5] Hardened/PaX Quickstart https://wiki.gentoo.org/wiki/Project:Hardened/PaX_Quickstart.
[6] checksec.sh http://www.trapkit.de/tools/checksec.html.
[7] KERNHEAP http://subreption.com/products/kernheap/.
[8] Advanced Portage Features http://www.gentoo.org/doc/en/handbook/handbook-amd64.xml?part=3&chap=6.
[9] Elfix http://dev.gentoo.org/~blueness/elfix/.
[10] Avfs: An On-Access Anti-Virus File System http://www.fsl.cs.sunysb.edu/docs/avfs-security04/.
[11] Eicar Download, http://www.eicar.org/85-0-Download.html.
Learn Digital Forensics
Build your digital forensics skills with hands-on training in Infosec Skills. What you'll learn- Forensics concepts
- Computer forensics
- Mobile forensics
- Network forensics
- And more
In this Series
- Gentoo Hardening Part 1: Introduction to Hardened Profile
- Digital forensics and cybersecurity: Setting up a home lab
- Top 7 tools for intelligence-gathering purposes
- iOS forensics
- Kali Linux: Top 5 tools for digital forensics
- Snort demo: Finding SolarWinds Sunburst indicators of compromise
- Memory forensics demo: SolarWinds breach and Sunburst malware
- Digital forensics careers: Public vs private sector?
- Email forensics: desktop-based clients
- What is a Honey Pot? [updated 2021]
- Email forensics: Web-based clients
- Email analysis
- Investigating wireless attacks
- Wireless networking fundamentals for forensics
- Protocol analysis using Wireshark
- Wireless analysis
- Log analysis
- Network security tools (and their role in forensic investigations)
- Sources of network forensic evidence
- Network Security Technologies
- Network Forensics Tools
- The need for Network Forensics
- Network Forensics Concepts
- Networking Fundamentals for Forensic Analysts
- Popular computer forensics top 19 tools [updated 2021]
- 7 best computer forensics tools [updated 2021]
- Spoofing and Anonymization (Hiding Network Activity)
- Browser Forensics: Safari
- Browser Forensics: IE 11
- Browser Forensics: Firefox
- Browser forensics: Google chrome
- Webinar summary: Digital forensics and incident response — Is it the career for you?
- Web Traffic Analysis
- Network forensics overview
- Eyesight to the Blind – SSL Decryption for Network Monitoring [Updated 2019]
- Gentoo Hardening: Part 4: PaX, RBAC and ClamAV [Updated 2019]
- Computer forensics: FTK forensic toolkit overview [updated 2019]
- The mobile forensics process: steps and types
- Free & open source computer forensics tools
- An Introduction to Computer Forensics
- Common mobile forensics tools and techniques
- Computer forensics: Chain of custody [updated 2019]
- Computer forensics: Network forensics analysis and examination steps [updated 2019]
- Computer Forensics: Overview of Malware Forensics [Updated 2019]
- Incident Response and Computer Forensics
- Computer Forensics: Memory Forensics
- Comparison of popular computer forensics tools [updated 2019]
- Computer Forensics: Forensic Analysis and Examination Planning
- Computer forensics: Operating system forensics [updated 2019]
- Computer Forensics: Mobile Forensics [Updated 2019]
- Computer Forensics: Digital Evidence [Updated 2019]

Get certified and advance your career
- Exam Pass Guarantee
- Live instruction
- CompTIA, ISACA, (ISC)², Cisco, Microsoft and more!

Digital forensics

Digital forensics

Digital forensics
Digital forensics