GDS Burp API – Part I

Introduction
In my previous article, I discussed the importance of Python and how we can utilize it to fill the gaps created by commercial scanners, thus improving the quality of throughput; however, that does not mean that we should limit ourselves to that! There is a lot more that we can do with a little bit of programming and using open source Python tools, libraries, scripts, etc. This article (the first of a series of two articles) is one step toward understanding an open source API developed by Marcin Weilgoszewski, known as GDS Burp API.
Objective
The aim of this article series is to help the user set up the environment and further explore the GDS Burp API to understand how best it can be used for extracting raw data that can help us in building customized security tools or fuzzing scripts. The effectiveness of custom security tool or scripts built this way is as good as the quality of the payloads fed to it.

What should you learn next?
This article provides a brief overview of Burp API, setting up the environment to access GDS Burp API in a hassle-free manner, and generating Burp logs, which we can then feed to the API.
Intended Audience
This series of articles has been written keeping in mind web application security professionals as the primary audience. However, any one with a basic understanding of web application security will benefit from this article. A basic understanding of the Python language is required to understand the API and utilize it when developing your own tools.
Out of Scope
This article series is not a replacement for GDS Burp API's documentation; instead it should be used in addition to the documentation to get the best out of it. Coverage of each and every function of the API is beyond the scope of this article. Readers are likely to benefit most if they attempt to learn the basics of the API and explore the entire API and its supported functions in order to use the same in their custom scripts.
What Is GDS Burp API?
GDS Burp API is a Python object interface to Burp's requests and responses recorded by Portswigger's Burp Suite. Using this API, we can extract important data that can help us extract raw data from Burp logs that can, in turn, be used to build our own custom fuzzing scripts, thus automating vulnerability assessment to a certain limit.
Using this API, we can do the following tasks:
-
Parse a single Burp log to extract a Python list that contains multiple values, each being either a request or a response
-
Extract cookie values, which include session id and any other cookie parameters
-
Extract a character set
-
Extract other properties associated with each Burp object
-
Extract query strings
-
Extract HTTP post parameters
-
Parse HTTP response
-
Extract HTTP response status code
-
Extract HTTP response reason
-
Extract HTTP response body
-
Extract user agent
-
Extract HTTP request path
-
Extract time stamps
Setting Up the Environment
In order for us to access utilize this API, we first need to download it from http://mwielgoszewski.github.io/burpee/
Alternately, you can also close the API using the following command:

git clone git://github.com/mwielgoszewski/burpee
Once downloaded, we can start using it directly; however for efficient usage, I suggest readers should update the PYTHONPATH variable so that you can seamlessly call it every time in a hassle-free manner. There are three ways in which we can invoke this API, as explained below:
-
Invoking Python from Burp API Directory
Navigate the file system to locate the folder in which the API is stored and then invoke the interpreter from the concerned folder; this way, Python will be able to locate the module, since it looks to see whether or not a module is there in the present working directory.
-
Temporarily Updating PYTHONPATH
Invoke the interpreter and type the following commands:
>>> import sys
>>> sys.path.append(<<api_dir_path>>)
In the previous command, replace <<api_dir_path>> with the actual path where the API has been located; this command will add the directory path to PYTHONPATH variable. However it will only work as long as the interpreter session is open. Once we quit the interpreter session, the changes will be undone. People looking for a quick hands-on can implement the above without really bothering much and play around with the API and quit once their task is completed.
-
Permanently Updating PYTHONPATH Variable
This is the recommended way of getting things done. PYTHONPATH is a variable that holds the list of directories in which Python will look first for any module. Hence, when a user imports a module via a script or interpreter, if Python does not find the module directory listed here, it will throw an error like this:
>>> import gds
Traceback (most recent call last):
File "<stdin>", line 1, in <module>
ImportError: No module named gds
To fix this problem, we need to append the path to the directory in which the GDS Burp API is located to PYTHONPATH. On Windows systems, we can do this using the environment variable by creating a variable, "PYTHONPATH"; however, before that we need the current PYTHONPATH in order to avoid missing existing libraries that are in the path. To identify the current path, invoke the following commands from the Python interpreter:
>>> import sys
>>> sys.path
The output of the above command should be something like the following:
['', 'C:windowssystem32python27.zip', 'C:Python27DLLs', 'C:Users<<user_name>> C:Python27lib', 'C:Python27libplat-win', 'C:Python27liblib-tk', 'C:Python27', 'C:Python27libsite-packages', 'C:Python27lib']
To set the environment variable, navigate to: Start> My Computer >Properties > Advanced System Settings > Environment Variables > System Variable and click on the "New" button.
Create a new variable named PYTHONPATH and append the above list in the "Variable value" field, as shown in following figure:
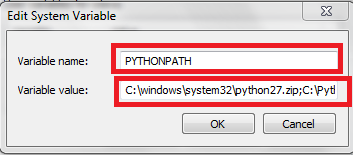
It should be noted that we need to sanitize the directory list and use ";" as a separator between the two directory paths. Append the directory path in which the API is stored at the end of this path. Once this is done, we are all set. We can now invoke our module from anywhere, since it is in the Python module's search path. To test whether the previous setting is working or not, try importing the module "gds" from any other working directory (e.g., C:) by calling the interpreter and importing the module. Now there should be no errors thrown by PYTHON.
If you have done the previous exercise with Python interpreter running, quit the interpreter and reload for changes to reflect, otherwise we'll get an error when importing.
Now that we have set up the environment for using GDS Burp API, let us focus on next important thing, Burp Suite logs, since this will be the raw input to our API to extract meaningful data.
Burp Logs
Burp Suite has been a favorite tool of many application security professionals and I am one of them. Burp is an extremely powerful tool in the right hands. One of the features Burp provides is the ability to generate log files, so it would be a good idea to manually explore the entire application after configuring the browser to point to the Burp proxy in order for Burp to record each and every URL visited and log them all. One can also use a spider to crawl the entire application; however, spiders have their own limitations. They will be able to discover only URLs that are identifiable by traversing the hyperlinks and may miss out any dynamic URLs that are generated using JavaScript—mostly applicable in web 2.0 applications that heavily use AJAX. Once the crawl (manual or automated) is completed, generate a Burp log that contains a wealth of information—possibly every URL of the application.
We can then use this Burp log file and feed it to our GDS Burp API to extract a list of URLs, headers, and many more fruitful details associated with these requests and responses that can help us when we are crafting our own fuzzing scripts.
The following section will explain how to generate Burp logs step by step.
Generating Burp Log Files
The logging feature in Burp Suite is not enabled by default. Hence, for us to generate logs, we need to explicitly activate it.
-
Enable Logging
Navigate to the Options > Misc Tab in Burp Suite. You should now be able to see a section called "Logging" on this Tab. In addition, you will be able to see multiple request and response options available for each tool supported by Burp with unticked check boxes. Tick the check box next to the option "All Tools –> Requests" to log all requests, no matter which tool (spider, repeater, scanner, intruder, etc.) we use for making a HTTP request. See the following screenshot for more details. Important tabs and options are highlighted in red boxes.
If you wish to log responses as well, tick the check box "Responses" and Burp will log all responses.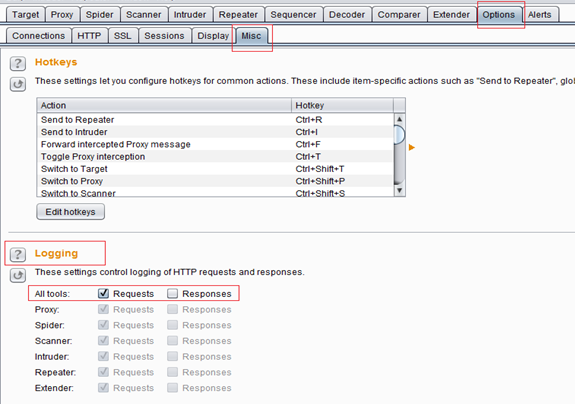
-
Create Log File
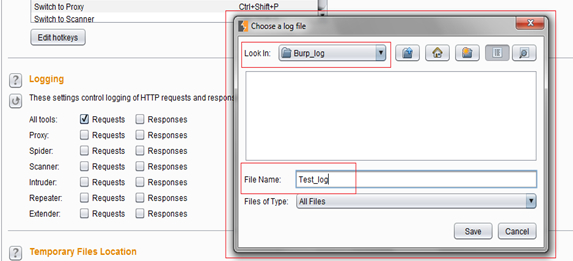
As soon as the user checks the check box to enable logging for the "All tools" option, it will prompt for a file name. Navigate to the desired directory where logs will be stored and provide the log file name as shown in the following screenshot:
Once the log file is set up, our job is done. Now Burp will automatically log each request that passes through the Burp Suite to this log file; hence, all we need to do now is browse the target web application. Initially the log file will not contain anything, so the size of the log file will be zero, as shown in following picture:
It should be noted that any request or response made through Burp Suite before setting up the log file will not be automatically written to this log file. However, every request made after enabling the logging will get recorded in log files, so it is a good idea to enable logging first and then browse the concerned website by piping our browser's output through Burp Suite. As we continue browsing, Burp continues writing requests to our log file, which is evident from the following snapshot taken after making few requests (post enabling logging):

This log file is actually a text file and can be opened using any text editor to view the contents.
What Next?
In the next article, I'll cover usage of the GDS Burp API against the log file we have generated. I'll cover important functions which will be helpful to us in parsing the log file that we have generated so far. It is recommended that readers familiarize themselves with how Python modules work.
Conclusion
By following this article, users should be able to set up environment and generate the Burp log file they can feed to the API for extracting fruitful details. We'll cover a live example that can help users in getting the best out of this API.
References
http://docs.python.org/2/using/cmdline.html#envvar-PYTHONPATH
http://mwielgoszewski.github.io/burpee/

FREE role-guided training plans

In this Series
- GDS Burp API – Part I
- The rise of ethical hacking: Protecting businesses in 2024
- How to crack a password: Demo and video walkthrough
- Inside Equifax's massive breach: Demo of the exploit
- Wi-Fi password hack: WPA and WPA2 examples and video walkthrough
- How to hack mobile communications via Unisoc baseband vulnerability
- How to build a hook syscall detector
- Top tools for password-spraying attacks in active directory networks
- NPK: Free tool to crack password hashes with AWS
- Tutorial: How to exfiltrate or execute files in compromised machines with DNS
- Top 19 tools for hardware hacking with Kali Linux
- 20 popular wireless hacking tools [updated 2021]
- 13 popular wireless hacking tools [updated 2021]
- Man-in-the-middle attack: Real-life example and video walkthrough [Updated 2021]
- Decrypting SSL/TLS traffic with Wireshark [updated 2021]
- Dumping a complete database using SQL injection [updated 2021]
- Hacking clients with WPAD (web proxy auto-discovery) protocol [updated 2021]
- Hacking communities in the deep web [updated 2021]
- How to hack Android devices using the StageFright vulnerability [updated 2021]
- Hashcat tutorial for beginners [updated 2021]
- How to hack a phone charger
- What is a side-channel attack?
- Copy-paste compromises
- Hacking Microsoft teams vulnerabilities: A step-by-step guide
- PDF file format: Basic structure [updated 2020]
- 10 most popular password cracking tools [updated 2020]
- Popular tools for brute-force attacks [updated for 2020]
- Top 7 cybersecurity books for ethical hackers in 2020
- How quickly can hackers find exposed data online? Faster than you think …
- Hacking the Tor network: Follow up [updated 2020]
- Podcast/webinar recap: What's new in ethical hacking?
- Ethical hacking: TCP/IP for hackers
- Ethical hacking: SNMP recon
- How hackers check to see if your website is hackable
- Ethical hacking: Stealthy network recon techniques
- Getting started in Red Teaming
- Ethical hacking: IoT hacking tools
- Ethical hacking: BYOD vulnerabilities
- Ethical hacking: Wireless hacking with Kismet
- Ethical hacking: How to hack a web server
- Ethical hacking: Top 6 techniques for attacking two-factor authentication
- Ethical hacking: Port interrogation tools and techniques
- Ethical hacking: Top 10 browser extensions for hacking
- Ethical hacking: Social engineering basics
- Ethical hacking: Breaking windows passwords
- Ethical hacking: Basic malware analysis tools
- Ethical hacking: How to crack long passwords
- Ethical hacking: Passive information gathering with Maltego
- Ethical hacking: Log tampering 101
- Ethical hacking: What is vulnerability identification?
- Ethical hacking: Breaking cryptography (for hackers)

Get certified and advance your career
- Exam Pass Guarantee
- Live instruction
- CompTIA, ISACA, (ISC)², Cisco, Microsoft and more!


