Establishing a Secure IPSec Connection to the Cloud Server

Introduction
It's a common occurrence. Enterprises are shifting all or part of their infrastructure to the cloud. This has been going on for a number of years, since the wide adoption of the cloud services. Although cloud services have existed in the past and a wide majority of companies were using it in daily lives without even realizing they are actually using it – in the last few years, the term has become very popular and now everything is shifting to the cloud.
But moving the infrastructure to the cloud doesn't bring only advantages, as some of the providers would like to imply. It brings its own problems that weren't present in the traditional enterprise environments. One of the largest concerns is certainly security-related, which discourages security-aware enterprises from migrating their whole infrastructure to the cloud. Nevertheless, the benefits are pervasive enough to migrate at least part of the infrastructure to the cloud, while keeping sensitive information stored safely in a private traditional environment.
Learn Cloud Security
In this article, we'll talk about how part of the infrastructure can be migrated to the cloud, while minimizing the treat and maximizing the security.
Migrating the Infrastructure
The first thing we need to ensure in every migration is which systems will be migrated to the cloud. Many companies use cloud-services for everything and they don't host their own private infrastructure, but at the end of the day, they have to protect the sensitive information stored in the cloud properly, which is not an easy task. All the information in the cloud has to be encrypted at the client-side, so that the server running in the cloud doesn't know anything about the decrypted data. The other option to avoid this problem is keeping sensitive information safe in a traditional environment. Still, a traditional environment isn't safe by default, but need to be properly protected to battle against malicious attackers. The only benefit of a traditional environment is that the security is in your own hands, which makes you responsible for securing the data. The other advantage is that the field of securing traditional environments has been researched in detail over the last few years, so there is enough information available to do it properly. The problem with the cloud is that you don't know how they're dealing with data and you don't have access to check whether the data is properly secured. You have to trust them to secure the data properly.
To avoid the problem completely, we can keep the sensitive information in our own network and only migrate the non-critical systems to the cloud. One of such systems is a presentation web page of a company, which usually doesn't contain sensitive information like user credentials, or their personal information, since the web page exists solely for presenting the company information, products, services as well as articles providing information about the business novelties.
Connecting to the Cloud System
It's usually the case that we would like to expose a number of ports on the cloud server in order to run different things on it. A widely used port is SSH port 22, which is used by administrators to connect to and administer the server. There are additional services bound to different ports, which we would like to have available, but ports are either bound locally (therefore they can be accessed only by local programs and services) or globally (they are exposed to the Internet and anybody can connect to them). We could protect the services my using firewall rules and allowing a connection only from special IP addresses, but that additionally complicates the overall configuration as we first have to have a static IP address, but we have to configure and maintain a valid set of IP addresses.
In order to be able to access the services, they have to be bound to a global port. Otherwise, they won't be accessible by anyone except the localhost, which isn't very useful to anyone, since nobody can access the services. There's an option of creating a secure SSH-tunnel to the cloud server and tunnel the traffic through to the existing service. The problem is that only administrators with an appropriate knowledge would be able to connect to those services, since normal users probably don't have the knowledge to create an SSH tunnel. The other problem are the services which normally expect to connect to a remote port running the same service in order to communicate with it successfully; they don't normally allow a creation of a SSH tunnel before connecting to the actual service. To solve that we would have to write a number of scripts run periodically by crontab to ensure the SSH tunnel is up and running to enable the services to connect to the remote service running on the cloud server.
We can solve the problem by creating and establishing an OpenVPN tunnel. When the VPN tunnel is established from the private network (VPN client) to the cloud server (VPN server), by default no rules are configured to limit the connection attempts, so both endpoints can connect to each other without any restrictions. Since we inherently trust the private network and distrust the public cloud server, we have to add appropriate rules to restrict the cloud server from being able to connect to internal services. By doing that, we're ensuring that even if a cloud server is compromised, the attacker won't be able to access our own private network. This is also true for the cloud service provider itself – since the CSP has absolute access to its own infrastructure, including our cloud server, it can access the server in order to gain access to our own private network. Therefore, we must be able to restrict the cloud-based server from being able to access our private network while still allowing the private network to connect to all of the services of a public cloud server.
Rather than using OpenVPN, we'll be using an IPsec tunnel, which we've described in details below.
The IPsec Tunnel
First, we should clarify what an IPsec is; it's a protocol suite used for securing communication over IP protocol. There are two types of IPsec protocols:
- Site-to-Site: used to connect two networks together.
- Remote Access: used to connect an endpoint device to a private network.
Note that we'll be using the following IP configuration details in this section of the article, which is important to understanding how everything functions.
- IP of the cloud server: 1.2.3.4
- IP of the pfSense box: 4.3.2.1
The OpenSwan
First, we have to install and configure everything on the remote cloud server, which can be done simply by installing the openswan package.
# apt-get install openswan
Then we have to decide whether to use a pre-shared PSK passphrases or a RSA certificates to connect both endpoints of the site-to-site IPsec tunnel. Note that RSA certificates are more secure than passphrases, but we'll be using a passphrase here for simplicity of following the article (it's not the point of this article to complicate things further by using the RSA certificates, but rather a secure tunnel communication between the local network and a remote cloud server).
We have to edit the /etc/ipec.conf and
version 2.0
config setup
protostack=auto
nat_traversal=yes
keep_alive=30
conn cloudvpn
authby=secret
auto=start
keyexchange=ike
esp=aes-sha1
pfs=no
type=tunnel
left=1.2.3.4
leftsubnet=1.2.3.4/32
right=4.3.2.1
rightsubnet=10.1.1.0/24
lifetime=1h
We also have to add additional sysctl rules to /etc/sysctl.conf in order to disable redirects on a network card to allow openswan to function properly.
net.ipv4.conf.all.accept_redirects = 0
net.ipv4.conf.all.send_redirects = 0
net.ipv4.conf.default.send_redirects = 0
net.ipv4.conf.eth0.send_redirects = 0
net.ipv4.conf.eth0.accept_redirects = 0
net.ipv4.conf.default.accept_redirects = 0
net.ipv4.ip_forward = 1
Then apply the changed rules by running the sysctl command:
# sysctl -p /etc/sysctl.conf
At the end, just restart ipsec in order for changes to take effect by issuing the following command:
# /etc/init.d/ipsec restart
The netstat command can be used to confirm whether is working as it should be; note that ipsec is listening on UDP ports 500 and 4500 on all interfaces.
# netstat -luntp | grep pluto
udp 0 0 127.0.0.1:500 0.0.0.0:* 19147/pluto
udp 0 0 1.2.3.4:500 0.0.0.0:* 19147/pluto
udp 0 0 127.0.0.1:4500 0.0.0.0:* 19147/pluto
udp 0 0 1.2.3.4:4500 0.0.0.0:* 19147/pluto
The pfSense
In pfSense, we have to select 'VPN – IPsec' to enable the IPsec tunnel to the remote endpoint.

Then we have to configure the two phases outlined below.
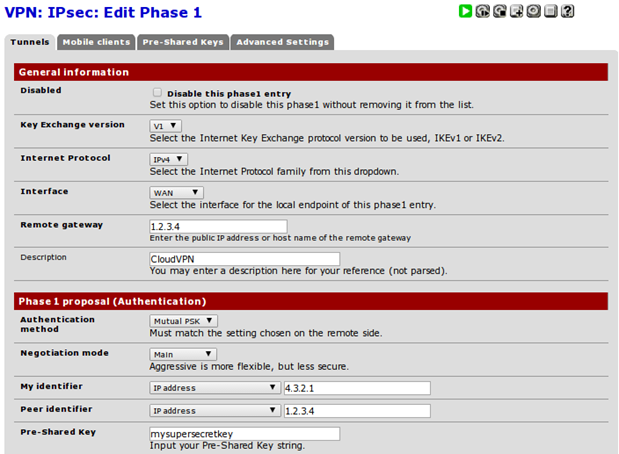
Phase One
Determines how the secure IPsec tunnel is established. When configuring the phase one, we mainly have to specify the remote gateway, which is make up IP address 1.2.3.4 and is the IP of the cloud-based server. We also have to choose the authentication details, the pre-shared password or a RSA key with the Main mode (note that Aggressive mode is not as secure, so we should avoid using it).
The 'My identifier' should be set to the IP address of the current endpoint, but in cases when pfSense is used as a border gateway, it will already be filled out correctly by choosing 'My IP address'. If the pfSense is not a border gateway, we should choose 'IP address' in the drop-down list and specify our WAN IP address.
The Peer identifier should be set to the 'Peer IP address' and the address of the other endpoint, which is the IP of the cloud server on our case, or 1.2.3.4.
At last, the Pre-Shared key should be set to a secret key known and configured by both endpoints.
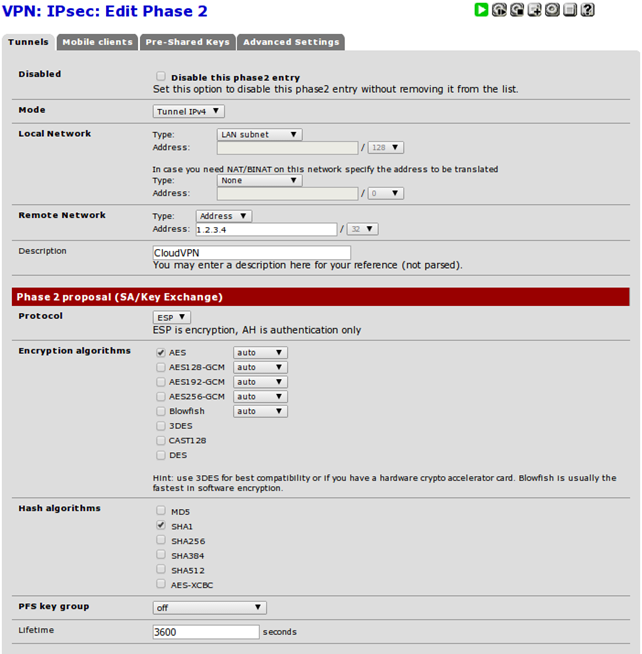
Phase Two
Determines how traffic is routed through the previously established IPsec tunnel. The most important fields are Local Network defining the local subnet, which will be accessible to the other end of the VPN tunnel; in our case this is set to LAN subnet meaning the cloud server will be able to access our LAN network.
The Remote Network should be set to a remote network, which will be accessible from the current end of the VPN tunnel. Since we only want to establish an IPsec connection with one cloud server, we must set a unique IP address 1.2.3.4 here. If we wanted to establish a site-to-site IPsec connection with another gateway pfSense box (or any other gateway device for that matter), we would have to specify a network at this point.
Note that the Local/Remote Network options should match on both endpoints, but should be reversed, so the cloud-based server should specify as Local Network what pfSense specifies as Remote Network and specify as Remote Network what pfSense specifies as Local Network.
Then we have to go to 'Status – IPsec' and press the play button to establish the connection. If there are some problems, we can observe the details in 'Status – IPsec – Logs' tab at the top of the web interface. On the cloud server, we can issue the following command to identify the details of establishing a connection, authentication details, etc to identify possible problems.
# tail -f /var/log/{syslog,messages,auth.log,daemon.log,pluto.log}
By configuring IPsec, we're effectively using VPN secure communication channel over insecure medium, the Internet. By doing that, the services running resources on the endpoint are accessible through a secure tunnel, which ensures the data in transit is properly secured.
A quick test
Now we can perform a quick test to ensure whether everything works as it should. Let's first open an arbitrary port 8888 on the current pfSense boxby running the command below.
# nc -l 8888
Surely the port 8888 on pfSense should not be accessible from the cloud server. Now let's connect from the cloud server to the internal IP address on port 8888.
# telnet 10.1.1.1 8888
At this point, the connection won't succeed, because the pfSense blocks all connections by default, so we have to add a rule to pass all connections coming from 1.2.3.4 to prot 8888 in the 'Firewall – Rules – IPsec' section.

At this point, the connection should succeed and we should be able to input something into the connection on the cloud server, which should be routed to the pfSense box.
Conclusion
In this article we've taken a look at the private traditional network as well as public cloud servers and discussed when it makes sense to migrate our own services to the cloud. Basically, when sensitive information is involved, we better keep the service in our own private network, because protecting access to such information is a lot easier when we have absolute power over the infrastructure. While it's more reasonable to keep sensitive data stored somewhere in a private network, it makes sense to migrate other systems not dealing with sensitive information to the cloud. This is due to the advantages of the cloud systems, where we don't have to worry ourselves with dealing and maintaining the hardware components, while renting access to the cloud system relatively cheaply.
We have shown how to set-up a VPN tunnel as well as an IPSec secure tunnel between the private network and a cloud-based system. We've done that to prevent anybody from being able to access the services running on the cloud server, while still having access to them from the internal network. One of the most important services that we want to have running on the cloud server is a backup service, which normally includes an agent running on all systems that we would like to backup. Afterwards a backup manager running on a server in a private network can securely connect to the backup service, ensuring the cloud server is backed up on a regular basis, while not exposing the service to the public.
Learn Cloud Security
The most important thing to recognize is the fact that to the private network, a cloud server seems like it is present in a local private networking. This has an advantage of being able to configure the services to connect to that server as if the server is running inside the same LAN environment. Additionally, such a setup can easily be used as a high-availability cluster, where multiple servers are dispersed around the world in different datacenters, while serving the same application. Therefore, if one server fails for some reason or the other, the application will still be available since the other servers are still up and running. By using the presented techniques, the servers don't even realize they are physically located in different parts of the world, but thing they are all a part of one local network, where the data replication and load balancing is being carried out.

In this Series
- Establishing a Secure IPSec Connection to the Cloud Server
- The rise of cloud computing: Trends and predictions
- Understanding the basics of cloud infrastructure: What you need to know
- How cloud security, data privacy, and cybersecurity convergence drives successful careers
- Secure cloud computing: What you need to know
- Working across multiple cloud service providers: CSP security learning path
- Securing cloud-based applications training: What you need to know
- Security risks of cloud migration
- DevSecOps in the Azure Cloud
- Amazon Athena Security: 6 essential tips
- Securing cloud endpoints: What you should know
- AWS security and compliance overview
- CloudGoat walkthrough series: IAM privilege escalation by attachment
- CloudGoat walkthrough series: EC2 server-side request forgery (SSRF)
- CloudGoat walkthrough series: Remote code execution
- CloudGoat walkthrough series: Lambda Privilege Escalation
- Information security strategy for the hybrid and multi-cloud
- CloudGoat walkthrough series: Cloud Breach S3
- CloudGoat walkthrough series: IAM privilege escalation by rollback
- Working with CloudGoat: The “vulnerable by design” AWS environment
- Malicious Amazon Machine Images (AMIs)
- Key findings from Ponemon’s State of Vulnerability Management in the Cloud and On-Premises report
- Cloud Pentesting Certification Boot Camp: The ultimate guide
- Cloud Based IDS and IPS Solutions [Updated 2019]
- AWS Security Monitoring Checklist [Updated 2019]
- Amazon Inspector: A cloud-based vulnerability assessment tool
- System administrator vs. cloud administrator
- 5 key cloud security use cases
- Deep Packet Inspection in the Cloud
- Honeypots in the Cloud
- Biometrics in the Cloud
- Open-Source Intelligence Collection in Cloud Platforms
- How to Safeguard Against the Privacy Implications of Cloud Computing
- AWS Cloud Security for Beginners — Part 2
- AWS Cloud Security for Beginners — Part 1
- AWS Security Monitoring Checklist — Part 2
- Rise of the Rogue Cloud: The Fundamental Security Mistake Enterprises Make and How to Correct It
- Controlling the Risks of Cloud-Enabled End-Point Security Products
- The Ultimate Guide to CCSP Certification
- Five Reasons Why Security Professionals Need the Cloud
- Amazon S3 Buckets-Hardening
- Cloud Service Reconnaissance
- Cloud Computing Security: Be Secure Before Moving to Cloud
- Cloud Technology Bringing New Possibilities in Threat Management
- Attacking the Cloud
- Man in the Cloud Attacks: Prevention and Containment
- Cloud originated DDoS attacks
- Where Is Your Data Safer? In the Cloud Or On Premise?
- DDOS Protection for Public Cloud Customers
- Security Barriers in the Adaptation of Cloud Technology
- SIEM as a Service

Get certified and advance your career
- Exam Pass Guarantee
- Live instruction
- CompTIA, ISACA, (ISC)², Cisco, Microsoft and more!

Cloud security

Cloud security