Coding of Disassembler

We have practiced much disassembling by using assembly de-compilation tools such as Reflector, ILSpy, etc. Although such tools offer many advantages and are in widespread use among crackers, security professionals, and reverse engineers, nowadays they are commercialized or rarely available even for testing. This research paper is specially designed to learn how to make our own custom disassembler in order to diagnose assembly of both C# and IL code. It also integrates the making of code injection operability, which demonstrates implanting a malware or spyware into an existing executable or library file.
The creation of a custom disassembler using the .NET framework is, in fact, a challenging undertaking because .NET framework languages, such as C# and VB.net, have some limitations in implementing the tactics of source code extraction or converting the MSIL code to C# code. Eventually, we could not achieve the dreamed-of implementation by the .NET framework alone. We shall have to interoperate with other frameworks or import third-party APIs. Hence, we shall move forward beyond the .NET constraint boundary by combining or importing open source project code into C# code to make possible the development of this amazing reverse engineering tool. In the first part of this paper, we shall concentrate on user interface design, along with obtaining necessary information related to target assembly.

Become a certified reverse engineer!
Prerequisite
This time, we are not confronted by any ready-made tools, as we were earlier. In fact, we are going to get a taste of real coding by developing a reverse engineering tool that streamlines the task of disassembling. So, the user machine has to configure with the following software:
- Visual Studio 2010
- Mono.Ceil.dll 9.5.0
- Icsharp.Decompiler.dll
- NuGet Package Manager
- Icsharp.NRefactory.dll
Project Planning Blueprints
This project is basically composed of multiple modules and each module is assigned a particular functionality to perform. In this article, we shall demonstrate the making of this project in a development life cycle manner. The tasks that we are going implement are the following:
-
Software design
-
Package installation and configuration
-
Namespace and reference definition
-
Loading the assembly origin Information
-
Showing assembly members
-
Disassembling C# source code
-
Disassembling MSIL code
-
Message box injection
-
Spyware injection
-
Testing
-
Code analysis
So, in this first article, we are not going to illustration the design process; rather we shall begin our voyage by package installation (the NuGet package), and then move ahead by showing the assembly information as well as the member loading process.
Software Design
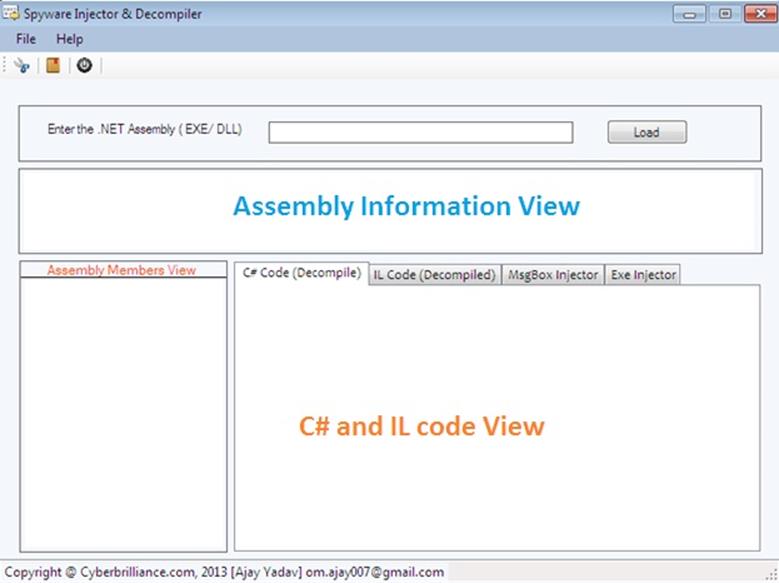
The custom disassembler cum injector stipulates a user-friendly, easy-to-operate end-user design that can even be manipulated by laymen. Though such an undertaking can be shown in command line view too, that is relatively cumbersome and offers fewer features. As per this software internal functionality, it typically first asks to upload a .NET-built assembly, which could be .dll, .exe, or anything else. Later, it displays the aspects of assembly origin in a comprehensive manner, as well as showing all members, such as namespace, method, and property-related specification of the assembly in the TreeView control. The moment we select or expand any member of the assembly, we get the decompiled view of the business logic in both C# code and MSIL code in separate tabs. Finally, the most significant features, such as message box and spyware/malware injection, could be encountered on behalf of selection of members from the TreeView control. We are going to craft the following design in order to de-compile assembly and inject malware:
That software encapsulates a couple of controls that are arranged in a specific order to create the final design. It is presumed that the programmer must have proper experience in both designing and coding in .NET technology. Hence, it would be waste to elaborate the user control and arbitrary controls designed on a C# window form. It doesn't matter, indeed, how you design your software. Rather, the matter of concern is that the business logic and features implementation should be postulated in the proper order.
Getting Started
Making this software is not similar to a common Windows form application. We shall have to deal with open source APIs, such as the Mono project and the NuGet package, because the Visual Studio IDE alone is not capable of making this happen. This segment embarks on the process by learning the initial configurations.
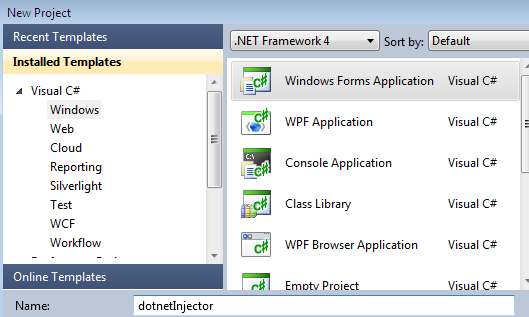
So, open the Visual Studio IDE and go to "New Project Type" from the File menu, select the "Window Forms Application" type from the project template, and assign the project name as "dotnetInjector," as shown below:
The loader form shall be the entry point, having incorporated the disassembling and injection characteristics. Afterward, add one more form as "about" to the solution; the functionality is typically scattered across multiple form modules

Adding External Reference
Now, right click the dotnetInjector | reference and choose "Add Reference." Here import some external DLL file references in order to consume their special classes, as follows:
-
Mono.ceil.dll
-
ICSharp.decompile.dll
NuGet Package Installation
The NuGet gallery is the central package repository used by all package consumers and developers. NuGet is a special package manager like Linux Yum for the Microsoft development platform, including .NET. The NuGet client tools provide the ability to produce and consume packages.
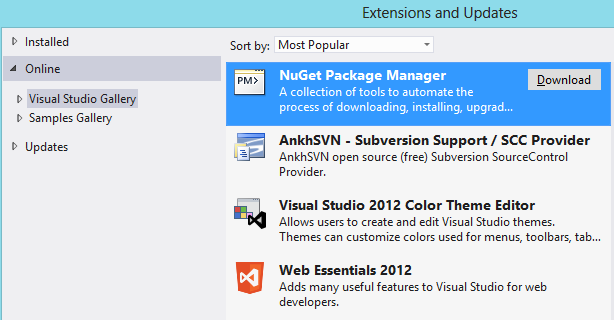
Once the package is downloaded and installed as an add-in in the Visual Studio IDE, we have found its entry as "Library Package Manager" in the Tool menu:
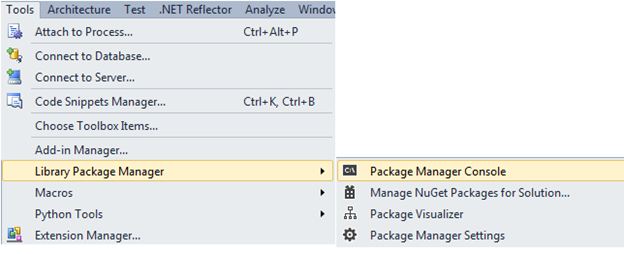
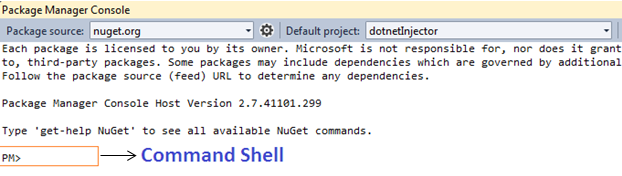
You can install, remove, update, and list any packages by using PowerShell command-line commands or by using the "Manage NuGet Packages" dialog box in the Package Manager console window in Visual Studio. Both options are accessible from the Visual Studio main menu. The following figure shows the power shell view of Package Manager, where we can manipulate it using built-in commands, such as the command prompt to install, list, or delete a package, as follows:
In order to list the available packages at the NuGet repository, issue the following command:
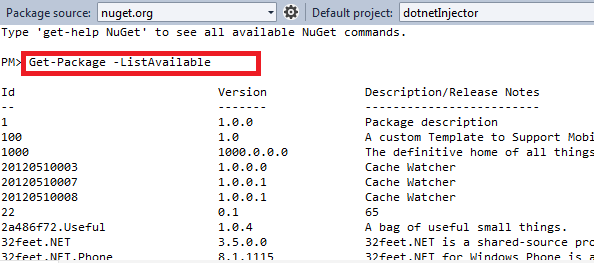
As we have stated earlier in the software requirement section, we need to import or install the ICSharp.Decompile.dll; likely, the NuGet repository has such a package, which incorporates all the relevant library files. So install this version of the package, especially 5.0.0.6, using the following command:

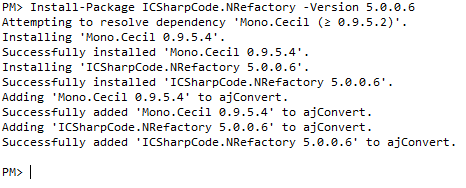
PM> Install-Package ICSharpCode.NRefactory -Version 5.0.0.6
Thi
s command connects the NuGet.org server, first downloading all the relevant or dependent packages and later on installing them one by one, as shown below:
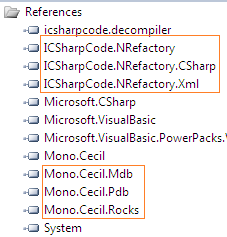
When the package is installed successfully, the following library DLLs are automatically added to the References:
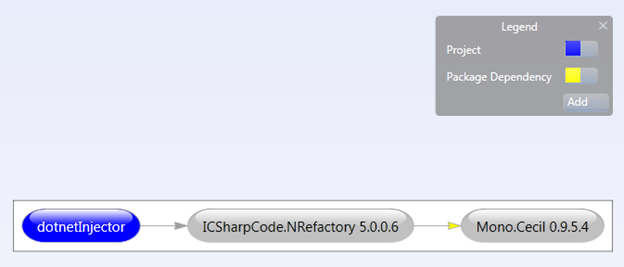
The NuGet add-in creates dependency charts for the packages that are installed in the current package in order to set up a correlation.
If we want to remove any package and their associate entries from the reference tab, we can issue the following command:
PM> Uninstall-Package ICSharpCode.NRefactory -Version 5.0.0.6
When you install a package, NuGet copies files to your solution and automatically makes whatever changes are needed, such as adding references and changing your package.config file. If you decide to remove the library, NuGet removes files and reverses whatever changes it made in your project so that no chaos is left. We can observe the change made in the package.config file after package installation:
[xml]
<?xml version="1.0" encoding="utf-8"?>
<packages>
<package id="ICSharpCode.NRefactory" version="5.0.0.6" targetFramework="net40-Client" />
<package id="Mono.Cecil" version="0.9.5.4" targetFramework="net40-Client" />
</packages>
Importing API
I assume that the developer would already have created the design. So, after making the entire relevant configuration, import the open source projects API, which we have downloaded via NuGet, namespace definition in the Loader.cs file.
Importing Open Source API
using Mono.Cecil;
using Mono.Cecil.Cil;
using ICSharpCode.Decompiler;
using ICSharpCode.Decompiler.Ast;
We also need a sort of .NET special classes; import the following namespace, too, in the Loader.cs class file:
Importing .NET API
using System.IO;
using System.Net;
using System.Diagnostics;
Assembly Information Loading
This segment illustrates the real coding implemented behind this project. First, in the Loader.cs class, define a Boolean type variable and LoadedAsmbly property of AssemblyDefinition type:
[c]
public partial class Loader : Form
public AssemblyDefinition LoadedAsmbly { get; set; }
public bool status = false;
……………….
}
We shall have to upload the assembly file in order to show its information. So we will attach a File OpenDialog box on the button click and then choose a file there that will display the uploaded file complete path in the text box:

Generate the button click event, place the following function, and set the Boolean variable to false. The ResetData() method typically cleans the control values and the openAssesmbly() method implements the "File Open" dialog box.
[c]
private void btnLoadAssem_Click(object sender, EventArgs e)
{
status = false;
ResetData();
openAssembly();
}
The openAssembly() method first shows a "File Open" dialog box, then puts the selected file in the textbox control and calls the LoadAsmOrigin() method, which displays the assembly origin related method. Later, on behalf of the status Boolean variable, it calls another method, as shown below:
[c]
private void openAssembly()
{
OpenFileDialog openAsm = new OpenFileDialog();
openAsm.Filter = "Executable | *.exe";
if (openAsm.ShowDialog() == DialogResult.OK)
{
txtURL.Text = openAsm.FileName;
LoadAsmOrigin();
if (status==false)
{
LoadAsmContents();
}
}
}
Exposing Assembly Origin
This section explains the processing of assembly native information. We first read the assembly path and pass the reference of the selected assembly file path in the LoadedAsmbly variable. Then a couple of invoked property values of the AssemblyDefinition class are displayed in the rich text box:
[c]
private void LoadAsmOrigin()
{
try
{
rtbInfo.Clear();
rtbInfo.AppendText("[Name]::" + LoadedAsmbly.MainModule.Name.ToString() + Environment.NewLine);
rtbInfo.AppendText("[CLR Runtime]::" + LoadedAsmbly.MainModule.Runtime.ToString() + Environment.NewLine);
rtbInfo.AppendText("[Full Name]::" + LoadedAsmbly.MainModule.FullyQualifiedName.ToString() + Environment.NewLine);
rtbInfo.AppendText("[Metadata Token]::" + LoadedAsmbly.MainModule.MetadataToken.ToString() + Environment.NewLine);
rtbInfo.AppendText("[Architecture]::" + LoadedAsmbly.MainModule.Architecture.ToString() + Environment.NewLine);
rtbInfo.AppendText("[EntryPoint]::" + LoadedAsmbly.MainModule.EntryPoint.ToString() + Environment.NewLine);
rtbInfo.AppendText("[Mvid]::" + LoadedAsmbly.MainModule.Mvid.ToString() + Environment.NewLine);
}
catch
{
ResetData();
MessageBox.Show("Couldn't Read Assembly, it is either Unmanaged or obfuscated");
status = true;
return;
}
}
It is good programming practice to put the sensitive code into the try/catch block so that we can escape from any unexpected occurrence. This software only accepts or disassembles a .NET-managed assembly, such as Reflector.
Exposing Assembly Members
We have examined how to obtain assembly-related information, such as name, entry, point and runtime. Now we shall populate entire members of the .NET assembly, for instance, namespace, methods, properties, and variables. This purpose is fulfilled by the LoadAsmContents() method, which is called previously in the openAssembly() method.
Typically, we first read the assembly path and enumerate the contents of the assembly using Enumerator. This software does not gather massive information. It mainly shows the disassembling of methods.
[c]
private void LoadAsmContents()
{
LoadedAsmbly = AssemblyDefinition.ReadAssembly(txtURL.Text);
TreeNode tn = null;
IEnumerator enumerator = LoadedAsmbly.MainModule.Types.GetEnumerator();
while (enumerator.MoveNext())
{
tn = this.tvMembers.Nodes.Add(td.Name.ToString());
IEnumerator enumerator2 = td.Methods.GetEnumerator();
while (enumerator2.MoveNext())
{
MethodDefinition method_definition = (MethodDefinition)enumerator2.Current;
if (method_definition.IsConstructor)
{
tn.Nodes.Add(method_definition.Name.ToString());
}
tn.Nodes.Add(method_definition.Name.ToString());
}
}
}
We use two enumerator objects in this context. The first one is used to list the main module of the assembly and the second is used to display especially methods that reside in the assembly.
Testing
This paper's objective is finished. Now test the application by running it via F5 and you see the design that is created by me. Where the first block represents the reading of any assembly, the second block incorporates the necessary information regarding the assembly and the vertical block shows the disassembled contents.
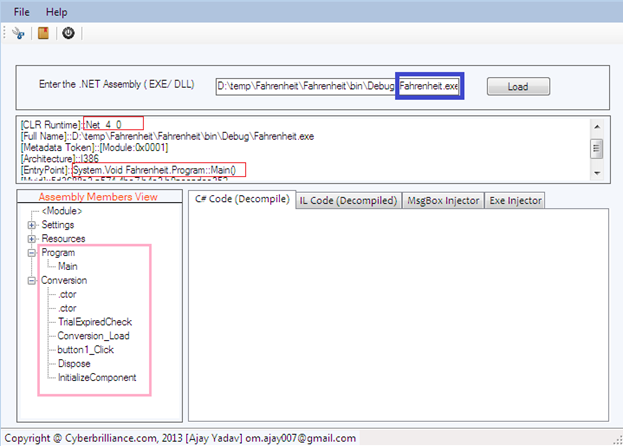
Upload the assembly (either .exe or .dll) and the next consecutive block renders all relative information regarding the uploaded assembly. The "Assembly Members View" box displays all the methods, properties, and constructors that reside in the assembly as we expand the namespace.
Final Note
Become a certified reverse engineer!
So we have finished the first paper of the "Disassembler Mechanized" series, where we basically set the software development platforms by first importing or configuring the open source package from the NuGet Repository. Later, we have revealed the software development strategy, which comprises multiple layers of functionality development. This software is going to implement much functionality, so it is not possible to elaborate the entire mechanism in a single edition. We therefore presented limited functionality in this paper, especially until showing the assemble contents view. In the forthcoming article, we shall illustrate C #and MSIL code disassembling from an .exe or .dll file.
- Exam Pass Guarantee
- Live expert instruction
- Hands-on labs
- CREA exam voucher
In this Series
- Coding of Disassembler
- Kali Linux: Top 8 tools for reverse engineering
- Stacks and Heap
- Top 8 reverse engineering tools for cyber security professionals [updated 2021]
- Arrays, Structs and Linked Lists
- Reverse engineering obfuscated assemblies [updated 2019]
- Crack Me Challenge Part 4 [Updated 2019]
- Writing windows kernel mode driver [Updated 2019]
- Assembly programming with Visual Studio.NET
- The basics of IDA pro
- Reverse engineering tools
- Hacking tools: Reverse engineering
- Reverse engineering a JavaScript obfuscated dropper
- Reverse Engineering – LAB 3
- Exploiting Protostar – Stack 0-3
- Reversing Binary: Spotting Bug without Source Code
- Reverse engineering virtual machine protected binaries
- Introduction to Reverse Engineering
- Pafish (Paranoid Fish)
- Extending Debuggers
- Encrypted code reverse engineering: Bypassing obfuscation
- Buffer Overflow Attack & Defense
- Invoking Assembly Code in C#
- iOS Application Security Part 32 - Automating tasks with iOS Reverse Engineering Toolkit (iRET)
- Hooking IDT
- A Guide to Debugging Android Binaries
- Kernel debugging with Qemu and WinDbg
- Shared Folders with Samba and Qemu
- Testing Hooks via the Windows Debugger – An Introduction to RevEngX
- Reverse Engineering with Reflector
- Applied Reverse Engineering with IDA Pro
- Injecting spyware in an EXE (code injection)
- Disassembler Mechanized Part 4: DLL Injector Development
- Disassembler Mechanized Part 3: Code Injection Operation
- Debugging TLS callbacks
- Disassembler Mechanized Part 2: Generating C# and MSIL code
- System address map initialization in x86/x64 architecture part 2: PCI express-based systems
- Applied cracking & byte patching with IDA Pro
- .NET reversing with Reflexil
- Reversing firmware part 1
- Reverse Engineering with Reflector: Part 1
- Remoting Technology
- Reverse engineering with OllyDbg
- Understanding Session Fixation
- Optimizing Managed Code Execution
- File system manipulation
- The BodgeIt store part two
- The BodgeIt store part one
- Understanding Windows Internal Call Structure
- Pin: Dynamic Binary Instrumentation Framework
- Linux Kernel Development Process

Get certified and advance your career
- Exam Pass Guarantee
- Live instruction
- CompTIA, ISACA, (ISC)², Cisco, Microsoft and more!

Reverse engineering
Reverse engineering
Reverse engineering
Top 8 reverse engineering tools for cyber security professionals [updated 2021]
Reverse engineering