.NET Reverse Engineering-1:CIL Programming

Introduction
The prime objective of this article is to confront with the .NET mother tongue language termed as Common Instruction Language (CIL) which laid down the foundation of .NET Reverse Engineering. Here, you will comprehend the distinction between CIL directive, attributes, opcodes and will come across numerous CIL tools that associate a significant role in code execution. The triggering point to writing this article is to provide a deep analysis and examination of CIL grammar.

Become a certified reverse engineer!
The source code of any software or executable application, is intellectual property of a vendor company and not to be disclosed due to proprietary issues. Without the actual code, we have to rely on what is called the native code, so it is required to delve into CIL before moving ahead to code dissembling. Apart from that, we shall discuss some of the advance conceptions related to reverse engineering such as: round-tripping engineering, obfuscation and code disassembling which uses some advance tools such as IDAPro, Ollydbg, Hex Editor, Ilasm and Reflector in the forthcoming articles of this series.
Abstract
MSIL (Microsoft Intermediate Language) is an essential fragment of CLR and the code that is written and executed under CLR is referred to as "managed code". The managed compiler translates that code (*.cs file) into CIL code, manifest and metadata. This process typically undergoes two compilation phases. The first compilation phase is performed by compiler in which source code is transformed to MSIL. The second compilation phase occurs at run time, when the MSIL code is compiled to native code. The .NET platform is considered language-independent because the process execution of a managed application is identical regardless of the source language. Finally CIL is full- fledged .NET programming language, with its own syntax and compiler.
The beauty of MSIL code is that it compiled once and executes anywhere by using JIT compiler which, compiles assemblies into native binary code that targets a specific platform. You can write an application and deploy that application to Windows, Linux, Mac and other platforms that support .NET run time.
Prerequisite
In order to execute and examine MSIL/CIL code, you have to configure your machine with the following tools;
Understanding CIL
When you build a .NET assembly using your managed language of choice (C#, VB, F#, Perl, COBOL), the associate compiler translates your source code into Common Instruction Language. CIL is just an another structural .NET programming language, it possible to build .NET assemblies directly using CIL and CIL compiler (ILASM.EXE) that ships with .NET framework.
The more you understand the grammar of CIL, the better able you are to move into the arena of advanced .NET programming. The programmer having comprehensive knowledge of CIL, can perform the following tasks:
- Disassembling an existing assembly, edit the CIL code, and recompile the updated code.
- CIL is the only .NET language that allows you to access each aspect of CTS and CLS.
- Building in-house dynamic assemblies using the System.Reflection.Emit namespace API.
CIL does not simply define a general set of keywords such as public, private, new, get, set, this. Rather, the token set understood by the CIL compiler is sub-divided into three categories. Each category of CIL token is expressed using a particular syntax. The three categories are:
CIL Directive
Directives are represented syntactically using a single dot prefix (.class, .assembly). They are a set of CIL tokens that are used to describe the structure of a .NET assembly called CIL directives. They are used to inform the CIL compiler how to define the namespace, class and methods that will populate an assembly.
CIL Attributes
Sometimes CIL directives are not descriptive enough to fully express the definition of a given type. However, they can be further specified with various CIL attributes to qualify how a directive should be processed.
CIL Opcodes
The Opcodes (or operation code) provides the type of implementation logic once a .NET assembly, namespace and type has been defined in terms of CIL code.
Despite catering numerous advantages, CIL programming has some drawbacks as such maintaining of safe code. CIL source code is inherently unsafe and could lead to disaster.
First CIL Program
We need a code editor in order to author our First CIL program, for instance Notepad or Wordpad but it is good to write code by using other full-fledged open source .NET IDE such as SharpDevelop or Xamarin Studio. They are integrated with existing .NET FCL an automatic directive recognition feature. No matter which IDE or editor we are using, the important point is to save that CIL code file with *.il extension.
The following code illustrates the first hello world program using CIL programming language. Open notepad, and place the following code, then save this file as Test.il
[plain]
.assembly extern mscorlib {}<b></b>
<pre>.assembly FirstApp
}
.namespace FirstApp
{
.class private auto ansi beforefieldinit Test
{
.method public hidebysig static void Main(string[] argd) cil managed
{
.entrypoint
.maxstack 1
ldstr "Welcome to CIL programming world"
call void [mscorlib] System.Console::WriteLine(string)
ret
}
}
}
File:- Test.il
CIL code Compilation
After finish coding, save this file as Test.il and compile it using the .NET framework shipped tool ILASM.exe as the following command:
ILASM /exe /debug Test.il
Here the exe option indicates that the target is a console base application. The debug option asks the compiler to generate a debug file (test.pdb) for the application which is a useful viewing source code in a debugger or disassembler.
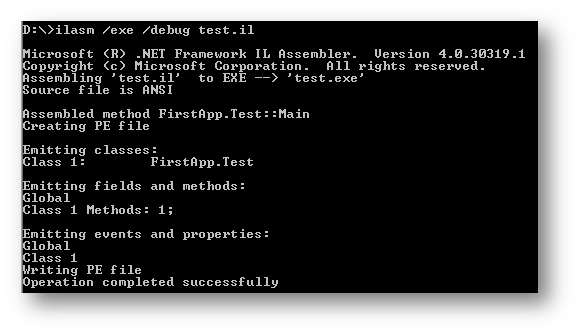
After successfully compiling the Test.il file, Test.exe is created in the project directory which is finally executable and yields our desired output as the following:

When building or modifying assemblies using CIL code, it is always advisable to verify that the compiled binary image is a well-formed .NET image using the peverify.exe utility as shown below:
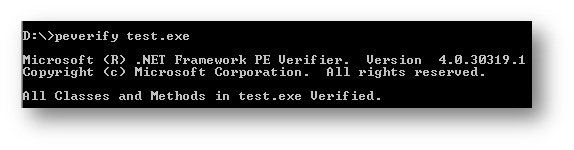
Here in the aforementioned figure, it is proved that the all opcodes within the test.exe binary are valid CIL codes. While the CIL compiler has numerous command-line options as the following:
In the aforementioned CIL code source file Test.il, the first declaration is an external reference to the mscorlib library. The mscorlib.dll contains the core of the .NET Framework FCL which includes the System.Console class. The second assembly directive is simple name of assembly, which is FirstApp and third directive defines the namespace.
[plain]
.assembly extern mscorlib {}
.assembly FirstApp
}
// class namespace
.namespace FirstApp
{ ……}
The following lines define a class and a method within the class. The class directive introduces a public class named Test which implicitly inherits the System.Object class. The method directive defines the public Main as a member method. The cil keyword indicates that the method contains Intermediate code.
[plain]
.class private auto ansi beforefieldinit Test
{
.method public hidebysig static void Main(string[] argd) cil managed
{ …}
}
The Main method commences with two directives. The .entrypoint directive, designates Main as the entry point of the application. The .maxstack set the size of the memory stack to 1 slot. The ldstr directive loads the string into memory. The call directive consumes one item from the memory and displays them using the WriteLine method. Finally ret directive indicates return or exit from the method.
[plain]
.entrypoint
.maxstack 1
ldstr "Welcome to CIL programming world"
call void [mscorlib] System.Console::WriteLine(string)
ret
CIL Code Post-mortem Analysis
CIL is much easier to understand and interpret when compared to assembly language. The contents of source code in CIL programming are case sensitive like C# in statements and, not terminated with a semicolon. Apart from that, the most significant part of CIL application is dotted prefixed directives and actual executable source code. There are several categories of directives proposed by .NET CLR such as assembly, class and method.
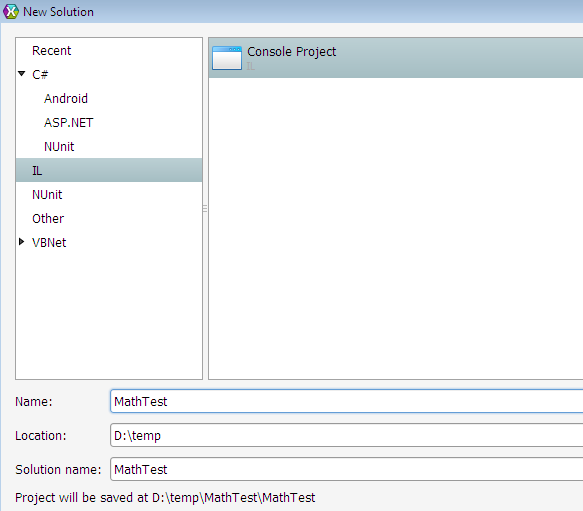
In order understand the CIL code directive, we shall write a console application using the Xamarin Studio that produces the addition of two integer types. Although we can develop such an application using other code editors but Xamarin studio provides more functionality and facilities in terms of writing crucial IL coding rather than other editors.
So first open the Xamarin studio and select New
Solution from File menu. Then choose IL type Console Project from project template as shown below:
Thereafter, rename the main.il to MathFun.il and place the following code in the MathFun.il file. We shall discuss each segments of the *.il file in the next section.
[plain]
.assembly extern mscorlib
{
.publickeytoken = (B7 7A 5C 56 19 34 E0 89 )
.ver 2:0:0:0
}
.assembly MathFun
{
.ver 1:0:0:0
.locale "en.US"
}
.imagebase 0x00400000
.file alignment 0x00000200
.stackreserve 0x00100000
.subsystem 0x0003
// =============== CLASS MEMBERS DECLARATION ===================
.class public auto ansi beforefieldinit MathFun
extends [mscorlib]System.Object
{
.field private string '<Name>k__BackingField'
.custom instance void [mscorlib]System.Runtime.CompilerServices.CompilerGeneratedAttribute::.ctor() = ( 01 00 00 00 )
.method public hidebysig specialname rtspecialname
instance void .ctor(string name) cil managed
{
// Code size 18 (0x12)
.maxstack 8
IL_0000: ldarg.0
IL_0001: call instance void [mscorlib]System.Object::.ctor()
IL_0006: nop
IL_0007: nop
IL_0008: ldarg.0
IL_0009: ldarg.1
IL_000a: call instance void MathFun::set_Name(string)
IL_000f: nop
IL_0010: nop
IL_0011: ret
.method public hidebysig specialname instance string get_Name() cil managed
{
.custom instance void [mscorlib]System.Runtime.CompilerServices.CompilerGeneratedAttribute::.ctor() = ( 01 00 00 00 )
// Code size 11 (0xb)
.maxstack 1
.locals init (string V_0)
IL_0000: ldarg.0
IL_0001: ldfld string MathFun::'<Name>k__BackingField'
IL_0006: stloc.0
IL_0009: ldloc.0
IL_000a: ret
.method public hidebysig specialname instance void set_Name(string 'value') cil managed
{
.custom instance void [mscorlib]System.Runtime.CompilerServices.CompilerGeneratedAttribute::.ctor() = ( 01 00 00 00 )
// Code size 8 (0x8)
.maxstack 8
IL_0000: ldarg.0
IL_0001: ldarg.1
IL_0002: stfld string MathFun::'<Name>k__BackingField'
IL_0007: ret
.method public hidebysig instance string Display() cil managed
{
// Code size 22 (0x16)
.maxstack 2
.locals init ([0] string CS$1$0000)
IL_0000: nop
IL_0001: ldstr "Hello "
IL_0006: ldarg.0
IL_0007: call instance string MathFun::get_Name()
IL_000c: call string [mscorlib]System.String::Concat(string,string)
IL_0011: stloc.0
IL_0014: ldloc.0
IL_0015: ret
.method public hidebysig instance int32 Addition(int32 x, int32 y) cil managed
{
// Code size 9 (0x9)
.maxstack 2
.locals init ([0] int32 CS$1$0000)
IL_0000: nop
IL_0001: ldarg.1
IL_0002: ldarg.2
IL_0003: add
IL_0004: stloc.0
IL_0007: ldloc.0
IL_0008: ret
.property instance string Name()
{
.get instance string MathFun::get_Name()
.set instance void MathFun::set_Name(string)
} // end of property Test::Name
.class private auto ansi beforefieldinit MathFun extends [mscorlib]System.Object
{
.method private hidebysig static void Main(string[] args) cil managed
{
.entrypoint
// Code size 57 (0x39)
.maxstack 4
.locals init ([0] class MathFun obj)
IL_0000: nop
IL_0001: ldstr "Ajay"
IL_0006: newobj instance void MathFun::.ctor(string)
IL_000b: stloc.0
IL_000c: ldloc.0
IL_000d: callvirt instance string MathFun::Display()
IL_0012: call void [mscorlib]System.Console::WriteLine(string)
IL_0017: nop
IL_0018: ldstr "Addition is: {0}"
IL_001d: ldloc.0
IL_001e: ldc.i4.s 15
IL_0020: ldc.i4.s 35
IL_0022: callvirt instance int32 MathFun::Addition(int32,int32)
IL_0027: box [mscorlib]System.Int32
IL_002c: call void [mscorlib]System.Console::WriteLine(string,object)
IL_0031: nop
IL_0032: call valuetype [mscorlib]System.ConsoleKeyInfo [mscorlib]System.Console::ReadKey()
IL_0037: pop
IL_0038: ret
}
}
MathFun.il
Now build this program using F8. After successful compilation, the final executable MathFun.exe file is created in the project Bin/Debug folder of the solution directory.
Assembly Directives
The assembly directive contains information that the compiler produces to the manifest, which is metadata pertaining to the overall assembly. This section lists common assembly directives as following;
.assembly extern
This directive represents an external assembly. The public types and methods of the referenced assembly are available to the current assembly. Here, is the syntax as:
.assembly extern name as alaisname { }
We implement such construct in the MathFun.il file by referencing the mscorlib.dll as following:
.assembly extern mscorlib
{
.publickeytoken = (B7 7A 5C 56 19 34 E0 89 )
.ver 2:0:0:0
}
Because of the importance of mscorlib.dll, the ILASM compiler automatically includes an external assembly reference to that library.
.assembly
It defines the simple name of the assembly. Assembly can be defined by specifying the friendly name of the binary;
.assembly CILType { }
There are some of the sub-directives available in the assembly block as:
- .ver
- .locale
-
.publickey
By taking the reference of MathFun.il file, we are updating the assembly definition to include a version number of 1.0.0.0 using .ver directive and culture information using .locale; such construct would be as the following:
.assembly MathFun
{
.ver 1:0:0:0
.locale "en.US"
}
.module
The .module directive ensures the final executable extension of the files such as *.exe;
.module MathFun.exe
.imagebase
The .imagebase directive sets the base address where the application is loaded. The default is 0x00400000.
.imagebase 0x00400000
.file
The .file directive adds a file to the manifest of the assembly. This is useful for associating helper documents with an assembly.
.file alignment 0x00000200
The nometadata is the primary option and stipulates that the file is unmanaged.
.stackreserve
The .stackreserve directive configures the stack size to 0x00100000 which is default.
.stackreserve 0x00100000
.subsystem
The .subsystem directive indicates the subsystem used by the application, such as console or GUI subsystem. Here the syntax as shown below:
.subsystem number
In the aforementioned example, we are constructing a console application. So mention 3 which are for console application and 2 for GUI applications.
.subsystem
0x0003
.corflags
The .corflags directive sets the runtime flag in the CLI header which stipulates an IL only assembly. The default value is 1 of the corflags.
.corflags 0x00000003 (As reference to MathFun.il)
.maxstack
The .maxstack directive establishes the maximum number of variables that may be pushed onto the stack during execution.
.maxstack 8 (default value)
Class Directives
This part describes the important class directives. It has contains the following significant directive:
.class
The .class directive defines a new reference, value or interface type. Here, the syntax is shown below:
attributes classname extends basetype implements interface
As per the aforementioned MathTest.il file, we implement the class MathOperation using .class directive in this way as the following:
.class public auto ansi beforefieldinit MathFun
extends [mscorlib]System.Object
The class directive is also adorned with variety of attributes. Here is the short list of the most common:
- abstract: indicates class that can't be instantiated.
- ansi and Unicode : determine the format of string.
- auto : CLR controlled the Memory layout of fields by this.
- beforefieldinit: the type should be initialized before a static class is accessed.
- private and public : set the visibility outside the class
The Test class also implements a constructor specification as Test() in order to initialize the field's data as in C#.net version.
[c language="#"]
public Test(string name)
{
this.Name = name;
}
So its IL code would be as the following:
[plain]
.field private string '<Name>k__BackingField'
.custom instance void [mscorlib]System.Runtime.CompilerServices.CompilerGeneratedAttribute::.ctor() = ( 01 00 00 00 )
.method public hidebysig specialname rtspecialname
instance void .ctor(string name) cil managed
{
// Code size 18 (0x12)
.maxstack 8
IL_0000: ldarg.0
IL_0001: call instance void [mscorlib]System.Object::.ctor()
IL_0006: nop
IL_0007: nop
IL_0008: ldarg.0
IL_0009: ldarg.1
IL_000a: call instance void MathFun::set_Name(string)
IL_000f: nop
IL_0010: nop
IL_0011: ret
}
.property
The property directive adds a property member to a class. Here, the syntax as shown below;
.property attributes return propertyname parametrs default { body }
If we define a property in C# code as the following:
[c language="#"]
public String Name
{
get;
set;
}
Then its corresponding MSIL code counterpart for Get and Set property would be as the following:
[plain]
.method public hidebysig specialname instance string
get_Name() cil managed
{
.custom instance void [mscorlib]System.Runtime.CompilerServices.CompilerGeneratedAttribute::.ctor() = ( 01 00 00 00 )
// Code size 11 (0xb)
.maxstack 1
.locals init (string V_0)
IL_0000: ldarg.0
IL_0001: ldfld string MathFun::'<Name>k__BackingField'
IL_0006: stloc.0
IL_0009: ldloc.0
IL_000a: ret
.method public hidebysig specialname instance void
set_Name(string 'value') cil managed
{
.custom instance void [mscorlib]System.Runtime.CompilerServices.CompilerGeneratedAttribute::.ctor() = ( 01 00 00 00 )
// Code size 8 (0x8)
.maxstack 8
IL_0000: ldarg.0
IL_0001: ldarg.1
IL_0002: stfld string MathFun::'<Name>k__BackingField'
IL_0007: ret
}
.property instance string Name()
{
.get instance string MathFun::get_Name()
.set instance void MathFun::set_Name(string)
}
.method
This directive defines the method in a class. Here is the syntax as:
.method attributes callingconv return methodname arguments { body }
We are defining two methods Display() and Addition(). First one would show "Hello" text on the screen and second Addition() method would compute the sum of two integer type supplied variables in the method as following:
[c language="#"]
public String Display()
{
return "Hello " + Name;
}
public int Addition(int x, int y)
{
return (x+y);
}
The resemble IL code for methods as:
[plain]
.method public hidebysig instance string
Display() cil managed
{
// Code size 22 (0x16)
.maxstack 2
.locals init ([0] string CS$1$0000)
IL_0000: nop
IL_0001: ldstr "Hello "
IL_0006: ldarg.0
IL_0007: call instance string MathFun::get_Name()
IL_000c: call string [mscorlib]System.String::Concat(string,
string)
IL_0011: stloc.0
IL_0014: ldloc.0
IL_0015: ret
}
The method attribute has some additional attributes as:
- hidebysig: hides the base class interface of this method.
- Specialname: this is used for special methods such get_Property and set_Property.
- Rtspecialname: this indicates the special method referred as constructor.
- Cil or il: the method contains the MSIL code.
- Native: the method contains platform-specific code.
- Managed: indicates the implementation is managed.
.field
The field directive indicates a new defined field which is state information for a class. Here, the syntax as shown below:
.field attributes type fieldname
In the C# code, we can define an integer type field as the following:
[c language="#"]
.field private initonly int32 x
.field private initonly int32 y
Main() Method Directives
The method block can contain both directives and the implementation code (CIL).
.entrtpoint
This directive designates a method as an entry point of the application. This directive can appear anywhere in the program.
.locals
The .locals directive declares the local variables that are available by name. Here, we are defining two integer types local variable in the MathFun.il as:
.locals init ([0] int32 x,[1] int32 y)
And we are assigning a string slot by also passing a string data into the class constructor as:
.locals init ([0] class MathFun obj)
MSIL Instructions
Each MSIL instruction assigned an opcode, which is commonly 1 or 2 bytes. Opcodes which caters an alternative means of identifying MSIL instructions, are used primarily when producing code dynamically at run time.
[plain]
IL_0000: nop
IL_0001: ldstr "Ajay"
IL_0006: newobj instance void MathFun::.ctor(string)
IL_000b: stloc.0
IL_000c: ldloc.0
IL_000d: callvirt instance string MathFun::Display()
IL_0012: call void [mscorlib]System.Console::WriteLine(string)
IL_0017: nop
IL_0018: ldstr "Addition is: {0}"
IL_001d: ldloc.0
IL_001e: ldc.i4.s 15
IL_0020: ldc.i4.s 35
IL_0022: callvirt instance int32 MathFun::Addition(int32,
int32)
IL_0027: box [mscorlib]System.Int32
IL_002c: call void [mscorlib]System.Console::WriteLine(string,
object)
IL_0031: nop
IL_0032: call valuetype [mscorlib]System.ConsoleKeyInfo [mscorlib]System.Console::ReadKey()
IL_0037: pop
IL_0038: ret
Synopsis
Become a certified reverse engineer!
This article touched briefly on the most important features of the common language runtime and ILAsm. You now know how the runtime functions, how a program in ILAsm is written,compile using either ilasm or Xamarin studio, and how to define the basic components (classes, fields, property and methods).We will pick opcode specification in depth along with the remaining crucial segments of the MSIL grammar in the next articles of this series.
- Exam Pass Guarantee
- Live expert instruction
- Hands-on labs
- CREA exam voucher
In this Series
- .NET Reverse Engineering-1:CIL Programming
- Kali Linux: Top 8 tools for reverse engineering
- Stacks and Heap
- Top 8 reverse engineering tools for cyber security professionals [updated 2021]
- Arrays, Structs and Linked Lists
- Reverse engineering obfuscated assemblies [updated 2019]
- Crack Me Challenge Part 4 [Updated 2019]
- Writing windows kernel mode driver [Updated 2019]
- Assembly programming with Visual Studio.NET
- The basics of IDA pro
- Reverse engineering tools
- Hacking tools: Reverse engineering
- Reverse engineering a JavaScript obfuscated dropper
- Reverse Engineering – LAB 3
- Exploiting Protostar – Stack 0-3
- Reversing Binary: Spotting Bug without Source Code
- Reverse engineering virtual machine protected binaries
- Introduction to Reverse Engineering
- Pafish (Paranoid Fish)
- Extending Debuggers
- Encrypted code reverse engineering: Bypassing obfuscation
- Buffer Overflow Attack & Defense
- Invoking Assembly Code in C#
- iOS Application Security Part 32 - Automating tasks with iOS Reverse Engineering Toolkit (iRET)
- Hooking IDT
- A Guide to Debugging Android Binaries
- Kernel debugging with Qemu and WinDbg
- Shared Folders with Samba and Qemu
- Testing Hooks via the Windows Debugger – An Introduction to RevEngX
- Reverse Engineering with Reflector
- Applied Reverse Engineering with IDA Pro
- Injecting spyware in an EXE (code injection)
- Disassembler Mechanized Part 4: DLL Injector Development
- Disassembler Mechanized Part 3: Code Injection Operation
- Debugging TLS callbacks
- Disassembler Mechanized Part 2: Generating C# and MSIL code
- System address map initialization in x86/x64 architecture part 2: PCI express-based systems
- Coding of Disassembler
- Applied cracking & byte patching with IDA Pro
- .NET reversing with Reflexil
- Reversing firmware part 1
- Reverse Engineering with Reflector: Part 1
- Remoting Technology
- Reverse engineering with OllyDbg
- Understanding Session Fixation
- Optimizing Managed Code Execution
- File system manipulation
- The BodgeIt store part two
- The BodgeIt store part one
- Understanding Windows Internal Call Structure
- Pin: Dynamic Binary Instrumentation Framework

Get certified and advance your career
- Exam Pass Guarantee
- Live instruction
- CompTIA, ISACA, (ISC)², Cisco, Microsoft and more!

Reverse engineering
Reverse engineering
Reverse engineering
Top 8 reverse engineering tools for cyber security professionals [updated 2021]
Reverse engineering