/dev/random: Pipe CTF Walkthrough

In this article, we will try to solve another Capture the Flag (CTF) challenge which was posted on VulnHub by the Segi. The downloadable URL of the Virtual Machine is given below.
The torrent download URL is also available for this VM which is given below in the reference section of this article. For those who are not aware of the site, Vulnhub is a well-known website for security researchers which aims to provide users with a way to learn and practice their hacking skills through a series of challenges in a safe and legal environment. The aim of this challenge is to gain root privilege through a web application hosted on the machine. In this walkthrough, we will be closely exploring following vulnerabilities.

What should you learn next?
- Basic Authentication Bypass.
- Uploading PHP Shell Code by Exploiting Logical Vulnerabilities in the PHP Code.
- Take Root access by exploiting improperly implemented Cron Job.
I started with running a complete Nmap scan on the target machine.

The Nmap result shows that there are 4 open ports on the target machine. You can check the open ports in the above screenshot. As port 80 is open, so I started by hitting the target machine IP on the browser. It opens a web page in the browser, and the page is asking for username and password. The basic authentication was implemented on the target machine. That can be seen in the below screenshot.

I tried to log in using some common usernames and passwords like admin-admin etc. but could not succeed. After that, I ran the BurpSuite Spider and DirBuster on the target machine for other entry points on the target machine, but I could not find any way to go further. As I know from my experience that if the basic authentication is not implemented correctly, it could be bypassed. So, I turned my focus on bypassing the authentication.
I turned on burp proxy on my browser and intercepted the request on BurpSuite and transferred it to the repeater to further modify and play with the request. You may see the request on repeater in the below screenshot.

I simply changed the request from GET to POST, and the basic authentication got bypassed. You can see the contents of the file index.php and the server response in the screenshot given below.

I analyzed the server response and noticed that there is a "scriptz" folder on the target machine and there is a hidden parameter "param" which is being used to send some data to the server. So, let us check these two points one by one. First, I checked the folder "scriptz" on the target machine and found that there is directory listing enabled. There were few files in that folder. You may see that in the following screenshot.

As can be seen in the above screenshot, there is a PHP backup file on the target machine. So, let us check the code of the file "log.php.BAK". You can see the same in the screenshot given below.

Let's try to understand this code.
This is a PHP code which is writing some kind of log in the log file. Now, let us see the file index.php on the browser whose authentication we bypassed on Burp repeater. You may check the screenshot given below.

In the above screenshot, we can see the home page of the target machine. There is a hyperlink on the index page. When I clicked on the URL and turned on burp proxy, I could see that it is sending a POST request. I moved that POST request to the Burp repeater for further analysis. You may see the request in the screenshot given below.

You may observe in the above screenshot, there is a "param" parameter which is sending some encoded data through the POST request. I transferred this data into the Burp Decoder for further analysis. It can be seen in the screenshot given below.

After moving onto the decoder, I used URL decoder to decode the data and got the clean-text string. You can see the clean-text string in the red box in the above screenshot. Now, I had understood the real logic of the code which was writing code into a log file. To quickly check this, I re-wrote the POST request to create a text file and encoded my crafted request by using the URL encoding. It can be seen in the below screenshot.

So now, I had the encoded POST request which would create "me.txt" file on the target machine. I replaced the POST request data on the repeater and submitted the request. I got a "200" response code from the server which means that the request was successfully executed on the server. It can be seen in the screenshot given below.

After that, I checked the "scriptz" folder to verify whether my test case was successful or not. If the test case is successful, then I will see the "me.txt" file in that folder. You may check the same in the screenshot given below.

The test case was successful as the file created by me got successfully created on the server. After that, I created another POST request and used URL encoding on Burp Suite. It can be seen in the screenshot given below.

The Encoded Request:
%4f%3a%33%3a%22%4c%6f%67%22%3a%32%3a%7b%73%3a%38%3a%22%66%69%6c%65%6e%61%6d%65%22%3b%73%3a%32%39%3a%22%2f%76%61%72%2f%77%77%77%2f%68%74%6d%6c%2f%73%63%72%69%70%74%7a%2f%6d%65%35%2e%70%68%70%22%3b%73%3a%34%3a%22%64%61%74%61%22%3b%73%3a%34%31%3a%22%3c%3f%70%68%70%20%24%63%6d%64%3d%24%5f%47%45%54%5b%27%63%6d%64%27%5d%3b%20%73%79%73%74%65%6d%28%24%63%6d%64%29%3b%20%3f%3e%22%3b%7d
After that, I replaced the POST parameter value with my encoded value and sent the request to the server. This time I created a PHP command shell on the server. You may see in the screenshot given below that the file got successfully added in the "scriptz" folder.

Now, let's execute the code and take the shell access of the target machine. It can be seen in the screenshot given below.

In the above screenshot, I connected to the target machine through Netcat. This verifies the access on the target machine. As expected my connection was not running as root, I was connected as an apache user, so I had the apache user access only. Now, I had to escalate it to the root for getting full access on the target machine. I ran a few commands to get the information for further moves.

As can be seen in the above screenshot, firstly, I ran a command to take the python stable shell access. After getting the access, I ran one more command to check the programs that can be run on the target system. I checked the system information on the target machine using the cat /etc/issue command. The result showed that it was using Debian 8. With this information, I tried to move forward from here and also did some research on google about this, but I could not find anything. So, I decided to enumerate other services and found that a Cron Job was configured in the system which was being run as a root user. The screenshot is given below for the same.

There were two interesting files inside the cron job.
So, let us read these files in the screenshot given below.
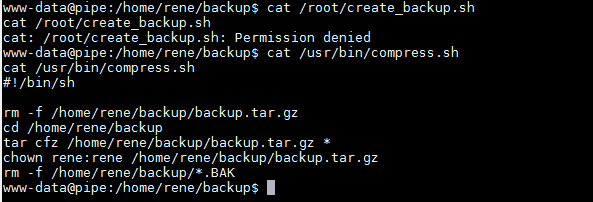
As can be seen in the above screenshot, I could not read the first file as, but I was able to read the second file I.e. 'compress.sh.' When I closely analyzed the backup file, and I observed that the 'tar' command was using a wildcard to perform the backup of the file within the directory /home/rene/backup/.
I already knew that the tar utility is vulnerable. Tar's '--checkpoint-action' parameter can be abused to execute arbitrary code as the user executing the tar binary. '--checkpoint-action' exists as a tar feature which allows binary execution of a command when the file prefixed with '–checkpoint action=exec=COMMAND-HERE' is reached. I exploited this to get the shell access of the target machine. You may check the steps in the screenshot given below.

As can be seen in the above screenshot, I ran the commands marked in red one by one. After all, commands were successfully executed, I had to wait for another few minutes as the cron was running in every 5 minutes.

As can be seen in the above screenshot, after the cron completed processing, I ran another command which gave me the root access of the target machine, and I successfully captured the flag and completed this CTF.
What should you learn next?
I would encourage all readers to try this challenge by yourself and if you face any difficulty then let me know in the comments section.
References:
In this Series
- /dev/random: Pipe CTF Walkthrough
- THE PLANETS EARTH: CTF walkthrough, part 1
- EMPIRE BREAKOUT: VulnHub CTF walkthrough
- JANGOW: 1.0.1: CTF walkthrough
- FINDING MY FRIEND 1 VulnHub CTF Walkthrough - Part 2
- FINDING MY FRIEND: 1 VulnHub CTF Walkthrough - Part 1
- HOGWARTS: DOBBY VulnHub CTF Walkthrough
- HACKATHONCTF: 2 VulnHub CTF Walkthrough
- EMPIRE: LUPINONE VulnHub CTF Walkthrough, Part 2
- EMPIRE: LUPINONE VulnHub CTF Walkthrough, Part 1
- HOGWARTS: BELLATRIX VulnHub CTF walkthrough
- Beelzebub: 1 VulnHub CTF walkthrough
- CORROSION: 1 VulnHub CTF Walkthrough Part 2
- CORROSION: 1 Vulnhub CTF walkthrough, part 1
- EVILBOX: ONE VulnHub CTF Walkthrough
- DEATHNOTE: 1 VulnHub CTF walkthrough
- MONEY HEIST: 1.0.1 VulnHub CTF walkthrough
- HACKADEMIC: RTB1 VulnHub CTF walkthrough
- DOUBLETROUBLE 1 VulnHub CTF walkthrough, part 3
- DOUBLETROUBLE 1 VulnHub CTF walkthrough, part 2
- DOUBLETROUBLE 1 Vulnhub CTF Walkthrough Part 1
- LOOZ 1 VulnHub CTF Walkthrough
- DIGITALWORLD.LOCAL: FALL Vulnhub CTF walkthrough
- HACKER KID 1.0.1: VulnHub CTF walkthrough part 2
- HACKER KID 1.0.1 VulnHub CTF Walkthrough Part 1
- HACKSUDO: THOR VulnHub CTF walkthrough
- THOTH TECH 1: VulnHub CTF Walkthrough
- FUNBOX UNDER CONSTRUCTION: VulnHub CTF Walkthrough
- Hackable ||| VulnHub CTF Walkthrough Part 1
- JETTY: 1 VulnHub CTF Walkthrough
- FUNBOX: SCRIPTKIDDIE VulnHub capture the flag walkthrough
- HMS: 1 VulnHub CTF Walkthrough
- DR4G0N B4LL: 1 VulnHub CTF Walkthrough
- PYLINGTON 1: VulnHub CTF Walkthrough
- DARKHOLE: 1 VulnHub CTF Walkthrough
- R-TEMIS: 1 VulnHub CTF walkthrough
- HACKABLE: II CTF Walkthrough
- MOMENTUM: 1 VulnHub CTF walkthrough
- NASEF1: LOCATING TARGET VulnHub CTF Walkthrough
- HACKSUDO: PROXIMACENTAURI VulnHub CTF Walkthrough, Part 2
- THE PLANETS: MERCURY VulnHub CTF Walkthrough
- HACKSUDO: PROXIMACENTAURI VulnHub CTF Walkthrough, Part 1
- VULNCMS: 1 VulnHub CTF walkthrough part 2
- VULNCMS: 1 VulnHub CTF Walkthrough, Part 1
- Ripper: 1 VulnHub CTF walkthrough
- PYEXP 1: VulnHub CTF walkthrough
- ADMX: 1.0.1: VulnHub CTF Walkthrough
- COLDDBOX: EASY VulnHub CTF Walkthrough
- HACKSUDO: 1.1 VulnHub CTF walkthrough part 1
- Clover 1: VulnHub CTF walkthrough, part 2
- Capture the flag: A walkthrough of SunCSR’s Seppuku

Get certified and advance your career
- Exam Pass Guarantee
- Live instruction
- CompTIA, ISACA, (ISC)², Cisco, Microsoft and more!

Capture the flag (CTF)
Capture the flag (CTF)
Capture the flag (CTF)

Capture the flag (CTF)