Configuring Kali Linux on AWS for FREE to get the Public IP

Kali Linux is the most favorite pentesting distribution. There are thousands of tutorials for Kali Linux are available on the Internet. However, people always complain about not getting the public IP (WAN), or they can only practice it within their local network. This problem can be solved by opening your Linux computer to the internet which involves configuring the router and port forwarding as well. However, it is not recommended because it will invite the unwanted traffic and intruders, and your machine might turn into the global network of botnets.
The best possible way is to host Kali Linux in the cloud, where the vendor takes care of the networking and server management, and you will focus on your pentesting only.

FREE role-guided training plans
In this article, we will discuss the steps to host Kali Linux in the Amazon AWS for free.
In the first step, create the Amazon AWS account or log in to your existing account, in the next screen provide your payment details (you will not be billed unit you exceed the free tier limitation).
In the next screen, let Amazon verify your identity using the call verification process. Once verified, select the basic plan and move to the next step.
In this step, generate the SSH key pairs to access the Kali Linux from your host computer. On your Amazon AWS console, click on the key pairs (under the network & security navigation), select the Create Key Pair option and give your pair a name.

The private key is automatically downloaded; keep it secure because you will not be able to get it again.
Now, locate the Kali Linux instance from the Amazon AWS Marketplace.
Before taking the instance, make sure that the appropriate region is selected. You can verify the region from your AWS console account as shown in the figure below:

Click continue on the Kali Linux instance, and under EC2 Instance Type, select t2.micro

Click on Launch with 1-click to launch the newly configured instance. You can see the status of your machine by looking at the Amazon AWS console.
You are done configuring the Kali Linux in the cloud, let's discuss the steps to access it from your Windows OS. You need the following tools:
- PuTTY
- PuTTygen
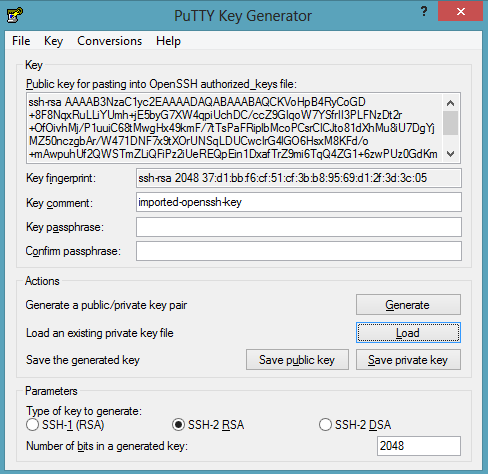
Download and install both the tools from the official website, open the PuTTygen and load the already downloaded private key file, the objective is to convert it into the Putty supported format:
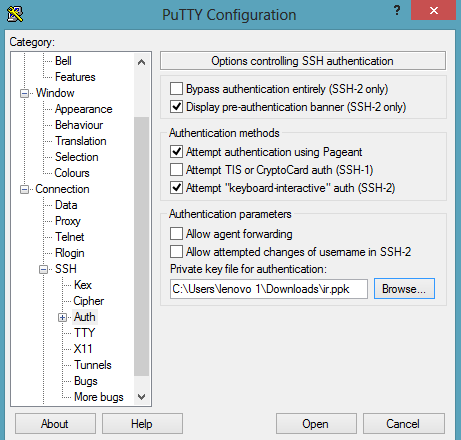
Save the private key and close the PuTTYgen program. Open the PuTTY program to connect it with your Kali Linux, load the private key in the Auth tab under the SSH navigation:
Moreover, in the session, use the username (ec2-user) and the public DNS detail of the Kali Linux machine:
Ec2-user@publicDNS
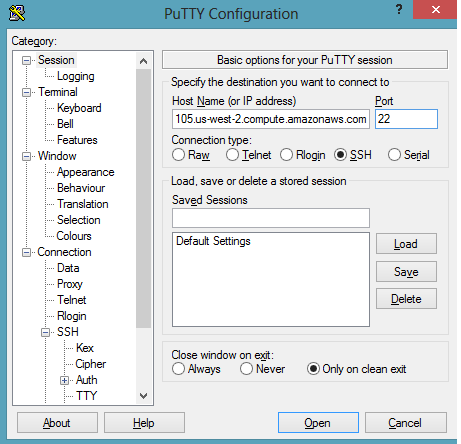
Hit open, and you are done.

Your Kali in the cloud is here, this is the minimal installation, and you cannot be able to access all the tools. However, you can get all the tools by hitting the following command:
apt-get install kali-linux-full
Alternatively; "apt-get install kali-linux-top10" to get the top10 security tools, you should not exceed the usage limit else your card will be charged.

For Linux Users:
You can also access the Kali AWS from your Linux machine. Set the permission and connect the server using the SSH, hit the following:
chmod 400 key_pairs.pem
ls -lah | grep key_pairs
ssh -i key_pairs.pem ec2-user@publicDNS

To get the root access to your Kali machine, hit the sudo su command.
VNC over SSH Tunneling to get the GUI Access of Kali Linux in AWS Cloud
Let's discuss the steps to get the GUI access of the newly installed and configured Kali Linux machine. The infrastructure used:
- Ubuntu (Local Linux machine to access the Kali)
- Kali Linux (configured in the AWS cloud)
- Windows with PuTTy (just to access the local and hosted Linux machine)- This is not required, you can do all the functions with your local Linux too, this machine has been used to access the Linux machines only.
Update the packages and install the TightVNC on your host Linux machine:
sudo apt-get update
sudo apt-get install xfce4 xfce4-goodies tightvncserver

The existing Kali Linux is the command based OS, but to get the GUI, you need to install it first. We will hit the following command in the newly created Kali Linux machine:
apt-get install gnome-core kali-defaults kali-root-login desktop-base
After getting the GUI installed, set up the VNC server by adjusting the resolution since you will be using the VNC for the first time, it will ask to create the password.
# tightvncserver –geometry 1024x768
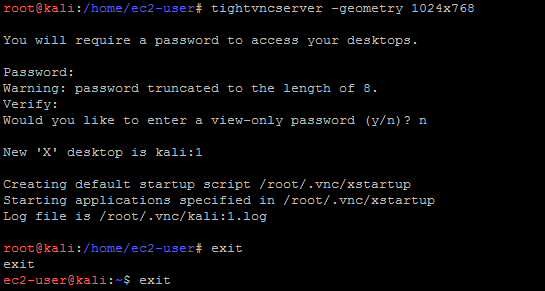
Kali:1 shows that it is listening on port 5900+1 =5901
Now it is time to setup the SSH tunnel; this should be done on your host Linux instead of the Kali (cloud).
# ssh -L 5901:localhost:5901 -N -f ec2-user@PublicDNS -i key_pairs.pem
# netstat -anop | grep 590

You can see the listening port. In the command above:
-N represents the SSH port forwarding
-f run the SSH commands in the background
The SSH tunnel has been created; we will be connecting the local host using the TightVNC viewer, you can use the Ubuntu default viewer as well.

And here is the connectivity:

Kali Linux is ready, and it is hosted in the cloud with public IP, and it cost you nothing. However, you need to take care of Amazon's abuse policy; they do not allow to scan the third party premises and to conduct the pentesting you need to complete the Penetration testing request form.
Video Tutorial:

FREE role-guided training plans
Enroll in an Ethical Hacking Boot Camp and earn two of the industry’s most respected certifications — guaranteed.
- CEH exam voucher
- PenTest+ exam voucher
- Exam Pass Guarantee
- Live online hacking training
In this Series
- Configuring Kali Linux on AWS for FREE to get the Public IP
- Intelligence-led pentesting and the evolution of Red Team operations
- Red Teaming: Taking advantage of Certify to attack AD networks
- How ethical hacking and pentesting is changing in 2022
- Ransomware penetration testing: Verifying your ransomware readiness
- Red Teaming: Main tools for wireless penetration tests
- Fundamentals of IoT firmware reverse engineering
- Red Teaming: Top tools and gadgets for physical assessments
- Red teaming: Initial access and foothold
- Top tools for red teaming
- What is penetration testing, anyway?
- Red Teaming: Persistence Techniques
- Red Teaming: Credential dumping techniques
- Top 6 bug bounty programs for cybersecurity professionals
- Tunneling and port forwarding tools used during red teaming assessments
- SigintOS: Signal Intelligence via a single graphical interface
- Top tools for mobile android assessments
- Top tools for mobile iOS assessments
- Red Team: C2 frameworks for pentesting
- Inside 1,602 pentests: Common vulnerabilities, findings and fixes
- Red teaming tutorial: Active directory pentesting approach and tools
- Red Team tutorial: A walkthrough on memory injection techniques
- Python for active defense: Monitoring
- Python for active defense: Network
- Python for active defense: Decoys
- How to write a port scanner in Python in 5 minutes: Example and walkthrough
- Using Python for MITRE ATT&CK and data encrypted for impact
- Explore Python for MITRE ATT&CK exfiltration and non-application layer protocol
- Explore Python for MITRE ATT&CK command-and-control
- Explore Python for MITRE ATT&CK email collection and clipboard data
- Explore Python for MITRE ATT&CK lateral movement and remote services
- Explore Python for MITRE ATT&CK account and directory discovery
- Explore Python for MITRE ATT&CK credential access and network sniffing
- Top 10 security tools for bug bounty hunters
- Kali Linux: Top 5 tools for password attacks
- Kali Linux: Top 5 tools for post exploitation
- Kali Linux: Top 5 tools for database security assessments
- Kali Linux: Top 5 tools for information gathering
- Kali Linux: Top 5 tools for sniffing and spoofing
- Kali Linux: Top 8 tools for wireless attacks
- Kali Linux: Top 5 tools for penetration testing reporting
- Kali Linux overview: 14 uses for digital forensics and pentesting
- Top 19 Kali Linux tools for vulnerability assessments
- Explore Python for MITRE ATT&CK persistence
- Explore Python for MITRE ATT&CK defense evasion
- Explore Python for MITRE ATT&CK privilege escalation
- Explore Python for MITRE ATT&CK initial access
- Top 18 tools for vulnerability exploitation in Kali Linux
- Explore Python for MITRE PRE-ATT&CK, network scanning and Scapy
- Kali Linux: Top 5 tools for social engineering
- Basic snort rules syntax and usage [updated 2021]

Get certified and advance your career
- Exam Pass Guarantee
- Live instruction
- CompTIA, ISACA, (ISC)², Cisco, Microsoft and more!

Penetration testing
Intelligence-led pentesting and the evolution of Red Team operations

Penetration testing
Red Teaming: Taking advantage of Certify to attack AD networks
Penetration testing
Penetration testing
Ransomware penetration testing: Verifying your ransomware readiness