Android Forensics

The article tries to cover various Android forensic techniques that can be helpful in a variety of situations. The techniques or discussions below can be either logical or physical. However, we will try to stick mostly to logical techniques. By the word 'logical,' the technique would mostly involve accessing the file system, etc. This article also assumes that the reader has basic knowledge about Android programming and other concepts related to the Android. Let's proceed to learn more.
Unlocking a screen locked Android phone / Breaking the Android passcode
Learn Digital Forensics
Firstly, it's important to note that every technique comes with some limitation or the other. You will need to figure out which technique would help you depending on the circumstances. Circumventing the passcode may not be always possible. We will take a few scenarios and see how you can take advantage in each case.
There are currently three main types of pass codes supported by Android devices – Pattern lock, PIN and alphanumeric code.
1. Smudge Attack:
This is not specific to any Android device but used generally by forensic analysts where they can deduce the password of a touch screen mobile. The attack depends on the fact that smudges are left behind by the user's fingers due to repeated swiping across same locations. The pattern lock or any pass code is something that the user will have to swipe every time that he wants to use his mobile. We can infer that the smudges would be heaviest across the same locations and hence under proper lighting and high-resolution pictures we can deduce the code. So during examining any device, forensic analysts usually take care to avoid hand contact with the screen to check for the smudge attack.
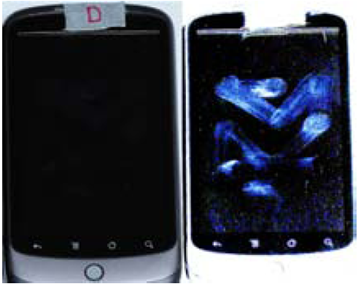
(Picture referenced from http://www.elsevierdirect.com site)
2. If USB - debugging is enabled:
If USB debugging in the Android is enabled, then bypassing the lock code can be done in a matter of seconds. Imagine an attacker who wants to get access to his friend's files and applications on his Android mobile. You can first ask his handset for some false reason, to make a call, for example, and turn on the USB debugging under Settings à Developer Options à USB debugging; and then hand over the mobile back to him. So later, at some convenient time, when you get access to the device, you can exploit it using any of the following ways discussed in this article. Now adb (Android Debugging Bridge) is primarily a command line tool that communicates with the device. ADB is bundled with the Android platform tools. To explain in simple terms, this is what happens when you deal with adb:
-
An adb daemon runs as a background process on each Android device.
-
When you install Android SDK on your machine, a client is run. The client can be invoked from shell by giving an adb command.
-
A server is also run in the background to communicate between the client and adb daemon running on the Android device.
You can use any of the below methods to take advantage of the USB debugging to bypass the screen lock:
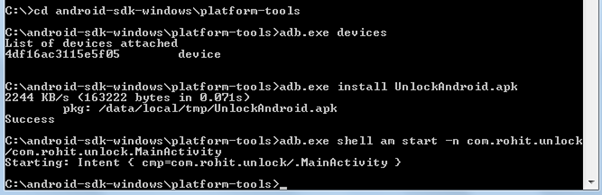
Using UnlockAndroid.apk:
Before going ahead with this process you can download the Unlockandroid.apk file from the below location.
URL: http://www.megafileupload.com/en/file/409464/UnlockAndroid-apk.html
-
Connect the device to the machine where Android SDK (including platform tools etc.) is installed.
-
Open command prompt and type cd C:android-sdk-windowsplatform-tools>adb.exe devices
-
The device must be identified by the adb if everything is going fine.
-
Copy the above UnlockAndroid.apk file into C:android-sdk-windowsplatform-tools directory.
-
In the command prompt type, C:android-sdk-windowsplatform-tools>adb.exe and install adb.exe UnlockAndroid.apk. Observe that the application is installed on the device.
-
To start the application just type:
C:android-sdk-windowsplatform-tools>adb.exe shell am start -n com.rohit.unlock
/com.rohit.unlock.MainActivity
-
Observe that the screen lock is bypassed now you can access all the application and folders in the mobile phone. Below is a screenshot of the process.
Deleting the gesture.key file:
If the Android device is using the pattern lock and it it's a rooted device, then the process below can be tried to bypass the screen lock.
-
Connect the device to the machine where Android SDK (including platform tools etc.) is installed.
-
Open command prompt and type cd C:android-sdk-windowsplatform-tools>adb.exe devices
-
The device will be identified by the adb if everything is going fine.
-
Connect to adb shell by typing : adb.exe shell
-
The terminal appears giving you access to shell. Now type rm /data/system/gesture.key. This is the file where pattern is stored.
-
Restart the phone and you will still observe that the device is asking for the pattern. You can draw any random pattern and unlock the device.
Below is the screenshot of the process.

Updating the SQLite files:
If the phone is rooted, then by updating the SQLite files you can bypass the screen lock. Here are the details.
cd /data/data/com.android.providers.settings/databases
sqlite settings.db
update system set value=0 where name='lock_pattern_autolock';
Cracking the PIN in Android:
We have seen how to bypass the screen lock and how to completely delete or disable the lock screen. But what if we wanted to know the actual PIN so that you can lock/unlock at any time? In Android, the PIN that user enters is stored in /data/system/password.key file. As you might expect, this key is not stored in plain text. It's first salted using a random string, then the SHA1-hashsum and MD5-hashsum are calculated and concatenated and then the final result is stored. Seems very complicated but not to the modern computing power, as the following code shows:
[plain]
public byte[] passwordToHash(String password)
{ if (password == null)
{ return null;
} String algo = null;
byte[] hashed = null;
try {
byte[] saltedPassword = (password + getSalt()).getBytes();
byte[] sha1 = MessageDigest.getInstance(algo = "SHA-1").digest(saltedPassword); byte[] md5 = MessageDigest.getInstance(algo = "MD5").digest(saltedPassword); hashed = (toHex(sha1) + toHex(md5)).getBytes();
} catch (NoSuchAlgorithmException e)
{ Log.w(TAG, "Failed to encode string because of missing algorithm: " + algo);
} return hashed; }
Since the hash is salted, it's not possible to use a regular dictionary attack to the get original text. Here are the steps you can follow to try to crack the PIN.
-
Pull out the salt using adb. Salt is stored in the 'secure' table from /data/data/com.android.providers.settings/databases/settings.db)
-
Get the password : sha1+md5: (40+32) (stored at /data/system/password.key)
Ex: 0C4C24508F0D29CF54FFC4DBC5520C3C10496F43313B4D3ADDFF8ACDD5C8DC3CA69CE740
-
Once you have the md5 and the salt, you can brute force using the tools available in market (Ex hashcat) to get password.
Data Extraction in Android:
After having seen different ways to bypass the Android screen lock, now let's have a look at how to extract the data from an Android phone. You can extract the data of all the files on the system or only those relevant files that you are interested in. But for any form of extraction, it's important that the device is unlocked or USB-debugging is previously enabled. There are two types of extractions.
Extracting through ADB: As explained earlier, adb is a protocol that helps you to connect to Android device and perform some commands.
Boot Loader Extraction: This can be done when the device is in Boot Loader mode. This takes advantage of the fact that during boot loader mode the Android OS will not be running.
Before extracting the data, it is important to know how the data is stored in the Android device to understand where to look, and what data to pull. Android stores the data mainly in the below four locations:
-
Share Preferences: Data is stored in key-value pairs. Shared preference files are stored in application's 'data' directory in the 'shared_pref' folder.
-
Internal Storage: Stores data that is private in device's internal memory (something like NAND flash).
-
External Storage: Stores data that is public in device's external memory that might not contain security mechanisms. This data is available under /sdcard directory.
-
SQLite: This is a database that holds structural data. This data is available under /data/data/Package/database.
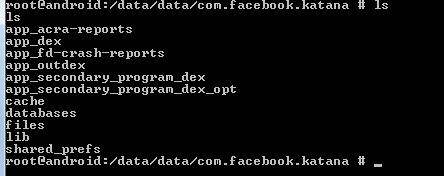
For example, if you want to analyze the Facebook Android application, here is how you do it. Download and install the Facebook application and sign in. As soon as you install any application in Android, the corresponding application data is stored in /data/data folder. However due to the security restrictions, you cannot access or pull this data unless you have root privileges on the phone. By using adb, let us see what the /data/data folder consists of. As shown in the below fig, a quick 'ls' on the /data/data folder gives the below results.
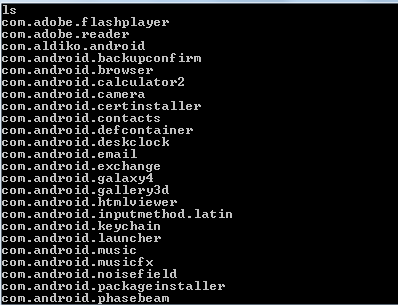
Whether it's a browser, gallery or contacts, everything is an app in Android. They are the applications that come along with the phone. Application like games, social network apps etc. are the applications installed by the user. But the data belonging to any of these applications will be stored in /data/data folder. So the first step is to identify where your application is.
To see the contents of that application, 'ls' into that directory.
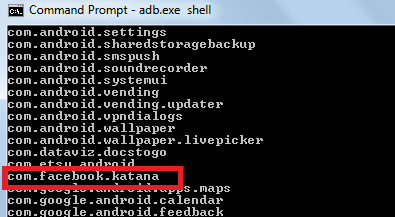
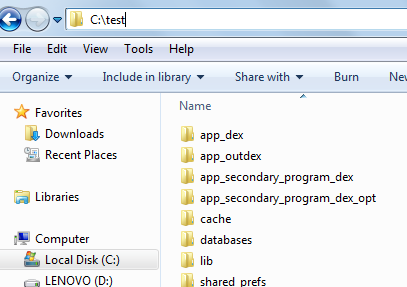
As you can see, these are the folders created by the Facebook application on your phone. For instance, the cache folder may consist of images that are cached and stored for faster retrieval during normal browsing. The main area of focus would be the databases folder where the data related to the user would be stored. Here comes the concept of application security. If the application were secure enough, it would take proper steps not to store any of the sensitive data permanently in the databases folder. Let us see what kind of data Facebook stores the when you are currently logged in. You can pull the Android folder into your system using the below command:
C:android-sdk-windowsplatform-tools>adb.exe pull /data/data/com.facebook.katana C:test
The databases folder must be now copied into the 'test' folder in your C drive.
In the 'databases' folder, you see DB file types which are the SQLite files where the data is stored. To view the data present in them, you can use a browser such as Sqlite browser. Download and install SQLite browser. In the SQLite browser, click on File -> Open Database and select any of those DB files.
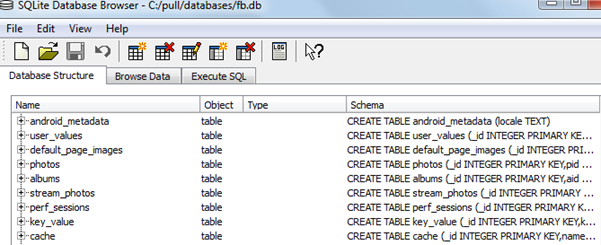
This shows you the database structure and helps you to browse the data stored in them. Now log out of the application, and you might notice that the data present in those tables would be deleted by the application.
Learn Digital Forensics
So to conclude, in this article we have seen how to bypass the Android screen lock under different conditions and how to extract the application data from Android phone.

In this Series
- Android Forensics
- Digital forensics and cybersecurity: Setting up a home lab
- Top 7 tools for intelligence-gathering purposes
- iOS forensics
- Kali Linux: Top 5 tools for digital forensics
- Snort demo: Finding SolarWinds Sunburst indicators of compromise
- Memory forensics demo: SolarWinds breach and Sunburst malware
- Digital forensics careers: Public vs private sector?
- Email forensics: desktop-based clients
- What is a Honey Pot? [updated 2021]
- Email forensics: Web-based clients
- Email analysis
- Investigating wireless attacks
- Wireless networking fundamentals for forensics
- Protocol analysis using Wireshark
- Wireless analysis
- Log analysis
- Network security tools (and their role in forensic investigations)
- Sources of network forensic evidence
- Network Security Technologies
- Network Forensics Tools
- The need for Network Forensics
- Network Forensics Concepts
- Networking Fundamentals for Forensic Analysts
- Popular computer forensics top 19 tools [updated 2021]
- 7 best computer forensics tools [updated 2021]
- Spoofing and Anonymization (Hiding Network Activity)
- Browser Forensics: Safari
- Browser Forensics: IE 11
- Browser Forensics: Firefox
- Browser forensics: Google chrome
- Webinar summary: Digital forensics and incident response — Is it the career for you?
- Web Traffic Analysis
- Network forensics overview
- Eyesight to the Blind – SSL Decryption for Network Monitoring [Updated 2019]
- Gentoo Hardening: Part 4: PaX, RBAC and ClamAV [Updated 2019]
- Computer forensics: FTK forensic toolkit overview [updated 2019]
- The mobile forensics process: steps and types
- Free & open source computer forensics tools
- An Introduction to Computer Forensics
- Common mobile forensics tools and techniques
- Computer forensics: Chain of custody [updated 2019]
- Computer forensics: Network forensics analysis and examination steps [updated 2019]
- Computer Forensics: Overview of Malware Forensics [Updated 2019]
- Incident Response and Computer Forensics
- Computer Forensics: Memory Forensics
- Comparison of popular computer forensics tools [updated 2019]
- Computer Forensics: Forensic Analysis and Examination Planning
- Computer forensics: Operating system forensics [updated 2019]
- Computer Forensics: Mobile Forensics [Updated 2019]
- Computer Forensics: Digital Evidence [Updated 2019]

Get certified and advance your career
- Exam Pass Guarantee
- Live instruction
- CompTIA, ISACA, (ISC)², Cisco, Microsoft and more!

Digital forensics

Digital forensics

Digital forensics
Digital forensics